> For the complete documentation index, see [llms.txt](https://docs.ndi.video/all/llms.txt). Markdown versions of documentation pages are available by appending `.md` to page URLs; this page is available as [Markdown](https://docs.ndi.video/all/using-ndi/ndi-tools/ndi-tools-for-windows/screen-capture.md).
# Screen Capture
Share Your Desktop Seamlessly.
**NDI Screen Capture** is an application designed to effortlessly share your Windows desktop video and audio with other devices on your network through an NDI stream.\
\
Whether you are conducting broadcasts and presentations, collaborating on projects, creating tutorials, or playing back media, Screen Capture provides a simple way to make your desktop available to other NDI-enabled applications and devices.
{% hint style="info" %}
Download NDI Tools [here](https://ndi.video/tools/download/).
{% endhint %}
***
## **Starting NDI Screen Capture**
[Install NDI Tools](/all/using-ndi/ndi-tools/installing-ndi-tools.md) and run NDI Screen Capture from the [NDI launcher](/all/using-ndi/ndi-tools/ndi-tools-launcher.md) or your applications list. After you launch Screen Capture, it runs from the Windows system tray. You may not see a full application window open. To access Screen Capture settings, right-click the NDI Screen Capture icon in the system tray.
Once Screen Capture is running, your computer creates an NDI source from the Windows desktop. That source can be viewed by other NDI-enabled applications or devices on the same network. If you are not sure whether Screen Capture is working, test the source in NDI [Studio Monitor](/all/using-ndi/ndi-tools/ndi-tools-for-windows/studio-monitor.md) before troubleshooting the receiving application.
***
## Testing on Studio Monitor
* On another Windows computer on the same network, open NDI Studio Monitor.
* Right-click anywhere in the Studio Monitor window, then look for the Screen Capture source in the source list.
* If the source appears in Studio Monitor, Screen Capture is sending an NDI stream.
* If the source does not appear in Studio Monitor, first check whether Screen Capture is running, whether both devices are on the expected network, and whether firewall, NDI group, Access Manager, or discovery settings may be limiting source visibility
***
## **Viewing on NDI-Enabled Devices**
View the output of Screen Capture on another NDI-enabled device using an application like [Studio Monitor](/all/using-ndi/ndi-tools/ndi-tools-for-windows/studio-monitor.md).
**Right-click on the screen** and select the device name and corresponding NDI stream.
***
## **Settings and Customization**
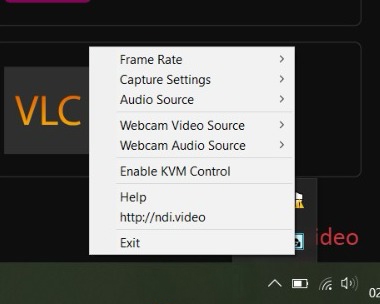
Right-click on the NDI Screen Capture app icon on the system tray to access different settings.
Right-click on the NDI Screen Capture icon to access different settings:
* **Framerate**\
This option allows to specify the NDI stream framerate[^1].
* **Capture Settings**\
With this setting, you can choose to capture the full screen or specify a particular area for capture (Region of Interest). Another option is to define the visibility of the mouse pointer.
* **Audio Source**\
Specify a particular audio source to be embedded into the NDI stream created by NDI Screen Capture.
* **Webcam Video Source**\
NDI Screen Capture enables the creation of an NDI stream using a webcam.
* **Webcam Audio Source**\
Specify a particular audio source to be embedded into the NDI stream created by the webcam option.
* **KVM Control**\
The KVM[^2] option in NDI Screen Capture allows for remote computer control over a network. When this feature is enabled, you can not only capture and send the computer's screen over the network using NDI but also remotely control the computer's keyboard and mouse inputs from another device.
* **Help**\
Access the Screen Capture Help Assistant and a quick web link to [ndi.video](https://ndi.video/) for more information about NDI and NDI Tools.
{% hint style="info" %}
Screen Capture and Screen Capture HX features are specific to Windows OS. Not all features will be available on macOS
{% endhint %}
[^1]: Frame rate is the measurement of how quickly a number of frames appears within a second, which is why it's also called FPS (frames per second).
[^2]: **KVM** stands for “Keyboard, Video (monitor), Mouse.” The main function of a KVM switch is to control, switch between, and manage multiple PCs or servers via a single keyboard, monitor, and mouse (also referred to as the 'console').
---
# Agent Instructions
This documentation is published with GitBook. GitBook is the documentation platform designed so that both humans and AI agents can read, navigate, and reason over technical content effectively. Learn more at gitbook.com.
## Querying This Documentation
If you need additional information that is not directly available in this page, you can query the documentation by asking a question.
Perform an HTTP GET request on the following URL with the `ask` and `goal` query parameters:
```
GET https://docs.ndi.video/all/using-ndi/ndi-tools/ndi-tools-for-windows/screen-capture.md?ask=&goal=
```
`ask` is the immediate question: it should be specific, self-contained, and written in natural language.
`goal` is what the user is ultimately trying to achieve, the reason they need the answer. Sharing it helps GitBook give you a better, more relevant answer. A goal is most helpful when it describes the outcome the user wants rather than restating the question. For example, with `ask=how do I create an API token`, a goal like `automate deployments from our CI pipeline` lets GitBook tailor the answer to that use case.
The response will contain a direct answer to the question and relevant excerpts and sources from the documentation.
Use this mechanism when the answer is not explicitly present in the current page, you need clarification or additional context, or you want to retrieve related documentation sections.