Loading...
Loading...
Loading...
Loading...
Loading...
Loading...
Loading...
Loading...
Loading...
Loading...
Loading...
Loading...
Loading...
Loading...
Loading...
Loading...
Loading...
Loading...
Loading...
Loading...
Loading...
Loading...
Loading...
Loading...
Loading...
Loading...
Loading...
Loading...
Loading...
Loading...
Loading...
Loading...
Loading...
Loading...
Loading...
Loading...
Loading...
Loading...
Loading...
Loading...
Loading...
Loading...
Loading...
Loading...
Loading...
Loading...
Loading...
Loading...
Loading...
Loading...
Loading...
Loading...
Loading...
Loading...
Loading...
Loading...
Loading...
Loading...
Loading...
Loading...
Loading...
Loading...
Loading...
Loading...
Loading...
Loading...
Loading...
Loading...
Loading...
Loading...
Loading...
Loading...
Loading...
Loading...
Loading...
Loading...
Loading...
Loading...
Loading...
Loading...
Loading...
Loading...
Loading...
Loading...
Loading...
Loading...
Loading...
Loading...
Loading...
Loading...
Loading...
Loading...
Loading...
Loading...
Loading...
Loading...
Loading...
Loading...
One of the biggest issues in AV distribution in the IP world is that equipment is not identifiable by its physical connection. In networking, every connected device needs to have a unique address so another device, hardware, and applications can reach it.
However, the network physical connection is dynamic and not related at all to the equipment address. For that reason, in a large network with hundreds (or thousands) of devices with addresses, it becomes difficult to find and interconnect equipment. NDI offers two different options for a zero-configuration discovery and registration: mDNS and Discovery Service.
This White Paper offers a compressed overview of NDI: its fundamental principles, technological features, protocols, and settings. It is updated in real-time by the NDI team to reflect the most recent developments to our Core Tech Platform. The current version of NDI is 6.3
NDI stands for Network Device Interface. It is a widely adopted video connectivity standard based on proprietary IP networking specifications. NDI enables multimedia systems to identify and communicate with one another over IP and to encode, transmit, and receive many streams of high-quality, low latency, frame-accurate video and audio, and exchange metadata in real-time.
NDI operates bi-directionally, with many streams on a shared connection. Its encoding algorithm is resolution and frame-rate-independent, supporting 4K resolutions and beyond, along with unlimited floating-point audio channels and custom metadata. NDI can be integrated and/or supported by any network-connected product, including video cameras, graphics systems, video mixers, capture cards, multimedia players, video editing applications, and many other devices and software. NDI
Video has transported images, information, ideas, and stories for over a century.
And over the last decade, we've been working behind cameras to push the envelope every time someone presses record. With each innovation, we've helped bring partners, creators, and users closer to the future of video.
Now, the future of video is here. The little red dot is everywhere. Video is not just moving images anymore. It's transferring data. More than something we consume, video generates new ideas and businesses every day. It's not how we transport experiences. Video is the experience:
From a state-of-the-art overseas production to the room of a gaming streamer;
from a smart network of traffic flow analysis to the most challenging remote surgeries;
from an auction with thousands of bidders on social media to a parent calming their baby through a monitor.
As video evolves, it unveils a common thread connecting all these new use cases and exciting possibilities. One breakthrough that redefines video:
We believe there is no video without connection.
Looking into the next steps of video-based industries, you find innovation and the rise of new use cases everywhere: video production going remote, collaborative, virtual, cloud-based, and AI, all at the same time; video streaming is growing with no limits, and live e-commerce is establishing itself as one of the main formats of e-commerce; a very big percentage of IoT is built using video, which is becoming the ultimate sensor for humans and machines.; many specialized use cases are becoming more common in surveillance, monitoring, smart cities, or hybrid learning and work.
The future of video is one in which content is transferred easily and efficiently via the Internet Protocol (IP). This global network will largely supplant and become far too decentralized and open-ended for current industry-specific connection formats like HDMI, SDI, etc., in any type of video workflow or production pipeline.
This is the next iteration of the world of video, audio, and media: a connected global environment that contains all devices, technologies, services, and businesses based on creating, sharing, coordinating, and consuming media, either by humans or machines.
NDI is the technology connecting it.
When we think about video connectivity, it’s natural to consider the ever-expanding possibilities, more options, and unlimited potential.
But the fact is that, as with all technology-driven revolutions, the existing way of doing things still presents more limitations than we would like:
For these reasons and many more, NDI enables effectively transitioning any setup, workflow, or production into an incredibly versatile IP video pipeline, offering backward compatibility with the existing infrastructure and devices.
Limitations in equipment and budget
Currently, the number and quality of connections are very dependent on cost, available cables, infrastructure, and bandwidth.
Complexity and need for specialized expertise
Most connectivity solutions require networking expertise to set up and troubleshoot. They struggle to provide a simple, user-friendly experienc
Too many working connectivity protocols
There can be many protocols in the same workflow, requiring a lot of conversion and understanding of different technologies. Alternatively, some products only operate in closed ecosystems.
High efficiency
We develop the most advanced video connectivity formats; and allow productions to scale without scaling costs.
Plug & play
We guarantee that any NDI-enabled product is easy to operate, even without networking knowledge, and always works seamlessly.
Interoperability
We unlock complete connectivity with a growing ecosystem of NDI-enabled and compatible devices; and NDI is the only protocol you’ll need.
Unlock the full potential of our technology with the most comprehensive NDI documentation online.
NDI 6.3.1
is now available! NDI 6.3 expands our discovery, monitoring, and control architecture bringing real-time insight and management to mid-to-large NDI networks. Review the for specific details
We are sunsetting our HX License Upgrade program. Please see this page for more details
Windows has a released a patch for the unexpected drop in traffic on . The patch is currently available for both Windows 10 and 11. Please see our article for more information about the original issue. You can also find more information on the
We’ve made the tough call to discontinue NDI Remote and take the service offline. This decision comes after identifying performance issues that can’t be quickly addressed. That said, we’re already exploring a more reliable way to bring Remote back in the future. We’ll share updates as soon as we have them. If you have questions or need a hand planning a workaround, please reach out through the proper channel. Our team’s here to help!
Potential deadlock issue in the new discovery server with sources for older versions
Rare rash in on Mac when enabling NDI output and allowing network access
Issue where fails to auto launch at starup if the selected source is unavailable
Sender Monitoring Enhancements: The now includes sender discovery and monitoring on both Windows and macOS.
Default Sender Monitoring Support: Enabled by default in existing sender-based NDI Tools apps.
: NDI Test Patterns, NDI Screen Capture, NDI Screen Capture HX, NDI VLC Plugin.
: NDI Test Patterns, NDI Scan Converter.
NDI Discovery Server Improvements: Enhanced capabilities. The NDI server utility is now available as a standalone installer for Windows and Linux and can run as a service. See for setup details.
Fixed an issue in the NDI plugin for Adobe Premiere where the field sequence was incorrectly displayed when playing SpeedHQ progressive clips in interlaced sequences.
Resolved poor NDI HX encoding performance on AMD GPU/CPU systems in and .
Fixed NDI Virtual Input on macOS failing to receive video when connected via and .
New APIs: Introduced APIs for , designed for integration with the NDI Discovery Server. See documentation for details.
Performance Improvements: Enhanced codec quality across multiple generations.
Enabled passthrough of the NDI capabilities message from NDI receiver to the NDI sender.
Enhanced Receiver Passthrough Control: Introduced per-codec passthrough override control via receiver creation JSON in the NDI Advanced SDK, enabling selective decompression of compressed formats. Please refer to the SDK documentation for details.
Improvements to . Please refer to the files for more details.
Are you looking for the rest of the release notes? You can find them
We've made an update to the NDI SDK terms, bringing these in line with our commitment to the health and growth of the NDI ecosystem. The NDI SDK remains royalty-free, subject to the SDK terms and conditions. For more details including a full explanation and updated list of exclusions please consult the terms and conditions by downloading the NDI 6.3 SDK. These changes apply to the NDI SDK only and are not applicable to the NDI Advanced SDK. For more information see the in our Forums
MAC (Media Access Control) address refers to a unique physical address identifying a network node. Sending and receiving video streams across an IP network requires applications that support video and can discover receiving applications that are looking for video.
NDI resolves host names to IP addresses over the LAN and does so automatically. When you start an application that sends NDI, the devices that can receive NDI become aware instantaneously. While this is a typical function on almost all networks, there are some cases where it is important to know how this works to properly configure networks utilizing managed data flow protocols.
These multicast queries are sent to a multicast address, and thus, no single device is required to have global knowledge.
When a service or device sees a query for any service it recognizes, it provides a DNS response with the information from its cache. The primary benefit of using mDNS is that it requires little or no administration to set up. Unless the network is specifically configured not to allow mDNS, NDI sources will be discovered. This format works when no infrastructure is present and can span infrastructure failures.
The mDNS Ethernet frame is a multicast UDP packet that broadcasts to:
MAC Adress
01:00:5E:00:00:FB (for IPv4)
IPv4 Address
224.0.0.251
UDP Port
5353
Choosing the network location type on Windows devices is critical for the successful discovery and registration of NDI. Typically, the first time a Windows machine is connected to a network, a dialog window appears that allows the user to choose the network location type: Private or Public. By default, Windows sets a new network location to Public.
This location is designed to keep machines from being visible and responding to broadcast pings. This location type also affects mDNS responses and keeps NDI video streams from being discovered and registered on the network.
Network locations should be set to Private for successful discovery and registration of NDI. The Domain network location is used for domain networks, such as those at enterprise workplaces. The network administrator controls this type of network location, and it cannot be selected or changed. In this type of configuration, mDNS discovery must be allowed at the domain level. Because mDNS uses a link-local multicast address, its capacity is limited to a single physical or logical LAN.
NDI is designed for use with standard consumer off-the-shelf (COTS) network infrastructure devices. Looking closely at the network topology and configuration will help to ensure that the maximum possible bandwidth is available.
When selecting a network switch, it is important to check the throughput speeds. Ensure that each port is full duplex (i.e., bi-directional communication) and that each port's upstream and downstream data speeds are at least 1 Gigabit per second (Gbps). In some cases, it is best to force the ports on managed switches to utilize 1 Gbps in contrast with Auto-Negotiation. The use of Auto-Negotiation can sometimes (mostly because non fully compatible Network Interfaces) result in 100Mb connections or even lower, which does not renegotiate until the port is flooded with traffic for some time. Also, poor termination of RJ-45 connectors can impact Auto-Negotiation.
The same suggestion applies when considering network switches that include 10 Gigabit per second ports. Many switches manufactured at the time of writing may share bandwidth across the backplane of multiple ports. Since these ports are generally reserved for linking to other switches, the specification for throughput may be listed differently than the Gigabit port section in the product documentation.
It is best to use switches from the same manufacturer, or ideally, the same model of switch, throughout a single subnet. This will simplify configuration and lessen the chances of compatibility and configuration issues.
Video, just like voice data in VoIP systems, is a very demanding data stream and will immediately expose a weakness in a network. The network must support multiple video, audio, and data streams in a reliable, synchronized manner without disruption. When delay, packet loss, and jitter reach thresholds where the video is impacted visually, the usefulness of that video drops to zero. It is important to understand the complexities of video in IP data networks to mitigate these factors.
Networks that are designed to move NDI video streams should be thought of as being primarily utilized for video. IP networks are, by their very nature, “best effort delivery” systems and were originally developed for the transport of data. By contrast to video, data services can function happily with packet retransmissions, lost packets, and even packets arriving out of order.
Video streams, while still composed of data, are much more rigid in their requirements. With the use of modern networking equipment and proper configuration, video can move across networks whilst still obtaining low latency, frame accuracy, and high-quality requirements necessary for live video production.
Added new command-line options in the NDI Recording tool. Please refer to the SDK documentation for details.
Resolved an issue where NDI Webcam would stop receiving video from the NDI HX Camera app when the camera resolution was changed.
Corrected video preview rendering in NDI Webcam to properly respect the source aspect ratio.
Fixed NDI Router terminating active streams upon application closure.
🟣 What is NDI?
📄 White Paper
🆕 Release Notes
📷 Webcam Input
🔻Download NDI Tools
🎥 NDI and OBS
💪 Using NDI
💻 Developing with NDI
❓FAQ
Audio is at the heart of countless applications, from media production to live broadcasting, and understanding the principles behind its digital transformation is key to unlocking its full potential.
This guide explores how NDI leverages digital audio technology to enable seamless, high-quality audio transmission over IP networks. Beginning with the fundamentals of digital audio, we'll delve into the technical aspects of NDI audio, its real-world use cases, and the innovative products driving this revolution. Whether you're an audio engineer or a curious enthusiast, this guide will provide a comprehensive look at the role of NDI in reshaping modern audio workflows.
Our certified devices are tested to ensure interoperability with all other certified produces. Please check the Product Finder on our website to search for products that have been certified.
NDI operates most efficiently in a dedicated network with high bandwidth and high availability. This contrasts with unmanaged environments such as the public Internet or networks where video rides along with data without priority.
Gigabit (1000 Mbps) networks are essential in production workflows. A typical NDI stream consisting of 1080 60P video yields a data rate up to 150 Mbps per stream. This extremely efficient stream is designed to have very low latency and allows multiple streams to be stacked together on a single Gigabit network. Even so, a production environment may require more capacity based on a simultaneous number of NDI streams required.
The following tables are intended to calculate bandwidth needs based on video resolutions and frame rates. It should be noted, however, that NDI is not deterministic. The bandwidth needed for NDI should be based on the determination of the average utilization required.
NDI HX1 is a legacy format that will eventually be discontinued. As such, there are not reference tables for it. Contact our if you have any questions.
These release notes refer to changes in our complete technology, including the SDKs, NDI Tools, and any other items. Take your time to comb through the documentation and decide what is more relevant for your specific context.
*Any reference to a ChangeLog refers to the release notes shown below
One approach to manually interconnect NDI devices is to specify the IP address of the transmitter in the receiver.
In Windows and MacOS, this can be achieved using the NDI Access Manager in the External Sources feature. Several NDI hardware decoders also support this functionality.
For Linux, the IP addresses of NDI senders can be added manually in the NDI configuration file called "ndi-config.v1.json." This file is in the home directory of the user currently logged in.
Specifying the IP address of an NDI source allows the receiver to receive NDI sources that are in a different
NDI groups enhance the efficiency and management of NDI-based workflows by providing a structured way to organize and control the visibility and access of NDI sources and destinations within a network.
A device can be part of different Groups, some Groups only in the Send or Receive mode:
The ways in which NDI is currently utilized — and can continue to be utilized — to connect are virtually limitless. This is primarily due to two factors: (1) our ongoing development of the features and capabilities of our Core Technology and (2) our community of users exploring and implementing NDI-based solutions. From professional broadcast studios to homemade streaming setups, NDI can be applied in any situation where a multimedia connection is needed. Despite the wide range of scenarios, users are consistently seeking certain performance standards, such as high-quality audio and video, low latency, and plug-and-play setups.
Learning how to use multicast is one of the most frequently explored topics within our community. To support this interest, we've gathered a collection of resources to learn more about implementing multicast with NDI. Whether you're just starting to explore multicast or looking to refine your existing setup you can check out the section in our , the guide for , or our articles on how to use NDI multicast with offer in-depth information and practical advice. You can also ask questions in the forums or take our NDI basics course via the . These resources are tailored to help you achieve optimal performance, ensuring high-quality audio and video, minimal latency, and seamless integration into your workflows.
This space includes a variety of reference guides, best practice documents, and step-by-step tutorials for using NDI. Our goal is to offer valuable information for anyone looking to connect their setups and workflows with NDI. We are committed to continuously updating this resource and adding new educational content to reflect the latest developments in our technology and its application within our community.
Today, millions of professional and amateur users leverage NDI-enabled devices and software to maximize IP for audio and video connectivity. In addition to developing the core technology that provides the connectivity features and infrastructure for this ecosystem of products, we recognized the importance of facilitating the operation of NDI workflows and setups.
Hence, we created NDI Tools, a collection of simple yet powerful free software applications designed to introduce anyone, from end users to professional installers, to the world of NDI connectivity and video over IP.
NDI tools work on most computers and are . Our team is committed to improving all our tools by releasing that make each tool even more powerful and valuable. This space contains all documentation and educational content related to NDI Tools. We continuously review it to reflect the most recent developments and updates.
NDI is designed to enable successful video transport using the default configuration of network interface drivers; however, most recent network interface drivers do support the configuration of advanced properties that can help optimize NDI transmission.
Consider the following adjustments but note that adjusting individual adapters can significantly affect performance and reliability positively and negatively. It is important to consider testing performance with a network analyzer before and after each setting change. The following adjustments are intended to help; however, performance will depend on network and usage (names and available settings vary between vendors, adapter models, and even between different driver versions):
NDI Utilities are standalone applications designed for specific purposes within NDI-based workflows or for integrating our technology into products. Unlike the NDI Tools, which feature a closed user interface (UI), these Utilities are meant for more flexible uses and exploration. Some of them may only be operated through a command-line terminal.
Click on a card to discover more about the functions and features of each Utility.
By default, an NDI Sender has the capability to generate two types of streams: a full-quality stream and a proxy stream. A receiver can readily activate the . A simple way to visualize a proxy stream is by utilizing NDI Studio Monitor and enabling the Low Bandwidth mode within the Video settings menu.
The Proxy stream serves as a means for an application to enhance the efficiency of NDI distribution across the network. For instance, an NDI-based Video Mixer can leverage the proxy stream for sources that are intended for use in a preview monitor rather than an actual output. Then, when a source is transitioned to an output, the application can seamlessly switch from the proxy stream to the full bandwidth stream.
This approach empowers receivers to effectively manage a more significant number of NDI sources while utilizing less network bandwidth.
The NDI Glossary provides clear definitions and explanations of key terms and concepts related to NDI technology as well as more general industry standard terms for AV over IP. We provided this to serve as a reference to help you navigate and understand the terminology used throughout the NDI ecosystem.
NDI offers a range of plugins designed to integrate our powerful connectivity technology seamlessly into popular creative applications. These plugins include NDI for After Effects, Premiere Pro, Output for Final Cut Pro, NDI for VLC, and Audio Direct. Each plugin enhances the flexibility and efficiency of your production pipeline, bringing the power of NDI directly into the tools you use every day.
Click on a card to discover more about the functions and features of each plugin.
When enabled, this allows the adapter to engage power-saving features while keeping connections active. This technology uses the standard IEEE 802.3az to allow for less power during periods of low data activity. Adapters that utilize the IEEE 802.3az standard should have no impact on the performance of NDI; however, some integrated circuits exist that were developed before the standard was finalized or do not adhere to the standard at all. In these cases, it is best to disable the energy efficiency while determining the best network optimization.
In NDI version 5 the default communication mechanism is a Reliable UDP protocol that represents the state-of-the-art communication protocol that is implemented by building upon all the experience we have seen in the real world with NDI across a massive variety of different installations
Reliable UDP, also known as RUDP, is a transport protocol that combines the advantages of UDP's low latency and simplicity with the reliability of TCP (Transmission Control Protocol). It is designed specifically for real-time multimedia applications, where maintaining the timeliness of data is crucial.
In the context of NDI, Reliable UDP is employed to ensure that video and audio streams are delivered reliably and with minimal delay. It achieves this by implementing several mechanisms:
Sequencing: Reliable UDP assigns a sequence number to each packet it sends. This allows the receiving end to detect missing or out-of-order packets and request retransmissions if necessary.
Retransmissions: If a packet is lost or arrives out of order, the receiving end can request a retransmission of the missing packet(s) using the sequence number information.
Flow control: Reliable UDP incorporates flow control mechanisms to manage the rate of data transmission. This prevents overwhelming the network or the receiving device with more data than it can handle, ensuring a smoother streaming experience.
Congestion control: RUDP also includes congestion control algorithms to prevent network congestion and avoid unnecessary packet loss. It dynamically adjusts the transmission rate based on network conditions, maintaining optimal throughput without overwhelming the network.
This protocol permits transport across multiple NICs and all network paths, it is intended to use hardware-accelerated network adapters with adaptive bandwidth sharing across NICs.
Multipath TCP is a transmission protocol that offers advantages such as maximizing throughput, optimizing resource usage, and enhancing network redundancy. It can seamlessly integrate multiple network pathways, including wireless and mobile networks. It is especially efficient when used with NDI equipment that utilizes multiple Gigabit connections to exchange a large number of NDI streams.
However, in scenarios where 10Gbit interfaces are connected with 1Gbit interfaces, Multipath TCP's efficiency is compromised. This is primarily due to network switches being unable to effectively manage network congestion in such situations. As a result, the protocol may not perform optimally in these specific network configurations.
This alternative protocol to TCP is used when reliable delivery of data packets is not required. UDP is typically used for applications where timeliness is of higher priority than accuracy, such as streaming media, teleconferencing, and voice-over-IP (VoIP). Forward error correction (FEC) is a method of obtaining error control in data transmission in which the source (transmitter) sends redundant data to the destination (receiver).
UDP (User Datagram Protocol) with Forward Error Correction (FEC) is a beneficial approach when the network is prone to errors or not entirely reliable. It provides a solution for error correction when data packets get lost or corrupted during transmission.
However, it's important to note that using UDP with FEC requires additional computational processing on the receiver side. The receiver needs to implement algorithms and mechanisms to manage the error correction process. This involves decoding the received data and applying error correction techniques to recover any lost or corrupted packets.
This network communications protocol enables two host systems to establish a connection, exchange data packets, and ensure data is delivered intact to the correct destination. TCP is typically grouped with IP (Internet Protocol) and is collectively known as TCP/IP.
Single-TCP is supported on all NDI versions. While the other transmission modes are likely to perform better, this mode offers baseline compatibility for all NDI clients.
Digital audio refers to the representation of sound in a digital format, wherein audio signals are converted into a series of binary numbers that can be stored, transmitted, and manipulated by electronic devices such as computers and audio processors.
Unlike analog audio, represented by continuously varying electrical signals, digital audio breaks down sound into discrete samples at regular intervals, typically measured in thousands of samples per second (expressed as KHz). Each sample captures the amplitude of the audio waveform at a specific point in time, allowing for precise reproduction and manipulation of sound.
Digital audio has revolutionized how we record, edit, transmit, and reproduce sound, enabling unprecedented levels of fidelity, flexibility, and convenience in a wide range of applications, from music production and broadcasting to telecommunications and multimedia entertainment.
Recording or converting sound into a digital format involves two primary steps: sampling and quantization.
Sound is a continuous analog wave. To digitize this sound, it is sampled at discrete intervals. The sampling rate, measured in Hertz (Hz), defines how many times per second the sound is sampled. A common sampling rate for CD-quality audio is 44.1 kHz, meaning the audio is sampled 44,100 times per second.
In broadcast video production, the sample rate is 48 kHz; for high-quality audio recording and mastering, the sample rate can be up to 768 kHz.
Once sampled, each snapshot of the sound's amplitude is converted into a digital value. This process is known as quantization. The bit depth determines the resolution of this conversion, with higher bit depths allowing a more precise representation of the sound's amplitude. Common bit depths include 16-bit, 24-bit, and 32-bit.
In addition to the fundamental concepts of sampling and quantization, understanding digital audio involves familiarity with various audio file formats. These formats can be categorized into two main types: uncompressed and compressed.
These formats store digital audio data without any compression, preserving the original quality of the audio. Common uncompressed audio formats include:
WAV (Waveform Audio File Format): Developed by IBM and Microsoft, it's a standard format for storing audio on PCs.
AIFF (Audio Interchange File Format): Developed by Apple, similar in quality and structure to WAV, commonly used on Mac computers.
Compressed formats store audio data using algorithms that eliminate redundant or less audible information to reduce file size. Compressed formats can be lossless or lossy.
Lossless Formats: These compress audio data without losing any information, allowing the original audio to be perfectly reconstructed from the compressed data. Examples include FLAC (Free Lossless Audio Codec) and ALAC (Apple Lossless Audio Codec).
An NDI Bridge executable can also be launched using the following command line arguments:
/verbose
Generates extensive log entries in Windows Event Logs, with the event source labeled as "NDI Bridge."
/host
Initiates Bridge in host mode.
/join
Launches Bridge in join mode.
/local
Starts Bridge in local mode.
/autorun
Minimizes Bridge window upon startup.
/noui
Suppresses the display of any user interface elements and prevents the creation of a taskbar icon.
For example, you can use /local /autorun to initiate the Bridge in local mode and minimize it. Similarly, /local /noui will start the Bridge in local mode without any user interface. If you use /autostart without specifying /host, /join, or /local, the Bridge will start in the last selected mode.
It's important to note that Bridge will not start with these flags if there is a configuration error, such as an invalid IP address for the remote address in the join mode while attempting to auto-start join.
If you prefer to configure Bridge using a configuration file, you can find the settings in AppData\Local\NDI\Application.NDI.Bridge.UI\bridge_settings.json.
Most setting names are self-explanatory, except for "selected_tab," which serves as an index field to indicate the last selected tab (mode) the user used (0 = host, 1 = join, 2 = local).
All settings for each mode are present in the same file, so you may need to adjust your logic to target the correct settings for the appropriate mode (e.g., "host_model," "local_model," "join_model").
NDI transmitters and receivers do not require any specific synchronization method to connect and function. An NDI infrastructure can operate “sync-free”, avoiding the complexity and cost of network systems that support synchronization layers. However, for specific use cases, developers and hardware manufacturers have several approaches to achieve synchronization.
When processing multiple video streams in production workflows, it may be necessary to synchronize all video streams to the same frame rate, with their frame start times aligned.
For physical video sources (e.g., cameras or video output cards) that have a fundamental native video timebase, synchronization is achieved through genlocking the internal video timebase to a reference signal, typically a blackburst signal.
For software-only implementations (e.g., character generators, DDR playback, graphics rendering engines) that lack an inherent internal video timebase, multiple platforms can maintain the same frame rate by locking system clocks using NTP, PTP, or similar protocols. However, even with locked system clocks, frame start times will not align across different applications since each application initializes its frame processing independently.
NDI Genlock provides a solution for software applications that lack an internal video timebase by allowing them to use an NDI signal as a timing reference. The Genlock instance connects to any visible NDI sender on the network and synchronizes the frame rate and frame start times to the selected source. The NDI source can reside on a local network, a remote network, or in the cloud.
To ensure proper operation of an NDI source as a Genlock reference, the following conditions must be met:
It is strongly recommended that the NDI source stream originates from NDI version 5 or higher, which includes significant enhancements for genlock support. Older NDI streams may not fully comply with NDI genlock operations.
The NDI source must have sufficient network bandwidth to provide the genlock stream to all NDI receivers. Configuring the source with multicast may help optimize bandwidth usage.
NDI Genlock supports cross-frame-rate locking, where, for instance, a 60Hz signal can synchronize to a 30Hz sender. However, this is not a recommended workflow and should be avoided if possible.
Some NDI sources, like the Test Pattern Generator and NDI Screen Capture, may not send a regular frame stream. These sources optimize CPU usage and save network bandwidth by skipping frames, making them unsuitable as genlock references.
If the NDI Genlock clock cannot successfully synchronize with the NDI sender, it will automatically fall back to using the system clock. While this fallback is not as precise, it allows video processing to continue with reasonable performance.
Setting up an NDI-based video production in a Virtual Private Cloud is quite easy; the first step is to define how to make NDI Discovery and Registration work in a VPC. Cloud providers allow the creation of a multicast domain; multicast is required to use mDNS-based discovery and registration. This setup requires the creation of a transit gateway with multicast enabled. Enabling multicast in the cloud might require specific knowledge; for this reason, the easiest solution to enable NDI Discovery and registration is to set up a Discovery Service. NDI Discovery Service requires just a basic Windows or Linux-based instance to run.
Looking for the OBS plugin? While NDI does not have an official OBS plugin you can download the unofficial one following the directions from our Getting Started with OBS guide.
Potential deadlock issue in the new discovery server with sources for older versions
Rare rash in Premiere Pro on Mac when enabling NDI output and allowing network access
Issue where NDI Webcam fails to auto launch at starup if the selected source is unavailable
auto-start issue where the service appeared running but failed to start
Added new command-line options in the NDI Recording tool. Please refer to the SDK documentation for details.
Sender Monitoring Enhancements: The now includes sender discovery and monitoring on both Windows and macOS.
Default Sender Monitoring Support: Enabled by default in existing sender-based NDI Tools apps.
Windows: NDI Test Patterns, NDI Screen Capture, NDI Screen Capture HX, NDI VLC Plugin.
macOS: NDI Test Patterns, NDI Scan Converter.
NDI Discovery Server Improvements: Enhanced capabilities. The NDI server utility is now available as a standalone installer for Windows and Linux and can run as a service. See for setup details.
Fixed an issue in the NDI plugin for Adobe Premiere where the field sequence was incorrectly displayed when playing SpeedHQ progressive clips in interlaced sequences.
Resolved poor NDI HX encoding performance on AMD GPU/CPU systems in and .
Fixed NDI Virtual Input on macOS failing to receive video when connected via and .
New APIs: Introduced APIs for , designed for integration with the NDI Discovery Server. See documentation for details.
Performance Improvements: Enhanced codec quality across multiple generations.
Enabled passthrough of the NDI capabilities message from NDI receiver to the NDI sender.
Enhanced Receiver Passthrough Control: Introduced per-codec passthrough override control via receiver creation JSON in the NDI Advanced SDK, enabling selective decompression of compressed formats. Please refer to the SDK documentation for details.
Improvements to . Please refer to the files for more details.
Fixed
Our latest release brings an update to the NDI SDK terms, bringing these in line with our commitment to the health and growth of the NDI ecosystem. The NDI SDK remains royalty-free, subject to the SDK terms and conditions. For more details including a full explanation and updated list of exclusions please consult the terms and conditions by downloading the NDI 6.2.1 SDK. These changes apply to the NDI SDK only and are not applicable to the NDI Advanced SDK. For more information see the in our Forums.
Updated the NDI Tools installer to display the on the data collection agreement page.
Fixed an issue with silent installation of .
Fixed an issue where the running as a service would not start automatically after windows restart.
Introduced the app in the Tools suite for macOS and Windows for NDI receiver discovery, monitoring and control.
NDI Tools now includes support for anonymous usage data collection to help improve future releases. Users can choose to opt in or out during setup and update their preference anytime from the NDI Tools Launcher.
Updated NDI Studio Monitor (Windows) and NDI Video Monitor (Mac) to enable settings for receiver monitoring and remote source control when used with the new NDI Discovery Server.
Improved for easier multicast configuration on Windows and Mac.
Added a new setting in applications on Windows to enable or disable notifications for new connections.
Improved error handling and user notifications in applications on Windows.
Enhanced existing with new capabilities for receiver discovery, monitoring, and control. It is now available as a standalone installer for Windows and Linux, allowing it to run as a service. Refer to the documentation for details.
Updated the to include local mode support.
A problem in and where the preview window could freeze or fail to render video.
Issue where the NDI record binary would stop recording when the record chop command was used with the -noautochop flag.
Crash in on macOS that occurred when its signal was received in or Studio Monitor.
Introduced a new set of APIs for receiver discovery, monitoring, and control, designed for integration with the NDI Discovery Server. Refer to the documentation for details.
Added visionOS support to Apple SDKs.
Optimized audio resampler performance in on ARM-based platforms.
Resolved a potential crash in the NDI library when handling UDP streams on certain ARM-based processors.
Fixes
Resolved a low-level exception that occurred when importing recorded SpeedHQ files into Adobe Premiere Pro.
Fixed an issue where NDI Virtual Input might stop functioning after a few seconds on certain macOS platforms.
Improved handling of connection metadata when used with the NDI Routing API.
Addressed a possible issue with the Discovery Server where sources might not appear intermittently.
Resolved a potential memory leak issue in NDI Test Patterns on Windows.
SDK
FPGA improvements.
Added support for 16-bit color formats on FPGA platforms.
Introduced encoder support for planar alpha.
Added support for new packed and semi-planar video formats.
Implemented 64-bit addressing in raw audio/video input and output logic. For more details, refer to the ChangeLog files.
The Advanced SDK now features a new API that enables dynamic adjustment of the received bandwidth for NDI video streams. For more information, please consult the .
Added new audio conversion utility APIs for NDIlib_audio_frame_v3_t structure.
Made improvements to the codec to verify the correctness of the bitstream before decompression.
SDK - Fixes
Fixed incorrect HDR color information in MOV files recorded using the NDI Recorder utility.
Addressed an issue where the NDI library took longer than expected to unload in specific scenarios.
Addressed a potential frame drop issue with streams under specific conditions.
NDI Tools
layout and style improvements. (macOS and Windows).
The app on macOS has been updated to utilize modern system extensions introduced in macOS Sonoma 14.1.
apps on Windows have been updated to use .NET 8.
NDI Tools - NDI Bridge
A connection test feature was added to determine optimal buffer delay settings for your network.
Introduced a dedicated statistics window with timeline graphs to monitor system and bridge usage.
Added a logging window with support for log-level filters to view bridge logs more effectively.
NDI Tools - New Utilities
The is now on the NDI website. It allows you to run in a headless mode as a Windows service. Please refer to the documentation for more details.
The utility is now on Windows and Linux via the NDI website. It also includes enhanced ASIO support for Windows devices.
The NDI Analysis tool has been improved to include additional information about NDI stream timings when exporting to a CSV file. Please refer to the
NDI Tools - Fixes
(macOS) now supports inputting multiple discovery server IP addresses.
Corrected an issue in (macOS) where HDR images were not rendered properly in the preview.
Resolved a potential exception in the source menu of (macOS) when parsing NDI sources.
NDI Tools - Known Issues
NDI Virtual Input may stop working after a few seconds with certain macOS platforms.
The now includes HDR support<html>
Corrected rendering issue when importing custom images from older versions of on Windows.
Resolved a potential crash in .
Resolved a minor talkback audio issue in .
Resolved a source limitation issue with the running on Linux.
Addressed an issue with NDI Frame Sync, restoring correct behavior in audio capture.
Fixed a potential threading issue when loading and unloading the NDI library on Windows.
Support for 16-bit color formats improved (P216/PA16).
There is a new specification for NDI HDR metadata (read the new dedicated in the NDI SDK for more details).
New receiver formats permit SpeedHQ pass-through with UYVY/P216 video.
Please note: The NDI Advanced SDK licensing scheme has been enhanced. To use NDI 6.0 features, advanced SDK users will need a new License ID (which replaces the former Vendor ID). Please contact
Improved audio synchronization with .
A new has been released.
now supports HDR patterns (macOS and Windows).
now supports displaying HDR content in PQ and HLG (Windows).
has been enhanced to capture NDI HDR streams.
now includes new KVM support.
The NDI Launcher app adds a one-click link to extensive online Docs & Guides.
Reduced latency from .
Resolved Local mode issue when handling a source that has multiple machine names.
has been enhanced to leverage the increased number of encoders supported by NVIDIA GeForce cards (may require NVIDIA driver update).
In Linux manual connections can be added in the NDI configuration file located in the home directory of the effective user: "ndi-config.v1.json"
Here is the way to manually set up NDI sources in the configuration file:
"networks": {
"ips": "192.168.123.200,10.10.123.22,",
"discovery": "",
In this scenario, NDI Device 01 is sending discovery information to Groups 02 and 04. Devices part of the Receive Groups 02 and 04 can discover and receive NDI streams from Device 01.
NDI Device 02 is sending discovery information in Groups: Public, 01, 02, and 04.
NDI Device 03 is sending discovery information in Groups: Public and 03.
There are different ways to define Groups in NDI Devices:
In MS Windows and MacOS, Groups are defined in the NDI Access Manager, which is part of the free NDI Tools:
The Groups string for each Send and Receive operation must not exceed 248 bytes in length, which means that the total length of the combined Group names should not exceed 248 characters.
In Linux, NDI Groups can be defined in the NDI configuration file located in the home directory of the effective user: "ndi-config.v1.json"
Here is the way to configure Groups in the configuration file:
},
"groups": {
"send": "Public",
"recv": "Public,Group 01,Group 02"
},
Hardware NDI Devices must support NDI Groups to be compliant with the NDI standard specifications.
Here are some examples of hardware devices with NDI Groups support:
You can browse the index below to access all the main topics, guides, and documentation included in this space. If your looking for guidance on specific OS look for the Apple or Windows icons next to the title.
If you find any inconsistent or unclear information, you can always reach out to our team.
We understand some users cannot upgrade their operating system or need a specific older version of NDI Tools for their unique workflow. If your workflow depends on older versions, we recommend reaching out to the developer or manufacture of the component in your workflow that requires this and ask them to update their NDI libraries. NOTE: These older versions of NDI Tools are provided without support- any features or updates will be in the latest version of NDI Tools, available at ndi.video. The NDI Tools README page has the listed updates for all NDI Tools versions. Due to licensing reasons, we can only provided NDI Tools as far back as NDI 5 for both Mac and Windows for now. Download old version of NDI Tools here
If you would like to use NDI Tools for commercial purposes please contact our sales team
720 50p
6.33
640x360 60p
3.00
NDI supports multicast-based video sources using UDP with forward error correction. Multicasting allows a single NDI source to be delivered to multiple receivers by replicating the NDI packets from the sender to any number of receivers.
Using multicast on a network that is not configured correctly can produce undesirable results and cripple network performance. For this reason, multicast sending is disabled by default.
For successful multicasting, IGMP is mandatory. IGMP allows the receiving NDI systems to request access to the sender. Without IGMP querying and snooping, Multicast traffic is treated the same as broadcast transmission, resulting in packet forwarding to all ports on the network. With IGMP snooping, multicast NDI traffic is forwarded only to the receivers that subscribe to the multicast NDI stream.
NDI subscribes to a multicast group and will unsubscribe when that stream is no longer needed. A routing querier on the network handles the management of multicast subscriptions. If multicast is enabled on the sender, the receiver is going to prioritize multicast receive over unicast.
While video and audio data are delivered to the network via multicast delivery, each receiver also connects to the sender via a unicast TCP connection for bi-directional communication of metadata (e.g., PTZ control, tally, etc.)
Basic multicast settings can be enabled in the NDI Access Manager on Windows and Mac machines.
In Linux, Multicast can be configured in the NDI configuration file located in the home directory of the effective user: "ndi-config.v1.json"
Here is the way to set up Multicast in the configuration file:
When multicast receiving is enabled, and a sender is available in the same local network, the receiver can negotiate for a multicast stream to be sent. If the sender is not on the same local network, this negotiation does not occur (since it could lead to a multicast stream being sent but never able to arrive at the receiver).
Suppose the network is correctly configured and can ensure a multicast stream to route reliably from a different network to the receiver’s local network. In that case, it is possible to specify the sender’s subnet in the “subnets” setting of the "ndi-config.v1.json" to allow multicast negotiation to occur.
These settings pertain to the multicast NDI setting on this machine. The first setting determines whether multicast sending is enabled or not.
By default, multicast sending is disabled. Next is the IP address prefix and mask. In this example, multicast IP addresses will be chosen in the range 239.255.0.0 - 239.255.255.255. NDI will attempt to use different multicast addresses to ensure that the streams can be filtered efficiently by the network adapter.
NDI senders need a range of multicast addresses available.
The TTL value controls how many “hops” the multicast sending traffic will take, allowing it to move outside the local network.
The following list presents examples of applications of NDI for Audio over IP in different contexts.
There are several use cases in the production of live events, such as sports and news, where NDI Audio can be utilized with great benefits. In sporting events, for example, the entire audio flow for commentary, where neither latency nor synchronization represents a real problem, could be managed using NDI with the advantage of distributing all the service video signals using the same technology. Another example of its use is audio communications like Intercoms. In this case, NDI also offers the advantage of infrastructure simplicity and, above all, the ability to be supported by software applications rather than dedicated hardware. Moreover, NDI works on wireless networks, thanks to NDI Bridge over WAN.
In these use cases, neither latency nor synchronization are blocking issues. What's essential are the ease of use and the ability of NDI to operate over the internet and wireless networks. NDI-based devices, such as the Mackie DLZ Creator, are excellent examples of products designed for these markets.
In these use cases, the features of NDI are of immense value:
With , multichannel audio streams can be distributed and shared over the Internet. NDI is natively unicast, which is the perfect solution for the cloud.
NDI does not require strong synchronization technology; PTP cannot operate over the Internet or in the cloud.
Even in these use cases, a technology allowing software-only solutions represents a significant advantage over competing technologies.
Furthermore, NDI also supports video and metadata, enabling the creation of a complete workflow with a single technology.
In this case, NDI's achievable latency does not represent a problem, and thanks to multicast's support, NDI can be easily implemented to provide audio streams to many receivers.
Another immense advantage of NDI in this market is its operation over wireless networks, a unique feature compared to other technologies that allow for the distribution of audio signals where a wired infrastructure is not possible.
NDI is extremely plug-and-play. The audio quality is perfectly compatible with high and very high-quality digital entertainment systems.
Discovery and Registration, especially based on the NDI Discovery Server, are much more efficient and reliable than other mDNS solutions.
In NDI, the receiver defines which source to use, which is exactly like a radio tuned to a broadcasting station. This is consistent with the normal user experience. Furthermore, no transmitter can unexpectedly connect to a receiver, a very common problem with AoIP for home entertainment solutions used today.
NDI Audio represents a winning solution in all applications with a wireless connection. Compared to other Audio Over IP technologies, NDI is less sensitive to the Wi-Fi network jitter and does not require a synchronization like PTP that can’t work over wireless connections.
With NDI, multiple audio channels can be multiplexed into a single transmission while maintaining synchronization. This is a huge advantage over other AoIP technologies.
Updated as of Version 6.2
NDI Discovery is a tool that enables you set up and manage Discovery Servers within workflows. We cover the capabilities of Discovery Service in depth in our White Paper.
Download NDI Tools here.
Looking for Discovery Service? Download it .
. After installing it, access NDI Discovery from the or your applications folder.
Once you've installed Discovery check out our guide. For high level introduction on how Discovery works read on Receiver Discoverability, Monitoring, and Control.
Displays all NDI sources (“senders”) that have registered with the Discovery Server. Each sender entry shows its device name/hostname, the network address, and port it is streaming from. Devices appear grouped by hostname. This tab helps you quickly see which NDI devices are currently available to provide streams on your network.
As of NDI 6.3, this view also includes senders registered using the new NDI Sender Advertiser APIs. These APIs extend discovery support to senders, coexist with the legacy advertisement system, and enable improved visibility into sender properties and events when used with the Discovery Server.
Shows all NDI receivers (endpoints listening for NDI streams) recognized by the Discovery Server. Devices are also grouped by hostname under receivers. This is especially useful when troubleshooting or confirming which machines are actively listening for NDI streams.
From the dropdown carrot under Receivers you can specify the source for that receiver
You can configure or change the Discovery Server IP and port. You can also see whether the application is connected to a Discovery Server and at which IP/port.
For first time set up, when using with for the first time be sure to select the Allow Receiver Advertising and Allow Receiver Control from the settings
FGPA-based receiver³
NO
(2) A VCU, or Video Codec Unit, is a specialized hardware module or component designed to handle the encoding and decoding of video streams. Note that the term VCU seems to be mainly used by AMD for their Zynq series of FPGAs. For instance, other SoCs such as Ambarella just call it a codec. The primary function of a VCU is to efficiently compress (encode) raw video data to reduce its size for storage or transmission and decompress (decode) video data for playback. By performing these operations in hardware, a VCU can significantly speed up video processing tasks, reduce CPU load, and decrease power consumption, which is especially beneficial in devices where power efficiency and high-performance video processing are critical. Integrating a VCU within a System on Chip (SoC) or as part of a dedicated video processing card allows for efficient handling of video content, making it a critical component for multimedia applications and devices in today's video-centric digital world.
(3) An FPGA-based encoder/decoder requires an SoC to be able to offer the user interface, the memory, the network interface of the system, etc.
Apple has turned off a feature called "legacy camera support" however it can be re-enabled in Recovery Mode by following these steps from Apple: https://support.apple.com/en-us/HT213969
When you restore these legacy settings, the camera privacy indicator won't display in the menu bar while a camera with older software is in use.
Restart your Mac into Recovery Mode:
Click the Options button, then click Continue.
From the Utilities menu, choose Terminal.
Enter this command:
system-override legacy-camera-plugins-without-sw-camera-indication=on
Press Return. Depending on your system configuration, you might be prompted to complete additional steps.
Quit Terminal.
From the Apple menu, choose Restart.
To change back to the default settings, follow the steps again and enter this command:
system-override legacy-camera-plugins-without-sw-camera-indication=off
This work around has been testesd for NDI Tools 6.2 and the latest editions of Mac. We recommend you update to the latest versions of both NDI Tools and macOS for best results.
We're always trying to improve our documentation. See something you need but can't find? Leave us some feedback and tell us what you'd like to see. You can find the feedback buttons on the right side of the page 🙂
As a technology designed to connect video, ensuring interoperability across all NDI products—both hardware and software—is one of the fundamental principles that NDI strives to uphold for its growing user community.
In this guide, we will explore how NDI can connect video while maintaining interoperability and consistent performance at the heart of any workflow. We will cover some of the basics of digital video and explain the various ways NDI-enabled devices and NDI formats can work together to create a seamless networking environment.
You will first need to insure that you have installed the NDI SDK. By default it will install to Library
If you did not change the install location, open on MacOS and enter the following command:
A separate Terminal window will open with NDI Discovery Service running. If a different directory was chosen to install the NDI SDK to, replace 'Library' with your chosen directory path.
On the NDI Sender, open , and enter the IP address of your Mac and the Port Number
If you choose not to use Access Manager you can still enter the IP address using the settings in the relevant section of the NDI device
Share Your Desktop Seamlessly.
NDI Scan Converter is an application designed to effortlessly share your computer's desktop video and audio with any other device on your network through an NDI stream.
Whether you're conducting broadcasts and presentations, collaborating on projects, creating tutorials, or engaging in media playback, Screen Capture provides a valuable solution.
Download NDI Tools here.
and run NDI Scan Converter from the or your applications list.
The tool will appear in your system tray with the NDI logo. Upon launch, your computer's desktop video and audio are viewable from any NDI-enabled device on your network.
View the output of Screen Capture on another NDI-enabled device using an application like
Right-click on the screen and select the device name and corresponding NDI stream.
On the File top level menu, you can select which will be the source of your NDI stream. Select either Desktop to capture your entire desktop or choose a specific application window.
You can mute audio capture by clicking Mute Audio, which can be found on the Settings top-level menu.
Choose the desired system audio input for capturing sound along with your video in your MacOS Sound settings.
Chroma Subsampling
4:2:0
4:2:0
FPGA-based Transmitter
NO
NO
MacOS System Audio not Captured via NDI Scan Converter
Install or update:
OBS Studio 30 or newer
Distro AV NDI plug‑in for OBS
NDI Tools 6.1.1 for Mac — be sure to tick “Virtual Input” during setup and allow its Camera and Microphone extensions when macOS asks.
In OBS open Tools then NDI Output Settings, enable Main Output, give it a name, and click OK.
Launch NDI Virtual Input (in Applications > NDI). From its menu‑bar icon choose the OBS feed. Restart the app if you just approved permissions.
Open Zoom (or Google Meet, Teams, etc.).
Pick NDI Video for camera.
Pick NDI Audio (or “NDI Virtual Input”) for microphone. If the virtual mic is missing, reinstall NDI Tools and reboot.
Issue: When using by itself, the video signal is transmitted over NDI, but the audio is silent or only captures the system microphone. This is expected behavior.
Solution: Use an audio loopback tool to route system audio into the NDI stream:
(deprecated)
After installation:
Follow the tool’s instructions to route system output to a virtual input.
Launch .
Ensure audio is not muted in the Scan Converter menu.
Download and Install OBS Studio
Install OBS Studio version 30.0.0 or later (Qt6, x64/ARM64/AppleSilicon) on all relevant machines from https://obsproject.com.
Install the NDI plug in for OBS
Download the DistroAV NDI plugin from .
Before installing, remove any old versions of the OBS-NDI plugin to prevent conflicts.
Install the plugin after OBS Studio is installed.
Install NDI Runtime
Download and install the NDI Runtime version 6 or later as shown here: .
Enable NDI Output in OBS (on the source computer)
Open OBS Studio
Navigate to Tools > Distro AV NDI® Settings
1080 50i
20.00
640x360 25/30p
3.00
NDI HX3 stream specifications:
GOP size must be 20 frames Glass-to-Glass latency, less than 100ms I Frame request response, less than 80ms
1080 50i
26.00
640x360 25/30p
3.00
In more complex networking cases, ports may need your attention.
To extend beyond the local network, applications (such as NDI Bridge) use network communication ports. Connecting to a local application from an external network requires targeting the correct port, and that your network router is set up to accept traffic at that port.
This is much like an office with one main telephone number, but many extensions. On a WAN like the Internet, the ‘public IP number’ corresponds to the main telephone number. Your firm provides a list of extension numbers, each matching one phone. Likewise, your network router exposes certain ports for external access. Connecting to a network router is impossible if it doesn’t expose a port.
The NDI Bridge Host finds your public IP address automatically and listens for traffic arriving at the port you specify in its configuration app. It cannot, however, automatically configure the router to allow traffic from the WAN to reach that port. (By default, routers expose a limited set of common ports, and are manually configured to use other ports for specific purposes.)
Port Forwarding exposes a port (or a range of ports) so an external network can communicate with the port used by an internal application.
Sidenote: The word “forwarding” highlights the fact that it’s possible (though not required) to expose one port to external networks (the ‘external’ port), and pass traffic between it and a different ‘internal’ port. This is much like publishing one phone number publicly, and then secretly forwarding that number to a hidden private number.
To configure port forwarding, you need to know the internal port you will use, and how to access your router settings.
NDI Bridge defaults to port 5990 but lets you specify a different ‘internal port’.
If you assign a Host port number that is in use, NDI Bridge automatically increments the number until a free port is found. Knowing this, you may opt to forward a port range.
Router settings are often available on a webpage published on your local network, though this can vary. Your router documentation will provide details and login information for the router. Alternatively, an Internet search for “port forwarding” locates countless detailed guides (such as ). A network administrator may handle this task for you in more complex environments.
Once you have this information, you can access the port forwarding section of your router settings to enter the internal and external ports. Port forwarding options are often found under either “Applications and Gaming” or “Firewall”.) If a Protocol option is provided, select “Both”, or “UDP”.
When you start the Host or modify the designated port the NDI Bridge application automatically tests your port forwarding configuration. It reports success when everything is properly done.
Streamline Connectivity and Calibration.
NDI Test Patterns is a tool designed to facilitate precise audio and video calibration on NDI-enabled devices within your network.
With a range of test patterns and audio tones, this tool ensures accurate color properties and optimal sound levels.
Download NDI Tools here.
and run NDI Test Patterns from the or your applications list.
Upon launching, NDI Test Patterns will instantly share an NDI signal across your network, viewable on other NDI-enabled devices using software like Studio Monitor.
To receive the signal from NDI Test Patterns, right-click on the tool, select the device's name, and choose Test Patterns.
Explore a variety of test patterns by scrolling down the page and selecting the one that best suits your calibration needs.
Click the plus button at the bottom of the screen to add custom images to the list of patterns in NDI Test Patterns.
NDI Test Patterns supports images with embedded alpha, allowing you to load most 32-bit image file formats and use them as sources for overlays in your program.
Enable a one-kilohertz tone accompanying the NDI test pattern signal to test your audio equipment. Choose from various decibel levels to suit your audio calibration requirements.
NDI Router is a tool that enables the routing of NDI video and audio streams to a diverse array of destinations. This tool enables users to:
assign NDI sources to named router outputs quickly.
create presets for recalling router layouts for different shows or sites with just one click.
Elevate Your Webcam Conferencing Experience.
We're always trying to improve our documentation. See something you need but can't find? Leave us some feedback and tell us what you'd like to see. You can find the feedback buttons on the right side of the page 🙂
NDI Webcam Input is a tool that enables you to use any NDI video and audio signal on your network as a webcam source.
This is particularly beneficial for enhancing your video conferencing experience on platforms like Zoom, Microsoft Teams, Skype, and more. By replacing your conventional webcam with professional video production NDI-enabled equipment and software, you can bring graphics, virtual sets, and other visual enhancements to your virtual meetings.
Streamline NDI Source Management.
Your Window to NDI Signals.
NDI Studio Monitor is a tool that allows you to effortlessly view video and audio signals transmitted over your network through an NDI stream.
Studio Monitor is a valuable tool for anyone involved in video monitoring, digital signage, KVM control, recording, PTZ operation, or more.
Download NDI Tools .
Streamline Connectivity and Calibration.
NDI Test Patterns is a tool designed to facilitate precise audio and video calibration on NDI-enabled devices within your network.
With a range of test patterns and audio tones, this tool ensures accurate color properties and optimal sound levels.
Download NDI Tools .
Elevate Your Webcam Conferencing Experience.
As of the we are experiencing issues with Virtual input. If you also find you are having issues, please see the current .
NDI Virtual Input is a tool that enables you to use any NDI video and audio signal on your network as a webcam source.
This is particularly beneficial for enhancing your video conferencing experience on platforms like Zoom, Microsoft Teams, Skype, and more. By replacing your conventional webcam with professional video production NDI-enabled equipment and software, you can bring graphics, virtual sets, and other visual enhancements to your virtual meetings.
In modern networked media environments, efficient discovery and management of NDI® audio and video sources are essential for scalable, low-latency workflows.
The NDI Discovery Service is an OS-managed background process that runs the NDI Discovery Server the centralized registry for NDI sources and receivers and exposes its proprietary API for client access.
It provides a more predictable and scalable method for registering and locating NDI sources and receivers. It is especially valuable in networks where multicast traffic is restricted or discouraged, such as cloud-hosted or enterprise environments.
Streamline Video and Audio Signal Routing.
NDI Router is a tool that enables the routing of NDI video and audio streams to a diverse array of destinations. This tool enables users to:
assign NDI sources to named router outputs quickly.
create presets for recalling router layouts for different shows or sites with just one click.
Starting in NDI version 5, this lists all the network adapters that will be used for network transmission.
One or more NICs can be used to transmit and receive video and audio data. This capability can be used to ensure that the NDI primary stream data remains on a particular group of network adapters, for instance, allowing you to ensure that dedicated audio is on a separate network card from the NDI video. It is generally preferred that you let NDI select the network adapters automatically, which can smartly select which to use and how to choose the ones that result in the best bandwidth.
While in some modes, NDI can automatically balance bandwidth across multiple NICs, it usually is better for you to use NIC teaming at a machine configuration level which can result in much better performance than what is possible in software. If this setting is misconfigured to specify NICs that might not exist, then NDI might fail to function correctly.
Also, please note that the operation of computer systems that are separately on entirely different networks with different IP address ranges is often not handled robustly by the operating system, and NDI might not fully function in these configurations.
Streamline NDI Source Management.
NDI Access Manager is a tool designed to give you control over the visibility and discoverability of NDI sources within your network. This tool allows you to manage precisely who can see specific NDI sources through the utilization of . Ideal for enhancing content-sharing workflows, NDI Access Manager is available for free as part of the NDI Tools package.
Download NDI Tools .
Enable real time, renderless playback and preview over IP.
NDI for Adobe After Effects is a groundbreaking plugin that seamlessly integrates your laptop or workstation into your live production workflow. (Available for Windows and Mac)
By enabling you to send an NDI stream directly from your After Effects timeline, it simplifies the review and approval process, streamlines collaboration between remote teams, and accelerates live-to-air editing workflows.
Download NDI Tools .
Quick acess to all your NDI Tools, and more.
The NDI Launcher is a platform where you can access all the tools you have on your computer. By clicking on any card, you'll open that specific tool. Alternatively, you can find all the tools within your selected folder (by default, they will be installed in the Applications folder).
The following is an ever-growing list of terms that relate directly to products, features, and our connectivity technology in general.
The NDI Discovery Server is a command-line application available for Windows, macOS, and Linux. It allows you to replace mDNS-based automatic discovery with a centralized registry of NDI sources.
This can be very helpful for installations where you wish to avoid having significant mDNS traffic for a large number of sources. It can also be useful when multicast is not possible or desirable; it is very common for cloud computing services not to allow multicast traffic. When using the Discovery Service, NDI can operate entirely in unicast mode and thus in almost any installation. The Discovery server supports all NDI functionality, including NDI groups. Clients should be configured to connect with the Discovery Service instead of using mDNS to locate sources.
When there is a Discovery server, NDI applications will use both mDNS and the Discovery server to find and receive sources on the local network that are not on machines configured to use discovery.
For senders, if a Discovery Service is specified, then mDNS will not be used; these sources will only be visible to other finders and receivers configured to use the Discovery server.
Updated as of Version 6.2
NDI Discovery is a tool that enables you set up and manage Discovery Servers within workflows. We cover the capabilities of in depth in our .
Download NDI Tools .
Share Your Desktop Seamlessly.
NDI Screen Capture is an application designed to effortlessly share your computer's desktop video and audio with any other device on your network through an NDI stream.
Whether you're conducting broadcasts and presentations, collaborating on projects, creating tutorials, or engaging in media playback, Screen Capture provides a valuable solution.
Download NDI Tools .
The following list presents some products that make use of NDI connectivity technology for Audio over IP networking. It will be updated over time, as more relevant products enter the market.
Unleash High-Quality Audio Distribution.
NDI Audio Direct is a collection of VST audio plugins for MS Windows designed to integrate seamlessly with virtually any audio software application, allowing you to harness the power of NDI. (Available for Windows only)
This innovative tool empowers users to select, receive, and generate multichannel audio with exceptional quality and minimal latency.
It facilitates easy Audio over IP, supporting workflow both on-premises and in virtual or cloud environments, and it's compatible with any digital audio workstation through VST plugins.
NDI Apps bring the power of NDI technology directly to your everyday devices. From mobile phones and tablets to desktop computers, these applications make it possible to capture, send, and receive high-quality video and audio across standard networks without the need for specialized hardware.
Whether you’re streaming a live event, collaborating remotely, or extending the reach of your production setup, NDI Apps are designed to make professional-grade connectivity accessible anywhere. By turning consumer devices into fully functional NDI sources and receivers, these apps help bridge the gap between professional broadcast environments and everyday creative workflows.
Capture (coming soon)
Seamless Integration for Live Production.
NDI for Adobe Premiere Pro is a powerful plugin that accelerates live-to-air editing workflows with real-time renderless playback and preview over your network via NDI. (Available for Windows and Mac)
By enabling you to send an NDI stream directly from your Premiere Pro timeline, it simplifies the review and approval process, streamlines collaboration between remote teams, and accelerates live-to-air editing workflows.
Download NDI Tools .
To efficiently transmit audio over IP, the digital audio data is often compressed using a codec (compressor-decompressor). Codecs like AAC, MP3, and Opus are designed to reduce the amount of data needed to represent the audio without significantly compromising quality.
Digital audio is divided into packets, small chunks of data that are transmitted over the network. Each packet contains a portion of the audio signal and metadata for routing and reassembling the audio on the receiving end.
Several protocols are used to manage the transmission of audio over IP. These include RTP for streaming audio, SIP for signaling and controlling communications sessions, and more specialized protocols like Dante, AES67, and Ravenna, each designed for specific use cases and industries.
Synchronization is a critical aspect of Audio over IP systems, ensuring that audio packets from various sources arrive in time and are played back coherently. Synchronization may refer to clock synchronization between endpoints (i.e. the same function as word clock in digital audio), or between channels in a stream. Achieving precise synchronization across a network involves several key mechanisms:
For environments requiring higher precision than NTP, PTP (defined in IEEE 1588) provides sub-microsecond accuracy, making it ideal for professional audio and video applications. Protocols like AES67 and Dante use PTP for clock synchronization between endpoints.
In professional audio environments, it's essential that audio samples are aligned perfectly across multiple streams or channels. This can be achieved through sample-accurate timing information embedded in the audio packets or external clocking mechanisms provided by the AoIP protocol.
To cope with timing variations (jitter) in packet arrival caused by network congestion or path variations, AoIP devices use jitter buffers. These temporarily store incoming packets to realign them into a steady stream before playback, ensuring smooth audio delivery.
Traditional NDI discovery uses mDNS, which works well on smaller networks but can cause congestion or fail in multicast-restricted environments. The Discovery Service introduces a centralized registry model that:
Reduces unnecessary network chatter.
Enables reliable operation across subnets and firewalled segments.
Offers real-time updates and visibility into connected NDI sources and receivers.
Supports enhanced monitoring and control features introduced in NDI 6.2.
Discovery Service is flexible. You can run it as a background service on Windows or Linux or run the Discovery Server as a standalone command-line application. All with minimal resource usage.
Additionally, it can be run on a local machine or hosted remotely to serve multiple clients.
It supports both 32-bit and 64-bit environments (64-bit recommended). Installation packages are available from ndi.video.
NDI clients, including senders, finders, and receivers, can be configured to use the Discovery Service in place of or alongside mDNS. This ensures broader compatibility across different segments of the network. It also means users will have greater control over which sources are visible to specific devices. As part of the 6.2 update, seamless integration using Access Manager or the new NDI Discovery Tool, are both included in the NDI Tools suite.
The NDI SDK includes new APIs that allow developers to query available NDI sources via the Discovery Service and subscribe to real-time updates. You can now also monitor and control receiver connections.
These capabilities unlock tighter integrations with third-party applications and more sophisticated media control workflows. For implementation details, see the SDK documentation under NDI-Recv Discovery, Monitor, and Control.
Click here to view the full Discovery Service documentation in our SDK which includes instructions, configuration options, and command-line usage on both Windows and Linux.
The NDI Discovery Service is designed to allow you to replace the automatic discovery NDI uses (mDNS) with a server that operates as a centralized registry of NDI sources. The NDI Discovery Server is a command-line application available for Windows, macOS, and Linux which provides the NDI Discovery Service. Multiple instances of the NDI Discovery Server can be used to provide redundancy.
This can be very helpful for installations where you wish to avoid having significant mDNS traffic for a large number of sources. It can also be useful when multicast is not possible or desirable. It is very common for cloud computing services not to allow multicast traffic. When using the Discovery Service NDI can operate entirely in unicast mode and thus in almost any installation. The Discovery Service supports all NDI functionality, including NDI groups. Clients should be configured to connect with the Discovery Server(s) instead of using mDNS to locate sources.
When the Discovery Service is available, NDI applications will use both mDNS and the Discovery Server(s) to find and receive sources on the local network that are not on machines configured to use discovery.
720 60p
6.99
640x360 60p
3.99
1080 50i
6.75
640x360 30p
3.00
1080 60i
7.39
640x360 30p
3.00
1080 50p
9.80
640x360 60p
3.99
1080 60p
10.99
640x360 60p
3.99
3840x2160 50i
13.22
640x360 30p
3.00
3840x2160 60i
14.33
640x360 30p
3.00
3840x2160 50p
18.77
640x360 60p
3.99
3840x2160 60p
21.00
640x360 60p
3.99
NO
NO
YES
YES
YES
SoC¹-based receiver with VCU²
NO
YES
YES
NO
NO
YES
SoC²-based receiver with FPGA & VCU²
NO
YES
YES
YES
YES
YES
Software-based receiver
NO
YES
YES
YES
YES
YES
4:2:0
4:2:0
4:2:2
4:2:2:4
FPGA (Supports SHQ in logic), with SoC, without hardware h.26x codec (VCU)³
NO
NO
NO
Rx + Tx
Rx + Tx
RX only
FPGA (Supports SHQ in logic), with SoC, with hardware h.26x codec (VCU)³
TX only
Rx + Tx
Rx + Tx
Rx + Tx
Rx + Tx
RX only
SoC with hardware h.26x codec (no FPGA) — e.g. Ambarella
TX only (by NewTek, EOL)
Rx + Tx
Rx + Tx
NO
NO
NO
Sofware on powerful CPU (GPU acceleration only for NDI HX formats, not SHQ)
RX only on Mac and Windows
Rx + Tx
Rx + Tx
Rx + Tx
Rx + Tx
Rx + Tx
NO
YES
YES
NO
SoC-based Transmitter with VCU²
YES *
YES
YES
NO
NO
NO
SoC-based Transmitter with FPGA & VCU²
YES
YES
YES
YES
YES
NO
Software based Transmitter
YES
YES
YES
YES
YES
YES
1080 60i
25.00
640x360 25/30p
3.00
1080 50p
41.00
640x360 25/30p
3.00
1080 60p
50.00
640x360 25/30p
3.00
3840x2160 50p
70.00
640x360 25/30p
3.00
3840x2160 60p
84.00
640x360 25/30p
3.00
1080 60i
31.00
640x360 25/30p
3.00
1080 50p
52.00
640x360 25/30p
3.00
1080 60p
62.00
640x360 25/30p
3.00
3840x2160 50p
92.00
640x360 25/30p
3.00
3840x2160 60p
110.00
640x360 25/30p
3.00
NDI for Video
NDI for Audio
🛠️ NDI Tools
Utilities
Using NDI with Hardware
Using NDI with Software
🆕 Release Notes
Installing NDI Tools
NDI Tools Launcher
🪟 NDI Tools for Windows
🍏 NDI Tools for Mac
Plugins
720 60p
9.99
640x360 60p
6.00
1080 50i
9.66
640x360 30p
3.99
1080 60i
10.59
640x360 30p
3.99
1080 50p
14.20
640x360 60p
6.00
1080 60p
15.99
640x360 60p
6.00
3840x2160 50i
19.11
640x360 30p
3.99
3840x2160 60i
20.66
640x360 30p
3.99
3840x2160 50p
26.88
640x360 60p
6.00
3840x2160 60p
30.00
640x360 60p
6.00
720 50p
9.11
640x360 60p
3.99
Resolved an issue where NDI Webcam would stop receiving video from the NDI HX Camera app when the camera resolution was changed.
Corrected video preview rendering in NDI Webcam to properly respect the source aspect ratio.
Fixed NDI Router terminating active streams upon application closure.
Fixed a localization issue in the NDI Bridge statistics window.
Fixed a crash that could occur when destroying an NDI receiver during an active connection attempt to a source. Improved handling of deinterlacing in NDI Studio Monitor.
A new 'deinterlacing' option has been added to the Video Settings menu.
Fixed incorrect byte order handling when using NDIlib_recv_color_format_RGBX_RGBA.
Fixed an issue where NDI output from Adobe Premiere could change resolution when clips on the timeline ended.
Resolved an issue where NDI Bridge could incorrectly select a temporary GPU adapter, which might become unavailable when remote desktop sessions end.
Fixed a potential issue where an NDI Finder could block indefinitely in certain environments.
Removed the NDI Remote application from the NDI Tools Suite. See here for more details
Addressed a localization issue that skewed statistics in NDI Bridge.
Usage of incorrect units for packet lost metric in NDI Bridge statistics window.
Issue where the NDI Bridge host could crash during stream cleanup or closure.
Fixed a potential crash in the NDI VST output plugin when used with certain DAW applications.
Issue where audio frameworks could fail to load at runtime on macOS, causing Free Audio to detect no audio devices.
Improved single-TCP sending performance by using scatter-gather to reduce per-message ACKs.
Local mode now includes an option to configure the local send group for bridge sources.
Resolved an issue where NDI Bridge failed to auto-start in Local mode.
Fixed a potential deadlock when closing an NDI Bridge stream in Join mode.
Corrected NDI Test Patterns to ensure the full Rec.709 color range is output for imported images (Windows).
Fixed an issue with NDI Remote when enumerating system audio devices.
Resolved a potential issue in NDI Studio Monitor when rendering test patterns with alpha transparency.
Enabled high bit-depth decoding in NDI Studio Monitor for streams with BT.2020 color primaries.
Added support for higher color depth when playing SDR files using the VLC player with the NDI output plugin enabled.
Fixed audio driver stability issues with NDI Webcam.
Resolved an issue with loading the NDI output plugin for Final Cut Pro on newer macOS versions.
NDI Video Monitor on Mac was not playing audio.
Ensured correct permissions were set on the NDI Runtime installer on MacOS.
Resolved an issue where the NDI Tools registration state was not being saved correctly.
The NDI Advanced SDK includes a new NDI Bridge Utility for hardware (currently available for Linux), with comprehensive guidance on its use.
NDI Recorder utility enhanced to capture NDI HDR streams.
NDI Screen Capture HX (Windows) has received support for HDR screens and 10-bit HEVC.
NDI Analysis in Frame Checker mode will now output HDR color information if present.
Install NDI Tools and run NDI Studio Monitor from the NDI launcher or your applications list.
The application launches as a pop-up window, providing an IP address or QR code for remote control from another device on the same network.
Click on the NDI button on the top menu bar to browse a list of devices broadcasting over NDI. Then, you can select any channel to view the video and audio in real-time.
If your desired source is not listed, ensure that the equipment is on the correct network and configured properly.
Explore the Settings tab to customize your viewing experience:
Low Bandwidth: Optimize viewing NDI sources in low bandwidth contexts.
Mute: Mute audio from the selected NDI source.
Set Record Path: Specify the location where recorded files will be saved.
Allow Receiver Advertising: Makes Video Monitor available for monitoring when using Discovery Server.
Initiate recordings by clicking the red button in the top right corner of the application.
PTZ Control: Take advantage of NDI Video Monitor's capability to remotely control PTZ cameras. Select the NDI camera source under the NDI tab and access PTZ Control under Settings. Manipulate camera movement and store preset positions for quick recall.
Device Web Page: Access the web page of certain NDI-enabled cameras and devices for configuration changes.
To open multiple instances of Video Monitor on Mac use the command open -a "NDI Video Monitor.app" -n on Terminal
An NDI Tool that allows you to connect and share NDI streams between remote NDI infrastructures across a WAN.
A software application that stores and shares the discoverability information of NDI senders. It is an alternative to the default discovery and registration method in NDI based on mDNS and does not require multicast.
The service provided by NDI Discovery Server.
A version of NDI bridge capable of connecting an NDI stream from an embedded NDI device to an NDI Bridge host via a WAN
Two specific video codecs which are used for the NDI HX formats
A sender or receiver, typically audio and/or video, that can be connected to another device, potentially something other than NDI but able to send or receive NDI streams. A single NDI sender/receiver can support multiple inputs and outputs and each of which could support audio, video, metadata or a combination. This is part of the negotiation between receiver and sender.
The terms input and output should be avoided in an NDI context and the terms Sender and Receiver should be used instead as these are NDI standard terms
Basic unit of data transmission in H.264/H.265 systems
A software component in the SDK used to find NDI senders and/or other devices on a network.
NDI genlock supports using an NDI signal as a timing reference for software applications which otherwise lack an internal video timebase
A way to organize NDI devices to filter NDI senders using NDI discovery service for easier management and discovery
In an NDI system usually refers to a Speed HQ based NDI stream. Potentially could refer to the NDI sender to sending a proxy or a full stream.
Encompasses all previous versions of HX.
An NDI premium product and one of our high efficiency formats.
In the NDI context a router is an NDI SDK instance that can map NDI streams to alternate senders.
An NDI connection between two or more hosts that negotiate the start of data transmission. The negotiation primarily concerns the transmission protocol (TCP, UDP, mTCP, or RUDP), codec and the type of stream, either video, audio, metadata or a combination of the three.
A device or application (NDI SDK instance) able to receive an NDI stream.
A device, application or NDI SDK instance able to send an NDI stream.
The original proprietary codec used with NDI.
iPhone 17 startup crash
Low quality NDI stream not restarting after format change
iOS26 Liquid Glass UI fixes and updates
Locked white balance controls on lenses that do not support it
Various efficiency improvements
Added PAL and Cinema frame rate support (24, 25, 48, and 50)
Added video rotation override
Ensure that Adobe Premiere Pro is installed on your machine.
Install NDI Tools on your machine.
Open or start a new project in Adobe Premiere Pro.
Go to the top of the screen, select Edit, then navigate to Preferences and choose Playback.
Enable Mercury Transmit by selecting the checkbox.
Select NDI output and click OK to apply the settings.
Click play or scrub through your Premiere Pro timeline.
Your project's video and audio output will be displayed in real-time across your network.
Use NDI-enabled software, such as NDI Studio Monitor, to view these sources.
Right-click on NDI Studio Monitor, choose the transmitting device's name and select Adobe After Effects.


Check Main Output and/or Preview Output
(Optional) Give the output a name (e.g., "OBS-StreamPC")


open -a "Terminal" "/Library/NDI SDK for Apple/bin/Application.Mac.NDI.DirectoryService"Download NDI Tools here.
Install NDI Tools and run NDI Router from the NDI launcher or your applications list.
The NDI Router interface comprises four main components:
Preview Pane: Located in the center, it displays the source routed to the selected destination.
Source Buttons: On the left of the preview pane, these buttons can be easily assigned to any NDI stream.
Destination Buttons: To the right of source buttons, these identify router outputs.
Preset Buttons: Positioned at the far right, these buttons enable the effortless recall of complete router layouts.
NDI Router can manage up to 64 sources and 64 destinations. To configure it, click on the gear icon in the upper right corner of the application to activate configuration mode.
Once configuration mode is activated, sources, destinations, and preset buttons can be added by clicking on the icons highlighted below.
After exiting configuration mode, it is possible to define sources and destinations.
NDI Router creates virtual outputs, which are then used as sources for NDI receivers. By selecting the NDI sources, the NDI Router routes the NDI stream by directly connecting an NDI transmitter with a receiver without any stream passing through the NDI Router.
Sources can be managed and configured by right-clicking over a Source button. In this configuration panel, you can select the NDI sources that will be routed to the destination and define some extra settings like the button label, the text, and the background color.
Destinations can be managed and configured by right-clicking over a Destination button. In this configuration panel, you can define the NDI Virtual Stream name that will be received by the destination and some extra settings like the button label, the text, and the background color.
NDI receivers will be connected to the NDI Router's virtual output. Subsequently, in the NDI Router, select the destination button followed by the source button. The NDI stream will then be sent from the sources to the NDI receivers, which are virtually connected to the router.
Was this helpful? Please let us know by rating this page; you can also leave a review.
Download NDI Tools here.
Install NDI Tools. After installing it, access NDI Webcam Input from the NDI Launcher or your applications folder. Once started, the program will appear in your system tray on Windows at the bottom of the screen.
Right-clicking on the NDI Webcam Input in the system tray reveals a list of devices streaming NDI. Hover over each source to preview and select any channel being sent from that device.
By selecting an NDI channel, it will become available as a source in conferencing applications. In your conferencing software's video input settings, choose NDI video, and you're ready to go.
You can personalize your stream with additional configuration options.
Audio Settings Tab:
Adjust volume levels for your webcam destination, and choose the grouping of channels if your NDI output has multiple channels.
Video Settings Tab:
Send custom resolutions (e.g., 480p, 720p, 1080p) to your webcam destination.
Install NDI Tools and run NDI Access Manager from the NDI launcher or your applications list.
In the "Groups" tab, create different NDI groups (by clicking the plus sign icon) to determine which devices can send or receive specific NDI signals.
In this screenshot, the group "Public" can both receive and send, meaning any device can see the output NDI signals of this computer, and it can also see any other device in the same group "Public".
To configure a group, you should attribute it to a name. You can also add a small memo/note with additional information about the group.
By entering group names, you restrict NDI sources to only those devices that have the corresponding Group in their Receive Groups list.
If you want to explore some examples of how to connect different devices to NDI Groups, check the scenarios in our White Paper.
Use the External Sources tab to reach NDI-enabled devices on subnets that are not on your current network.
Add external sources by specifying IP addresses, providing easily identifiable names, and managing settings.
Explore advanced settings in the "Advanced" tab to address specific network challenges:
Configure transport modes, multicast ranges, network mapping, and more.
To streamline the management of NDI signals, particularly in larger networks, designate an NDI discovery server, set preferred NICs, and define device aliases.
NDI Access Manager settings are saved into a specific file in the computer's operating system. All NDI applications will look for this file when they first start to get the NDI configuration data. If this file is updated while an NDI application is running, it will continue to use the previous information. To refresh the settings for an NDI application, restart it again which will make it read the file and get the new settings.
The NDI Access Manager configuration file is stored in the following location:
%programdata%/NDI/ndi-config.v1.json
Always ensure network configurations align with IT guidelines for better network compatibility and optimal performance. Consult with your IT department before configuring NDI Access Manager.
Install NDI Tools and run NDI Test Patterns from the NDI launcher or your applications list.
Upon launching, NDI Test Patterns will instantly share an NDI signal across your network, viewable on other NDI-enabled devices using software like Studio Monitor.
Right-click on the NDI Studio Monitor tool, select the device's name and choose Test Patterns to receive the signal from NDI Test Patterns.
Explore a variety of test patterns by scrolling down the page and selecting the one that best suits your calibration needs.
Click the plus button at the bottom left of the screen to add custom images to the list of patterns in NDI Test Patterns.
NDI Test Patterns supports images with embedded alpha, allowing you to load most 32-bit image file formats and use them as sources for overlays in your program.
Enable a one-kilohertz tone accompanying the NDI test pattern signal to test your audio equipment. Choose from various decibel levels to suit your audio calibration requirements.
After installing NDI Tools, access NDI Virtual Input from the NDI Launcher or your applications folder.
Download NDI Tools here.
While launching NDI Virtual Input for the first time, you will be prompted to install the NDI Virtual Camera extension before using the application. This is a needed step for macOS to recognize the application as a virtual camera you can access system-wide.
Important
The system dialogue will prompt you with two options. Although the highlighted button is 'OK', you must click on 'Open System Settings' to proceed to install the extension.
If the 'OK' button is clicked, you must access the Camera Extension settings manually. Find them in System Settings > General > Login Items & Extensions > Camera Extensions (click on i icon)
If NDI Virtual Camera still doesn't work after a correct install, you may be facing a known issue where macOS has multiple versions of the camera extension installed. We are actively working towards fixing this issue, please read the hotfix we have in place.
Hover over each source to select any channel being sent from that device. Sources can be previewed on the area above the dropdown selector.
By selecting an NDI channel, it will become available as a source in conferencing applications. In your conferencing software's video input settings, choose NDI Virtual Camera, and you're ready to go.
provide user-friendly controls for ease of use.
Download NDI Tools here.
Install NDI Tools and run NDI Router from the NDI launcher or your applications list.
The NDI Router interface comprises four main components:
Preview Pane: Located in the center, it displays the source routed to the selected destination.
Source Buttons: On the left of the preview pane, these buttons can be easily assigned to any NDI stream.
Destination Buttons: To the right of source buttons, these identify router outputs.
Preset Buttons: Positioned at the far right, these buttons enable the effortless recall of complete router layouts.
NDI Router can manage up to 64 sources and 64 destinations. To configure it, click on the gear icon in the upper right corner of the application to activate configuration mode.
Once configuration mode is activated, sources, destinations, and preset buttons can be added by clicking on the icons highlighted below.
After exiting configuration mode, it is possible to define sources and destinations.
NDI Router creates virtual outputs, which are then used as sources for NDI receivers. By selecting the NDI sources, the NDI Router routes the NDI stream by directly connecting an NDI transmitter with a receiver without any stream passing through the NDI Router.
Sources can be managed and configured by right-clicking over a Source button. In this configuration panel, you can select the NDI sources that will be routed to the destination and define some extra settings like the button label, the text, and the background color.
Destinations can be managed and configured by right-clicking over a Destination button. In this configuration panel, you can define the NDI Virtual Stream name that will be received by the destination and some extra settings like the button label, the text, and the background color.
NDI receivers will be connected to the NDI Router's virtual output. Subsequently, in the NDI Router, select the destination button followed by the source button. The NDI stream will then be sent from the sources to the NDI receivers, which are virtually connected to the router.
Here is the way to manually setup NIC Selection in the configuration file:
},
"adapters": {
"allowed": [
"192.168.30.8,10.10.122.123"
]
Using the NIC selection, in combination with the Discovery Server, is ultimately the best solution for controlling the NDI network.
You might need to enable hidden files on Mac. Click [CMD SHIFT .]
Here are additional steps operators can take to help direct NDI traffic through a preferred NIC:
Access Manager: While Access Manager sets preferences, combining it with the following methods can give the selection more weight.
NIC Metrics: Adjust the metrics for each NIC in the network settings. Lower metrics will prioritize that NIC for traffic.
VLANs can assist with managing NIC traffic in the following ways:
Traffic Segmentation: VLANs segment network traffic, ensuring that specific types of traffic are isolated and routed through the desired NIC.
Improved Control: By assigning different VLANs to different NICs, you can control which NIC handles specific traffic types. This can be particularly useful for separating NDI traffic from other network traffic.
Enhanced Security: VLANs can improve security by isolating sensitive traffic and reducing the risk of unauthorized access.
Simplified Management: VLANs can simplify network management by allowing you to configure and manage traffic routing more efficiently.
Firewall Rules: You can use firewall rules to block NDI traffic on the NIC you don't want to use. This can force the traffic to go through the preferred NIC.
Set Up a Discovery Server: Configuring a Discovery Server on the network you want to use for NDI can help keep the traffic on that subnet. If deploying multiple redundant discovery servers, ensure that all discovery servers reside on the desired subnet.
Install NDI Tools and run NDI Access Manager from the NDI launcher or your applications list.
First, select the Receive Groups or Send Groupstabs to determine if you are creating NDI groups that allow devices to send or receive specific NDI signals. Them, create a new NDI group by clicking New.
To configure a group, you should attribute it to a name. You can also add a small memo/note with additional information about the group.
By entering group names, you restrict NDI sources to only those devices that have the corresponding Group in their Receive Groups list.
If you want to explore some examples of how to connect different devices to NDI Groups, check the scenarios in our White Paper.
Use the External Sources tab to reach NDI-enabled devices on subnets that are not on your current network.
Add external sources by specifying IP addresses, providing easily identifiable names, and managing settings.
Explore advanced settings in the "Advanced" tab to address specific network challenges:
Configure transport modes, multicast ranges, network mapping, and more.
To streamline the management of NDI signals, particularly in larger networks, designate an NDI discovery server, set preferred NICs, and define device aliases.
NDI Access Manager settings are saved into a specific file in the computer's operating system. All NDI applications will look for this file when they first start to get the NDI configuration data. If this file is updated while an NDI application is running, it will continue to use the previous information. To refresh the settings for an NDI application, restart it again which will make it read the file and get the new settings.
The NDI Access Manager configuration file is stored in the following location:
Mac
$HOME/.ndi/ndi-config.v1.json
Linux
$HOME/.ndi/ndi-config.v1.json
Always ensure network configurations align with IT guidelines for better network compatibility and optimal performance. Consult with your IT department before configuring NDI Access Manager.
Install NDI Tools on your machine.
Open or start a new project in Adobe After Effects.
On Windows, navigate to the top of the screen and select Edit > Preferences > Video Preview
OR
On a Mac, open Video Preview Preferences in After Effects and enable NDI in the Video Preview Section.
Enable Mercury Transmit by checking the box.
Select NDI output from the options.
Click OK to apply the settings.
Click play or scrub through your After Effects timeline.
Your project's video and audio output will be displayed in real-time across your network.
Use NDI-enabled software, such as NDI Studio Monitor, to view these sources.
Right-click on NDI Studio Monitor, choose the transmitting device's name and select Adobe After Effects.
This helps us keep improving your experience as a user. You can also subscribe to our mailing list to keep receiving exclusive updates and news about community initiatives by checking the box at the bottom.
By default, your NDI channels are public. This means they will be available for anyone to access as long as they are connected to the same network as you. Group privacy can be enabled in two simple steps:
Click the Privacy box at the top right corner of the launcher.
Replace "Public" on the NDI Group Name field with a personalized group name to enable privacy for your group.
You can then share this name with others so they can enter your private group.
You can learn more about NDI Groups in our white paper.
In the NDI launcher for Windows, you can set up some tools to be launched automatically every time you start your computer. This could save you some time when setting up workflows.
Check the boxes to select which tools you want to launch automatically.


Within NDI version 5, there is full support for redundant NDI Discovery servers. When configuring a Discovery server, it is possible to specify a comma-delimited list of servers (e.g., “192.168.10.10, 192.168.10.12”), and then they will all be used simultaneously. If one of these servers then goes down, as long as one remains active, then all sources will always remain visible, no matter what the others do, then all sources can be seen.
This multiple-server capability can also be used to ensure entirely separate servers to allow sources to be broken into separate groups, which can serve many workflows or security needs.
Once two NDI devices have discovered each other on the network, video can be passed from the sending device to the receiving device. After the compression of the video, the NDI sending device opens a session to the receiving NDI device. At this point, we have two endpoints that consist of an IP address and a port number.
In Windows and MacOS, the Discovery Server addresses are configured in the Advanced Feature Tab. On Linux, however, the addresses of the NDI Discovery Servers can be manually added in the NDI configuration file, which is stored in a hidden folder named ".ndi" within the home directory of the effective user. The configuration file is named "ndi-config.v1.json".
Here is the way to manually set up the Discovery Service in the configuration file:
NDI Discovery Service to control devices' discoverability.
As mentioned above, with NDI 5, we enabled support for multiple NDI Discovery Servers. NDI Receivers can now specify a comma-delimited list of Discovery Servers (e.g., "192.168.25.10, 192.168.25.12"), and they will all operate simultaneously. Only devices explicitly registered with a Discovery Server will be visible to other clients configured to use that same server.
Moreover, an NDI Discovery Server can be connected to multiple network interfaces and supports multiple subnets. Using multiple servers and subnets allows sources to be organized into distinct areas. These areas can cater to various workflows and security requirements.
Here is an example that explains how multiple Discovery Servers can be used for control device discoverability:
Spinning up or shutting down the Discovery Servers with IP Address 192.168.25.243 - 192.168.25.244 - 192.168.25.245 will turn on or off discoverability between the 3 NDI areas.
The example above is related to multiple Discovery Servers in a single subnet.
However, the Discovery Server can be connected and shared between different subnets.
Discovery Servers can be easily deployed on Linux-based virtual machines, and the process of spinning up or shutting down Discovery Servers can be efficiently automated and managed by solutions like Terraform.
As of NDI 6.2, the Discovery Tool provides a GUI to monitor NDI senders and receivers registered to a Discovery Service.
Install NDI Tools. After installing it, access NDI Discovery from the NDI Launcher or your applications folder.
Once you've installed Discovery check out our Getting Started with Discovery guide. For high level introduction on how Discovery works read this guide on Receiver Discoverability, Monitoring, and Control.
Displays all NDI sources (“senders”) that have registered with the Discovery Server. Each sender entry shows its device name/hostname, the network address, and port it is streaming from. Devices appear grouped by hostname. This tab helps you quickly see which NDI devices are currently available to provide streams on your network.
Shows all NDI receivers (endpoints listening for NDI streams) recognized by the Discovery Server. Devices are also grouped by hostname under receivers. This is especially useful when troubleshooting or confirming which machines are actively listening for NDI streams.
From the dropdown carrot under Receivers you can specify the source for that receiver
You can configure or change the Discovery Server IP and port. You can also see whether the application is connected to a Discovery Server and at which IP/port.
For first time set up, when using with Video Monitor for the first time be sure to select the Allow Receiver Advertising and Allow Receiver Control from the settings
Check out
Install NDI Tools and run NDI Screen Capture from the NDI launcher or your applications list.
The tool will appear in your system tray with the NDI logo. Upon launch, your computer's desktop video and audio are viewable from any NDI-enabled device on your network.
View the output of Screen Capture on another NDI-enabled device using an application like Studio Monitor.
Right-click on the screen and select the device name and corresponding NDI stream.
Right-click on the NDI Screen Capture icon to access different settings:
Framerate This option allows to specify the NDI stream framerate.
Capture Settings With this setting, the user can choose to capture the full screen or specify a particular area for capture (Region of Interest). Another option is to define the visibility of the mouse pointer.
Audio Source Specify a particular audio source to be embedded into the NDI stream created by NDI Screen Capture.
Webcam Video Source NDI Screen Capture enables the creation of an NDI stream using a webcam.
Webcam Audio Source Specify a particular audio source to be embedded into the NDI stream created by the webcam option.
KVM Control The KVM option in NDI Screen Capture allows for remote computer control over a network. When this feature is enabled, you can not only capture and send the computer's screen over the network using NDI but also remotely control the computer's keyboard and mouse inputs from another device.
Help Access the Screen Capture Help Assistant and a quick web link to for more information about NDI and NDI Tools.
Avsono
Salsa Sound
Telos Alliance
Waves
On-Hertz
It's important to note that, in addition to the software listed, any product (hardware or software) sending or receiving video over NDI is also, in essence, doing the same for audio.
NDI
Audio Direct VST3 Plugins NDI Free Audio (distributed with the NDI SDK) NDI Screen Capture NDI Virtual Input
Mackie
LAMA
Install NDI Tools. After installing it, access NDI Audio Direct from any digital audio workstation program.
By default, the NDI Audio Direct VST plugin is installed on C:\Program Files\Common Files\VST3. You can set your software's VST plugin location to this path or copy them to a folder of your choice.
In your DAW application, look for the VST plugin settings menu (the location is specific to each DAW) and check if the VST3 path is correctly configured, then perform the plugin re-scan. This will load the NDI Plugin in the DAW application.
Here is the Plugin Management interface in Ardour:
When you load the NDI Input plugin in your DAW, you'll see a menu to configure the following settings:
NDI source
Number and configuration of Audio Channels: NDI Audio Direct supports up to 16 audio channels in different configurations.
Audio Level: You can adjust the source level to match your DAW level setting.
When you load the NDI Output plugin in your DAW, you'll see a menu to configure the following settings:
The NDI Output
Number and Audio Channels configuration: NDI Audio Direct supports up to 16 audio channels in different configurations.
Audio Level: You can adjust the source level to match your level destination.

NDI uses both TCP and UDP ports for handling inbound and outbound traffic. For example, ports in the range of 5960 and up are used for both TCP and UDP connections, allowing for efficient data transmission and reception.
5353
UDP
This is the standard port used for mDNS communication and is always used for multicast sending of the current sources onto the network.
Digital video involves capturing, processing, compressing, storing, and transmitting moving visual images in digital form. Understanding digital video requires knowledge of several key concepts, including chroma subsampling, bit depth, and color spaces such as YCbCr and RGB. These elements are crucial for balancing video quality with bandwidth requirements, particularly in video transmission.
Color space refers to the method of representing the range of colors. YUV and RGB are two primary color spaces used in digital video.
RGB is based on the primary colors of light (Red, Green, and Blue) and is used primarily in devices that emit light directly, like computer monitors, TVs, and cameras. It represents colors by combining these three colors at various levels of intensity, suitable for applications where precise color representation is crucial.
Color space refers to the method of representing the range of colors. YUV and RGB are two primary color spaces used in digital video.
In the YUV color space, the Y component represents the luminance, or brightness, of the color, which is essentially a grayscale representation of the image. The U and V components represent the chrominance, or color information, separate from the luminance. Specifically: U (Chrominance-B): The U component indicates the difference between the blue component and the reference luminance (Y). Essentially, it represents the blue projection of the color minus its luminance. This helps in determining how blue or how opposite of blue (which can be interpreted as yellowish) the color is. V (Chrominance-R): The V component indicates the difference between the red component and the reference luminance (Y). It represents the red projection of the color minus its luminance. This component helps determine how red or how opposite of red (which can be interpreted as greenish) the color is.
The U and V components do not directly correspond to specific colors but rather to the chromatic difference from the luminance. By adjusting these components, you can shift the hue and saturation of a color. The Y component ensures that the brightness of the color is maintained independently of its hue and saturation, which is particularly useful in broadcasting and video compression technologies where luminance is more critical to the perceived quality of the image than color details. This separation allows for more efficient compression by reducing the resolution of the U and V components relative to the Y component, exploiting the human visual system's lower sensitivity to fine details in color compared to brightness. To make it simple the U component in the YUV color space essentially represents the color spectrum between blue and its complementary color, which can be seen as a range from blue to yellow-green. This range is not about moving directly from blue to red but rather moving from blue towards green and red, where the midpoint might represent less saturation or a neutral point where the blue influence is minimized. Similarly, the V component represents the spectrum between red and its complementary colors, moving from red towards blue and green, where its midpoint could represent a neutral point with minimized red influence, potentially leaning towards cyan or green.
In essence, the U component controls the blue-yellow balance, while the V component controls the red-cyan (or red-green) balance. By adjusting these two components along with the Y (luminance), you can navigate through the color space to represent a wide range of colors.
The choice between YUV and RGB in a digital video workflow depends on the application's requirements. YUV is typically used for video compression and transmission, where bandwidth efficiency is paramount. In contrast, RGB is used in contexts where accurate color representation and direct control over each primary color are needed, such as in content creation and display technologies.
With YUV color space it is possible to use the chroma subsampling as a method to spatially reduce the color information in a signal while retaining the luminance data. This technique leverages the human visual system's characteristic of being more sensitive to variations in brightness (luminance) than to color (chrominance). By reducing the amount of color information, chroma subsampling significantly lowers the bandwidth and storage requirements for video data without substantially impacting perceived image quality. Video signals consist of luminance information, which represents the brightness levels, and chrominance information, which represents the color. Chrominance is further divided into two components, U and V Chroma subsampling is expressed in a notation like 4:2:2, 4:2:0, 4:4:4, etc. where the first number (4 in these examples) refers to the reference number of luminance samples in the first row of a 2x2 block of pixels.
The second number indicates the number of chrominance samples (U and V) in the first row of pixels, showing how many color samples are taken compared to the luminance samples. The third number indicates the number of chrominance samples in the second row of pixels.
4:4:4 subsampling means that no chroma subsampling is applied. Every pixel has its own color information, resulting in the highest quality but also the largest bitrate.
4:2:2 subsampling reduces the color information by half horizontally but keeps full-color information in the vertical direction. It's a common compromise between quality and bandwidth used in professional video environments.
4:2:0 subsampling reduces the color information by half both horizontally and vertically, which is widely used in consumer video formats (e.g., Blu-ray, DVD, streaming media PTZ and Prosumer Cameras) because it significantly reduces the bitrate with minimal visible loss of quality.
4:1:1 subsampling reduces the color information by a quarter of the horizontal resolution and keeps full-color information in the vertical direction.
Alpha Channel:
The YUVA color space is an extension of the YUV color space that includes an Alpha channel. In color spaces, the Alpha channel represents the opacity of a color, allowing for varying levels of transparency and compositing images over one another.
The alpha channel sampling is usually the same as the luminance and is expressed in a notation like 4:2:2:4, 4:2:0:4, 4:4:4:4, etc.
Bit depth, also known as color depth, refers to the number of bits used to represent the color of a single pixel in a digital video. Higher bit depth allows for more colors to be displayed, resulting in more detailed and nuanced images. Common bit depths include:
8-bit: Capable of displaying 256 shades per channel (YUV), resulting in 16.7 million colors in total.
10-bit: Can display 1,024 shades per channel, offering over a billion colors. This greater range allows for finer gradients and more detailed color representation, reducing banding in video images.
Your Window to NDI Signals.
NDI Studio Monitor is a tool that allows you to effortlessly view video and audio signals transmitted over your network through an NDI stream.
Studio Monitor is a valuable tool for anyone involved in video monitoring, digital signage, KVM control, recording, PTZ operation, or more.
Download NDI Tools here.
and run NDI Studio Monitor from the or your applications list.
The application launches as a pop-up window, providing an IP address or QR code for remote control from another device on the same network.
Click on the menu in the top left or right-click anywhere on the Studio Monitor window.
A list of devices broadcasting over NDI will appear, and you can select any channel to view the video and audio in real-time.
By clicking on the top menu or right-clicking anywhere on the Studio Monitor window, you'll be able to access the settings that you can customize to your needs. You can find a list of all available settings below.
If you experience dropped frames (indicated by the red bar) you can check in
Run a new NDI Studio Monitor to open a second instance of Studio Monitor.
Run at Windows Start is helpful for setting up a digital signage system.
Allow Web Control
Define the soundcard for audio output.
Silent, mute, or unmute audio output.
Adjust the output audio level.
Show the NDI source's Alpha Channel
Show a background checkerboard
Enable a center cross overlay
Quickly output video directly from your Final Cut Pro timeline.
NDI Output for Final Cut Pro is a groundbreaking plugin that seamlessly integrates your laptop or workstation into your live production workflow. (Available for Mac only) By enabling you to send an NDI stream directly from your Final Cut Pro timeline, it simplifies the review and approval process, streamlines collaboration between remote teams, and accelerates editing workflows.
Download NDI Tools here.
Install on your machine.
Open or start a new project in Final Cut Pro.
Configure Sound Preferences
Go to Sound in System Preferences on your Mac.
Use NDI-enabled software, such as , to view these sources.
Right-click on , choose the transmitting device's name and select Final Cut Pro.
This guide will explain how to get set up with NDI Tools application, Discovery Server and Studio Monitor on a Windows machine
(Optional) If you want to run the Discovery Server as a Windows Service then you'll need to install the stand alone Discovery Server package.
The Discovery Service is only available for Windows and Linux. The screenshot below is the setup for Windows.
Install the Discovery Server package. During installation, you must specify the IP address and port for the Discovery Service.
You can use 127.0.0.1 (localhost) as the IP if you are only testing with receivers on the same machine. Otherwise, you must specify the IP address of the machine where the Discovery Server is running.
The port can be left at the default value unless a different port is needed.
The Discovery Service will start automatically
Install the .
Launch and complete the registration form (if not already done).
Launch
In the Advanced tab under Network Mapping enable Discovery Servers
Input the IP address of the Discovery Server and click Apply.
Launch Discovery from
Go to the Settings tab.
If you configured the Discovery Server IP in Access Manager in the previous step, then you should select and enable Use Access Manager Settings.
Launch
Click on the Menu button on the top left. Select Settings.
Click and enable Allow Receiver Advertising.
In the Discovery Application
You should now see the Studio Monitor receiver in the Discovery application.
Receivers will be grouped by hostname first.
720 50p
96.94
Step-by-step Guide
We're always trying to improve our documentation. See something you need but can't find? Leave us some feedback and tell us what you'd like to see. You can find the feedback buttons on the right side of the page 🙂
Installing NDI Tools is easy: it requires only a couple of simple actions. In case you are not sure how to do it, follow this step-by-step guide to install and run the most updated collection of NDI Tools as fast as possible. Before you know it, you'll be using NDI to connect your video workflows.
If you plan to use NDI Tools for commercial purposes please contact our
Just open your preferred web browser and type in your address bar. This will take you to our NDI Tools page, where you can explore and dive into the complete collection of NDI Tools we have to offer.
Make sure you download NDI Tools only through the official NDI website. Other websites might offer NDI Tools downloads, but only the official page will guarantee that you are downloading the most updated release of our tools.
By clicking the "Download NDI Tools" button, you'll enter the page. This includes all the NDI Tools and plugins you need to set up, test, and manage your NDI workflow. On this page, you'll be able to explore a list of all included tools in NDI Tools (both for the Windows and Mac versions) and understand the minimum requirements to install it on your computer.
On the top right side of the NDI Tools download page, you'll find a menu with two buttons. Select the one that corresponds to your operating system, and you'll be prompted to save the NDI Tools Installer in a location of your choice.
The installation steps include reading and agreeing with a and selecting the location where the tools should be installed. Now, you're ready to install NDI Tools.
You can now find all the different NDI Tools within your selected folder (by default, they will be installed in the Applications folder). Besides the NDI Tools, you can also open the , which offers an overview of all the tools, as well as some additional features.
If you'd like to learn more about each tool, but also CLI Tools and Plugins, be sure to explore the additional documentation and tutorials by navigating the left menu.
Thank you for connecting with NDI.
This guide will explain how to get set up with NDI Tools application, Discovery Server and Studio Monitor on a Windows machine
(Optional) If you want to run the Discovery Server as a Windows Service then you'll need to install the stand alone Discovery Server package.
The Discovery Service is only available for Windows and Linux. The screenshot below is the setup for Windows.
Install the Discovery Server package. During installation, you must specify the IP address and port for the Discovery Service.
You can use 127.0.0.1 (localhost) as the IP if you are only testing with receivers on the same machine. Otherwise, you must specify the IP address of the machine where the Discovery Server is running.
The port can be left at the default value unless a different port is needed.
The Discovery Service will start automatically
Install the .
Launch and complete the registration form (if not already done).
Launch
In the Advanced tab under Network Mapping enable Discovery Servers
Input the IP address of the Discovery Server and click Apply.
Launch Discovery from
Go to the Settings tab.
If you configured the Discovery Server IP in Access Manager in the previous step, then you should select and enable Use Access Manager Settings.
Launch
Click on the Menu button on the top left. Select Settings.
Click and enable Allow Receiver Advertising.
In the Discovery Application
You should now see the Studio Monitor receiver in the Discovery application.
Receivers will be grouped by hostname first.
Includes Alpha Channel
720 50p
121.18
NDI High Bandwidth is I-frame only.
NDI encoders offer a proxy stream with lower resolution and higher compression, and applications can use the proxy stream for preview, reducing network usage and processing requirements.
We're always trying to improve our documentation. See something you need but can't find? Leave us some feedback and tell us what you'd like to see. You can find the feedback buttons on the right side of the page 🙂
The following guides provide detailed information about our suite of NDI Tools for Mac, including their features, capabilities, and practical applications. From setup instructions to advanced tips, these resources are designed to help you maximize the potential of NDI technology in your workflows.
Click on a card to discover more about the functions and features of each NDI Tool. You can
If you're unsure about a process for Mac check out the . You can also check out our and our for common questions and troubleshooting guides
You can find information on how to uninstall NDI Tools on the official
We're always trying to improve our documentation. See something you need but can't find? Leave us some feedback and tell us what you'd like to see. You can find the feedback buttons on the right side of the page 🙂
The following guides provide detailed information about our suite of NDI Tools for Windows, including their features, capabilities, and practical applications. From setup instructions to advanced tips, these resources are designed to help you maximize the potential of NDI technology in your workflows.
Looking for NDI Analysis? Analysis is currently not available on the Tools Launcher. You can download it
Click on a card to discover more about the functions and features of each NDI Tool. You can
You can find information on how to unintall NDI Tools on the official

NDI Tools is available for both Windows and macOS, but the platforms do not offer identical utilities or the same feature depth. Both operating systems include the core tools needed to configure, route, and monitor NDI streams. However, several applications are platform-specific, and even shared tools may differ in implementation or capability. Understanding these differences is important when designing workflows, especially in environments that rely on remote production, GPU acceleration, or advanced monitoring.
Running Dante and NDI in different networks or VLANs is always the recommended choice but this sometimes requires complex network infrastructure that is not always feasible.
As IP-based audio and video solutions become standard in live production and broadcast environments, a common question arises:
Can NDI and Dante coexist on the same network?
NDI 6.1 provides a new version of NDI Bridge that allows for additional settings and a new logging feature that allows you to get even greater insight into the capabilities of your NDI Network.
Since NDI 5, it’s been possible to set a buffer when connecting to or hosting a Bridge network that will store up frames of data up to a certain amount before sending them to the rest of the NDI Network. While this does increase latency, it also allows a seamless viewing experience where the viewer shouldn’t notice a drop of signal or frames that can naturally occur when video is transmitted over the public Internet. Previous version of NDI Bridge would allow the user to define their own size of that buffer as a trial an error, but with NDI 6.1’s new Bridge, there is a “Test Buffer" application that can recommend buffer size.
NDI uses compression to enable the transmission of many video streams across existing infrastructure, specifically discrete cosine transform (DCT), which converts video signals into elementary frequency components. This method of compression is commonly used in encoding formats and mezzanine codecs within the industry.
One of the most efficient codecs in existence, NDI achieves significantly better compression than many codecs that have been accepted for professional broadcast use. On a typical, modern Intel-based i7 processor, the codec can compress a video stream to the following benchmarks:
The NDI codec's peak signal-to-noise ratio (PSNR) exceeds 70dB for typical video content.
"networks": {
"ips": "",
"discovery": "127.0.0.1,127.0.0.1"
}, },
"multicast": {
"send": {
"ttl": 1,
"enable": true,
"netmask": "255.255.0.0",
"netprefix": "239.255.0.0"
}"multicast": {
"recv": {
"enable": true,
"subnets": [ "10.28.5.0/24", "10.28.4.0/24" ]
}
}Tyically an audio channel is usually a single mono audio input on a device. Less commonly could refer to video components such as luma channel or alpha channel etc.
A codec (compressor-decompressor) is a technology or software used to encode and decode data, specifically for audio, video, or multimedia files. Codecs compress data to reduce file size for easier storage or transmission and then decompress it for playback or editing.
Any hardware capable of communicating over a network using the Internet Protocol (IP) or NDI network. A device can be a source or destination or both while the function of the machine could be sending or receiving.
A domain refers to a LAN subnetwork of users, systems, devices, and servers. Domain can also refer to the IP address of a website on the Internet.
DNS (Domain Name System) is a system used by the Internet and private networks to translate domain names into IP addresses.
Ethernet, standardized as IEEE 802.3, refers to a series of LAN (Local Area Network) technologies used to connect computers and other devices to a home or business network. Ethernet is a physical and data link layer networking protocol that supports data transfer rates starting at 10 Mbps, typically over twisted pair cabling, but also fiber optic and coaxial cabling.
Specific details of a signal, eg: resolution, frame-rate, codec encoding, etc.
A process used to synchronize a video source by allowing devices to lock their video signals to a common external reference signal (often referred to as a sync signal or black burst), It is used in video production and broadcasting to ensure that multiple video devices, such as cameras, switchers, and monitors, operate in perfect sync.
High-bandwidth Digital Copyright Protection developed to prevent unauthorized copying of digital content as it travels across connections like HDMI, display port, etc. It is commonly used in high-definition content transmission between devices such as Blu-ray players, TVs, computers, and gaming consoles.
A specific machine, device, or computer that is connected to a network that can provide or consume services, resources, or data.
IGMP (Internet Group Management Protocol) is the protocol used in IP multicasting that allows a host to report its multicast group membership to networked routers in order to receive data, messages, or content addressed to the designated multicast group.
IP (Internet Protocol) is the communications protocol for the Internet, many wide area networks (WANs), and most local area networks (LANs) that define the rules, formats, and address scheme for exchanging datagrams or packets between a source computer or device and a destination computer or device.
IPv4 (Internet Protocol Version 4) is the fourth and most used version of the Internet Protocol. IPv4 uses a 32-bit IP address scheme for network identification and communication, with each unique IP address expressed as four numbers (between 0 and 255) separated by decimal points.
IPv6 (Internet Protocol version 6) is the latest version of the Internet Protocol, developed to eventually replace IPv4 (Internet Protocol version 4). IPv6 uses a 128-bit IP address scheme for network identification and communication, with each unique IP address expressed as eight groups of four hexadecimal digits (numbers from 0-9 or letters from A-F) separated by colons. In addition to exponentially increasing the number of available IP addresses, IPv6 simplifies and streamlines network communication while increasing security, compatibility, and efficiency.
LAN (Local Area Network) is a network that connects computers and devices in a room, building or group of buildings. LANs are typically deployed in homes, offices, and schools, where users share access to the same server, resources, and data storage. A system of LANs can also be connected to form a WAN (Wide Area Network).
Layer 2 refers to the OSI networking model's second layer or Data Link layer. A layer 2 switch uses hardware-based switching to transmit data between connected devices based on their MAC (Media Access Control) layer addresses.
Layer 3 refers to the OSI networking model's third layer or Network layer. A layer 3 switch uses hardware-based switching to transmit data between connected devices based on their IP addresses.
A collection of compiled functions and classes that can be shared by multiple independent applications on a system.
MAC (Media Access Control) address refers to a unique physical address identifying a network node.
Mbps (Megabits per second) is a unit of measurement for data transfer speed, with one megabit equal to one million bits. Network transmissions are commonly measured in Mbps.
mDNS (multicast DNS) refers to the use of IP multicast with DNS to translate domain names into IP addresses and provide service discovery in a network that does not have access to a DNS server.
Device used to display or view a video signal or listen to an audio signal. Also defineed as the act of examining details of an audio or video stream
The OSI (Open System Interconnection) reference model is a standard that defines worldwide network communication, developed by ISO (International Organization for Standardization). The OSI reference model divides network communication into seven layers: 1) Physical, 2) Data Link, 3) Network, 4) Transport, 5) Session, 6) Presentation, and 7) Application.
A packet, also known as a frame or datagram, is a unit of data transmitted over a packet-switched network, such as a LAN, WAN, or the Internet.
A port is a communications channel for data transmission to and from a computer on a network. Each port is identified by a 16-bit number between 0 and 65535, with each process, application, or service using a specific port, or multiple ports, for data transmission.
Details a decoder needs to decode the video data, such as resolution, frame rate, and other parameters. They must be included in the video stream for the decoder to interpret the video correctly.
QoS (Quality of Service) is the measure of performance for systems or networks, with considerations that include availability, bandwidth, latency, and reliability. QoS can also refer to prioritizing network traffic to ensure a minimum or required level of service, predictability, and/or control.
A networking device capable of transporting IP data based on Layer 3 details (IP Address and subnet details).
An SDI router (Serial Digital Interface router) is a device used to route and manage video signals in broadcast and production environments. It allows multiple SDI video sources, such as cameras, servers, and playback devices, to connected to and switch between various destinations, such as monitors, recorders, or live feeds.
Details a decoder needs to decode the video data, such as resolution, frame rate, and other parameters. They must be included in the video stream for the decoder to interpret the video correctly.
Subnet (short for subnetwork) refers to a distinct subdivision of an IP network, usually created for performance or security purposes. Subnets typically include the computers, systems, and devices in one location, office, or building, with all nodes sharing the same IP address prefix.
TCP (Transmission Control Protocol) is a network communications protocol that enables two host systems to establish a connection and exchange data packets, ensuring that data is delivered to the correct destination. TCP is typically grouped with IP (Internet Protocol) and is known collectively as TCP/IP.
Time to live (TTL) or hop limit is a mechanism that limits the lifespan or lifetime of data in a computer or network. TTL may be implemented as a counter or timestamp attached to or embedded in the data. Once the prescribed event count or timespan has elapsed, data is discarded or revalidated. In computer networking, TTL prevents a data packet from circulating indefinitely. In computing applications, TTL is commonly used to improve performance and manage the caching of data.
UDP (User Datagram Protocol) is an alternative protocol to TCP that is used when reliable delivery of data packets is not required. UDP is typically used for applications where timeliness is of higher priority than accuracy, such as streaming media, teleconferencing, and voice-over IP (VoIP).
WAN (Wide Area Network) is a network that spans a relatively broad geographical area, such as a state, region, or nation. WANs typically connect multiple smaller networks, such as LANs (Local Area Network) and MANs (Metropolitan Area Network). The Internet is an example of a WAN.
Uniquely and importantly, NDI is the first ever codec to provide multi-generational stability. This means there is no further loss once a video signal is compressed. As a practical example, generation 2 and generation 1000 of a decode-to-encode sequence would be identical.
The NDI codec is designed to run very fast and is largely implemented in hand-written assembly to ensure that the process of compressing video frames occurs as quickly as possible. Latency is both a factor of the network connection and the endpoint products. NDI has a technical latency of 16 video scan lines, although in practice, most implementations would be one field of latency. Hardware implementations can provide full end-to-end latency of within 8 scan lines.
NDI is available in some devices and applications using a different compression codec than NDI High Bandwidth. This format is known as NDI HX. Devices using this NDI format will be labeled with the HX moniker. HX offers similar video quality at a much lower bit rate, which can be useful in contexts with limited bandwidth, like Fast Ethernet networks, Wi-Fi, or WAN connections.
NDI HX is commonly found in hardware devices, like PTZ cameras and mobile phones, but it is possible to have NDI HX in software applications as well. Software applications using NDI HX will leverage the GPU on the computer for enhanced encoding performance. For this reason, having a good GPU on the system is an advantage.
There are two variations of NDI HX: NDI HX and NDI HX3; both can be decoded by software applications thanks to the codec provided by the NDI Tools.
5959
TCP
NDI Discovery Server is an optional method to have NDI devices perform discovery. This can be beneficial in large configurations when you need to connect NDI devices between subnets or if mDNS is blocked.
5960
TCP
This is a TCP port used for remote sources to query this machine and discover all the sources running on it. This is used, for instance, when a machine is added by an IP address in the access manager so that from an IP address alone, all the sources currently running on that machine can be discovered automatically.
5961 and up
TCP
These are the base TCP connections used for each NDI stream. For each current connection, at least one port number will be used in this range.
5960 and up
UDP
In version 5 and above, when using Reliable UDP connections, it will use a very small number of ports in the range of 5960 for UDP. These port numbers are shared with the TCP connections. Because connection sharing is used in this mode, the number of ports required is very limited and only one port is needed per NDI process running and not one port per NDI connection.
6960 and up
TCP/UDP
When using multi-TCP or UDP receiving, at least one port number in this range will be used for each connection.
7960 and up
TCP/UDP
When using multi-TCP, unicast UDP, or multicast UDP sending, at least one port number in this range will be used for each connection.
Ephemeral
TCP
Legacy to NDI v1 - The current versions (4.6 and later) no longer use any ports in the ephemeral port range.
640x360 60p
65.83
720 60p
105.83
640x360 60p
65.83
1080 50i
102.50
640x360 30p
18.75
1080 60i
112.50
640x360 30p
18.75
1080 50p
125.59
640x360 60p
65.83
1080 60p
132.14
640x360 60p
65.83
3840x2160 50i
158.33
640x360 30p
18.75
3840x2160 60i
171.42
640x360 30p
18.75
3840x2160 50p
223.80
640x360 60p
65.83
3840x2160 60p
249.99
640x360 60p
65.83
640x360 60p
82.29
720 60p
132.29
640x360 60p
82.29
1080 50i
128.12
640x360 30p
23.43
1080 60i
140.62
640x360 30p
23.43
1080 50p
156.99
640x360 60p
82.29
1080 60p
165.17
640x360 60p
82.29
3840x2160 50i
197.91
640x360 30p
23.43
3840x2160 60i
214.28
640x360 30p
23.43
3840x2160 50p
279.76
640x360 60p
82.29
3840x2160 60p
312.49
640x360 60p
82.29
🎨 Brand
If the 'OK' button is clicked on the previous step, you must access the Camera Extension settings manually. Find them in System Settings > General > Login Items & Extensions > Camera Extensions (click on 🛈 icon)


Set Controls Always Visible
Set Record Path to specify the location where recorded files will be saved.
Select Allow Receiver Advertising to make it available for monitoring when using Discovery Server.
Select Allow Receiver Control to manage which sources Studio Monitor can connect to.
Enable a 4:3 Aspect Ratio overlay
Enable a Square Aspect Ratio overlay
Flip horizontally or vertically the displayed source
Overlays the Tally indicators
VU Meter overlay: Visualizes the source's audio level, with or without a reference scale.
Lowest Latency: Reduces the time the system takes to display a source. When this option is activated, NDI Studio Monitor ceases to use frame-sync. Instead, it plays videos with less smoothness but offers the advantage of lower latency.
Low Bandwidth: Decoding the NDI Proxy stream, rather than the full bandwidth, is highly effective for reducing bandwidth usage. This approach is particularly beneficial when displaying a source solely for monitoring purposes.
Overlay: Select an NDI Source to overlay over the primary source. Picture In Picture: With this option, the secondary source is overlayed as picture-in-picture. Overlay using Alpha: This option overlaps the secondary source using his transparency.
Output: Floating Window: With these options is possible to define if the NDI Studio Monitor will be visible: 1) In a floating Windows 2) Full Screen in one of the available monitor 3) Full Screen in all available monitor.
NDI Video Output: an extremely beneficial feature for effortlessly sharing a single source with multiple destinations. This functionality effectively transforms NDI Studio Monitor into an NDI Router. When a new source is chosen in Studio Monitor, it is directly routed to various receivers, originating straight from the sender.
Scale Video to Window.
Always on Top
Hide Window Border
Move to Quadrant: helps you to move, resize and fit multiple monitors in a single screen.
PTZ Settings: enables the PTZ Control in the NDI Studio Monitor.
Enable USB Joystick as a PTZ Controller.
Help: Access the Studio Monitor Help Assistant and a quick web link to ndi.video for more information about NDI and NDI Tools.
Sound Output to NDI Audio.NDI Output Settings
Open NDI Output in System Preferences.
Set the Video Format and Frame Rate to match your Final Cut Pro project settings.
Match Final Cut Pro Project Settings
Ensure that your Final Cut Pro project settings match the configurations you set in the NDI Output preferences.
Enable A/V Output in Final Cut Pro
Open Final Cut Pro.
In the Window menu, enable A/V Output.
Otherwise, enter the IP address of the Discovery Server next to Setup Discovery Server and click Connect.
Just above you should see a message in green saying, Connected to Discovery Server at and the IP address and port.
If the message is in yellow saying, Attempting to Connect then double check your IP settings again. If you think you might have made a mistake with the Discovery Server’s IP address or port, you will need to run the installer again to reconfigure the IP and port.
Once done, click back to the Receivers tab.
Click and enable Allow Receiver Control.
GPU: Apple M series, AMD Vega, 5000 or 6000 series, Intel UHD 630 or Intel Iris Plus
Other: 1Gbps Local Area Network
GPU: NVIDIA, AMD, Intel GPU/APU • 6Gb of RAM or better
Other: 1Gbps Local Area Network
NDI Tools for Windows includes:
NDI Tools for Mac includes:
The overlap centers on configuration and routing utilities. The main differences are in capture tools, monitoring utilities, and virtual camera functionality.
NDI Bridge enables remote NDI workflows across WAN or VPN connections. It supports H.264 and HEVC transcoding, alpha channel transmission, encryption, and port forwarding. It also includes KVM functionality for remote control scenarios, which makes it well suited for distributed production environments.
Screen Capture HX provides GPU-accelerated capture with integrated compression. Users can define bandwidth presets, control resolution and frame rate, and use H.264 or HEVC encoding to optimize network performance. KVM remote control is also supported.
Webcam Input allows NDI sources to appear as standard webcam devices in conferencing applications. It includes system tray controls, audio channel grouping, customizable output resolution, and dedicated audio and video configuration tabs.
On macOS, screen capture is handled by Scan Converter instead of separate standard and HX variants. Scan Converter captures either a full desktop or a single application using macOS native screen capture integration. Because it operates within the macOS privacy framework, users must grant the appropriate system permissions. Unlike Windows, individual monitor capture in multi-display environments is not supported.
Virtual Input functions as a system camera extension. It requires Camera Extension approval in macOS System Settings and operates within Apple’s extension management framework. As a result, deployment and troubleshooting may involve system-level permissions rather than application-level configuration.
Video Monitor allows users to view NDI sources and includes PTZ control and recording functionality. It also supports low-bandwidth mode and web-based control through a QR code or IP address. It does not provide the same depth of overlays, routing, or advanced monitoring features as Windows Studio Monitor.
Windows includes Studio Monitor, which provides overlays, VU meters, safe area guides, alpha channel display, flip controls, lowest-latency mode, picture-in-picture, USB joystick PTZ control, and NDI video output routing. It is suitable for both previewing and technical validation.
macOS includes Video Monitor, which supports PTZ control, recording, low-bandwidth mode, and web-based remote control. However, it offers fewer overlay, routing, and advanced monitoring features than its Windows counterpart.
On Windows, Screen Capture supports full desktop capture and lets users define a region of interest. Screen Capture HX adds GPU acceleration, compression, and bandwidth management.
On macOS, Scan Converter captures either the full desktop or a selected application using native system integration. Capture behavior is governed by macOS privacy permissions, and individual monitor capture in multi-display setups is not supported.
Both Windows and macOS include Access Manager, Router, Test Patterns, and Discovery. Access Manager allows configuration of NDI groups and Discovery Server settings. Router enables routing of up to 64 sources to 64 destinations with preset recall functionality. Test Patterns generates calibration patterns, custom images with alpha channel support, and audio tones. Discovery allows users to view active NDI senders and receivers and configure Discovery Server IP and port settings.
On Windows, users benefit from startup integration options, GPU acceleration for Screen Capture HX, and expanded UI-based configuration.
On macOS, applications operate within Apple’s privacy and extension frameworks. Virtual Input requires camera extension approval, running multiple Video Monitor instances requires a Terminal command, and audio routing is tied to macOS system settings, often requiring third-party virtual cable software.
Both Windows and macOS versions of NDI Tools provide the core utilities needed for NDI configuration, routing, and monitoring. Windows offers a broader feature set for remote workflows, GPU-accelerated capture, advanced monitoring overlays, and granular virtual webcam configuration. macOS provides streamlined native integration within Apple’s ecosystem but operates within stricter system-level permission and extension requirements.
Platform selection should be guided by workflow complexity, monitoring requirements, remote production needs, and network architecture, rather than by assumptions of feature parity.
NDI is a video-over-IP protocol optimized for ease of use and versatility. Its key characteristics include:
Uses various transport methods: TCP, UDP, Multi-TCP, and R-UDP.
No centralized synchronization mechanism.
Audio and video are embedded together and rely on best-effort delivery.
Can be bandwidth-intensive, especially full-bandwidth NDI (100–300 Mbps per stream).
Dante, developed by Audinate, is designed for professional, low-latency audio transport over IP. Its key characteristics include:
Ultra-low latency (typically <1 ms)
Uses PTP (Precision Time Protocol, IEEE 1588) for tight synchronization between all devices
Each audio stream is typically mono, point-to-point
Highly sensitive to jitter and network congestion
Scenario 1: A Single Computer Running NDI and Dante
A single computer (e.g., running vMix or TriCaster) receives NDI streams and handles Dante audio via the same 1G NIC. As long as it only receives NDI streams, Dante works fine. Once the computer transmits NDI streams, Dante experiences:
Increased latency
Audio glitches
Eventually, Dante devices may mute audio completely due to PTP sync loss
NDI video streams can flood the NIC and switch buffers. Since Dante relies on highly predictable packet timing and synchronized clocks (via PTP), any jitter or delay in network delivery, especially in PTP packets, can cause the system to desynchronize, leading to audio dropouts.
Scenario 2: 10G Backbone with 1G Endpoint
The main NDI+Dante computer is connected via 10G to a core switch. A second switch, connected via 1G uplink, serves a Dante commentary station. Everything runs smoothly until an NDI decoder is added to the second switch and starts receiving a video stream from the main computer. Suddenly, the Dante commentary position experiences PTP errors and intermittent audio mute. Replacing the second switch with a 10G model and using a 10G uplink immediately resolves the issue.
Traffic from an NDI receiver saturates the uplink. Simply having an NDI transmitter alone doesn't cause this traffic surge. NDI streams are unicast and only begin flowing when a receiver connects. When the receiver is on the 1G switch and pulls full-bandwidth NDI from the 10G host, the 1G uplink becomes a bottleneck. This bottleneck causes latency and jitter, especially affecting:
PTP clock sync packets
Time-sensitive Dante audio packets
Consequently, sync is lost and Dante audio mutes. By contrast, if the NDI transmitter is on the 1G switch without an active receiver, the traffic isn't triggered, and Dante remains unaffected.
NDI supports multiple transport types, but not all are equally suitable in mixed environments.
TCP
With care
Requires proper flow control; can introduce delay under congestion
UDP
Better
Predictable; ideal for real-time flows
Flow Control must be enabled on all switches for stable coexistence.
To make it work reliably: 1. Use a 10G network backbone for any shared segments carrying both Dante and NDI. 2. Avoid Multi-TCP mode in NDI, especially in mixed Dante environments. 3. Enable flow control on all switch ports. 4. Use managed switches that support IEEE 802.1p traffic prioritization (to prioritize PTP and Dante audio) 5. Monitor the Dante Clock status and latency metrics on all endpoints. 6. Avoid 1G uplinks where video and audio traffic are mixed.
NDI and Dante can coexist on the same network, but only if the network is properly designed to handle their demands. Dante's strict timing requirements make it particularly vulnerable to congestion and jitter, while NDI’s high-bandwidth nature can easily monopolize links if not carefully managed.
Proper switch configuration, bandwidth planning, and protocol awareness are essential to ensure stable, high-performance operation in mixed NDI + Dante environments.
To use it, follow the steps below:
Launch NDI Bridge 6.1
Connect to your Bridge host if your the Join, or have a remote connection connect into your Bridge application if you’re the Host
Once connected, click on Start Test. Packets will be sent and received, and the recommended buffer will be shown.
Run the test for as long as necessary, then click Apply to use their recommended buffer size.
To run the test, both the Bridge Host and Bridge Client/Joiner must be running NDI 6.1.
One of the most powerful aspects of NDI is it’s ability to be flexible in it’s installation requirements, it doesn’t need a purpose-built machine. NDI Bridge, like all other NDI applications, is as powerful as the system it’s installed on, but until now there hasn’t been an easy way to determine how much system resources it uses. With NDI 6.1 Bridge, a user can now get a number of helpful stats that may pinpoint potential bottlenecks in a workflow. To access the system stats to see a live view of NDI Bridge’s resources, click the gear labeled Settings and Diagnostics and choose Statistics.
Clicking this will open a new window that can be positioned and resized anywhere, with helpful graphs and stats for the current connection. Each graph can be expanded to show a greater detailed view of the current resources.
Send Bps: Usually measured in mbps but depending on how much traffic is sent it can be kbps, this is the amount of data that’s being sent from the current machine to the destination. The graph measures only the last 60 seconds of data in a rolling, live view.
To see the current metric, the right hand-side column also displays the current bitrate of the sending device.
Receive Bps: This graphic shows a 60 second view of the amount of traffic being received by the system it’s installed on. Usually measured in mbps, it will give the user an idea of how much bandwidth that Studio Monitor or another NDI receive is receiving from the Bridge network.
This is also shown on the right hand side metric under Receive, where it shows a live view of the incoming bitrate.
If the Send and Receive numbers vary too greatly, there’s probably packet loss or connection issues which can result in poor performance. Increasing the Buffer size or using the recommended buffer settings may alleviate these issues
RTT: Round Trip Time is the measure of how long it takes a packet to be sent from the host to the receiver and back again. The graph shows a live view of the past 60 seconds and the right hand column shows a live view of the current RTT.
The RTT value may be high, but the key aspect to look for is consistency- a RTT value that fluctuates often indicates a poor connection and poor video performance
Packet Loss: Much like RTT, the key aspect here is consistency. Have a video stream with 0 packet loss would be ideal but in a world where video is transmitted over the public internet it can happen.
0 packet loss is preferred, but if the number grows over time or fluctuates, there’s an issue with the incoming stream or receiving PC dropping packets. Increase buffer size may be one way to alleviate that.
Bridge GPU: NDI Bridge provides 3 metrics for the GPU that the connected Bridge system (either host or join) is running on, GPU Encode, GPU Decode, and 3D Compute. This measures the amount of GPU usage that the Bridge service is using by itself to send an encoded signal.
These are a measure of the Bridge’s utilization only, not of the entire utilization of the engines of the PC. If packet loss occurs or the RTT is high and the buffer can’t resolve it, the Bridge system’s GPU may be at maximum and unable to render frames as quickly as necessary, resulting in poor video performance. Unfortunately, there’s not a way to resolve this outside of upgrading the PC or lowering the demand of other applications on that PC.
System GPU: Like the Bridge GPU, the System GPU must also decode frames of video for viewing and playback. If the System GPU is at maximum for resources but the connection is fine, the viewer will still notice dropped frames and other apparent issues they may cause them to incorrectly assume the network or NDI Bridge is at fault.
On the right hand side, there are a number of stats also available at any given time.
CPU and Memory refer to the percentage of CPU that is used by the system at the time. Memory refers to amount of RAM that the Bridge application is taking up by itself. As Bridge is software, we recommend you make sure those numbers stay under 50% utilization, the lower the better. This may mean closing out other open applications and shutting down other services that are taking processing cycles and using the RAM. If the Memory measurement creeps up, it could indicate a memory leak or a process that is stuck running and not shut down properly.
Under System are the same three metrics, GPU Encode, GPU Decode, and 3D Compute, which measure available metrics as reported by the system. GPU Encode is if the system is encoding from High Bandwidth to HX, and GPU Decode is used for receiving a signal and displaying it on Studio Monitor. 3D Compute is the overall usage of the GPU of that system. It’s important to note that 3D Compute is variable depending on the system. Sometimes it’s the 3D Compute engine is used to encode/decode, and sometimes it’s used for color conversion. If the system Bridge is running on has two different GPUs, the tasks will be spread out to reduce load. As a general rule keeping those values low will show improved performance.
SpeedHQ0
8bit
4:2:0
YUV
SpeedHQ2
8bit - 10bit
4:2:2
YUV
SpeedHQ7
8bit - 10bit
4:2:2:4
YUVA
H.264
8bit
4:2:0
YUV
(1) An SoC, or System on Chip, is an integrated circuit (IC) that integrates all components of a computer or other electronic system into a single chip. It may include a central processing unit (CPU), memory (RAM, ROM, and flash memory), input/output ports, and secondary storage – all on a single substrate or microchip. It can also contain other components such as a graphics processing unit (GPU), a network interface for communications, and specialized hardware accelerators for specific tasks like digital signal processing (DSP), encryption, or A/V Codecs.
H.264
8bit
4:2:0
YUV (A)
H.265
8bit - 10bit
NDI offers Alpha Channel support with both H.264 and H.265 (YUVA 4:2:0:4).
Since Alpha Channel is not officially supported by H.264 and H.265, this feature is restricted to software applications like NDI Bridge, TriCaster, Vectar Plus, and Connect from Vizrt. It is implemented by vertically stacking the video and alpha frames into a single frame before compression.


SpeedHQ
HX
The FPGA implementations include a SpeedHQ codec in the FPGA fabric for speed, but can also use the same software codec as the regular SDK. Typically, the ARM CPU cores on the FPGA+SoC devices are slow enough that decoding video in software is impractical, but this is gradually changing as everything gets faster. (Charles Steinkuehler)
Securely connect with multiple remote contributors.
We’ve made the tough call to discontinue NDI Remote and take the service offline. This decision comes after identifying performance issues that can’t be quickly addressed. That said, we’re already exploring a more reliable way to bring Remote back in the future. We’ll share updates as soon as we have them. If you have questions or need a hand planning a workaround, please reach out through the proper channel. Our team’s here to help! Support – NDI
NDI Remote is a tool that facilitates seamless connections with multiple remote contributors by simply sharing a link. This application enables receiving video and audio over the internet, transforming your device into an NDI video feed receiver.
Download NDI Tools .
and run NDI Remote from the or your applications list.
On the Send Invitation tab, enable a remote connection from the available list (up to eight connections). You should assign a specific name to the remote connection.
Then, click the share icon (paper plane icon) on the right side of the desired connection to open up a pop-up menu. This pop-up menu will present various methods to share an invitation:
Via email.
By sharing a unique QR code attributed to that connection.
By sharing a unique URL.
The receiver will only need to open the link in a web browser on the remote device, grant access to the camera and microphone, and the video will begin being shared.
Visit the . In there, you'll be able to select different sources to share:
Your hardware system camera
A feed of your computer's screen
You'll be prompted to provide access to your computer's camera and microphone. If you accept, you'll start seeing a feed from your camera.
A menu will also show up. By clicking the leftmost icon, you'll be able to name your feed so that others can identify it. You'll also be able to share it by clicking the Share button.
The person using the NDI Remote tool can view and manage the incoming connection on the Received Invitations tab. The NDI Remote connection is now generating an NDI source, which any NDI-enabled application in your local area network can receive.
A TURN (Traversal Using Relays around NAT) server is a network entity that facilitates the relaying of network traffic. When two devices are unable to establish a direct connection due to NAT or firewall restrictions, they use a TURN server as an intermediary. The TURN server temporarily stores the data from the sending device and forwards it to the receiving device.
TURN servers are particularly important in VoIP and interactive video conferencing applications that use protocols like WebRTC.
This process helps in overcoming the limitations imposed by NAT, which can change the public IP address and port number of a packet and make it difficult for the receiving device to interpret where the data originally came from
With NDI Remote, a custom TURN server can be specified by the user:
Go to the My Connections tab and click the gear icon to open the Turn Relay Server options.
Activate the Turn Relay Server by checking the corresponding box.
Enter the Turn Server's URL and port provided by your system administrator.

R-UDP
Recommended
Reliable UDP; good compromise between speed and reliability
Multi-TCP
Avoid
Creates multiple TCP streams with independent buffers; bad for real-time sync like Dante
4:2:0
YUV (A)


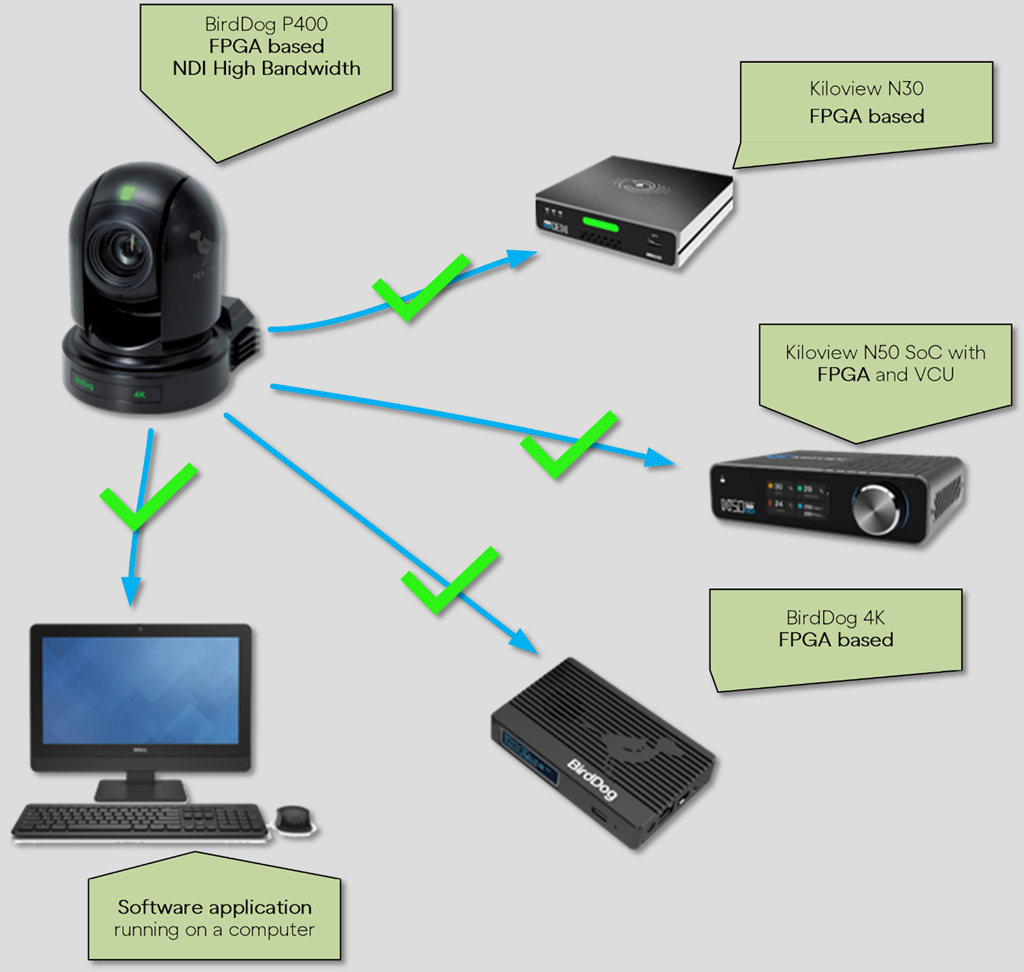
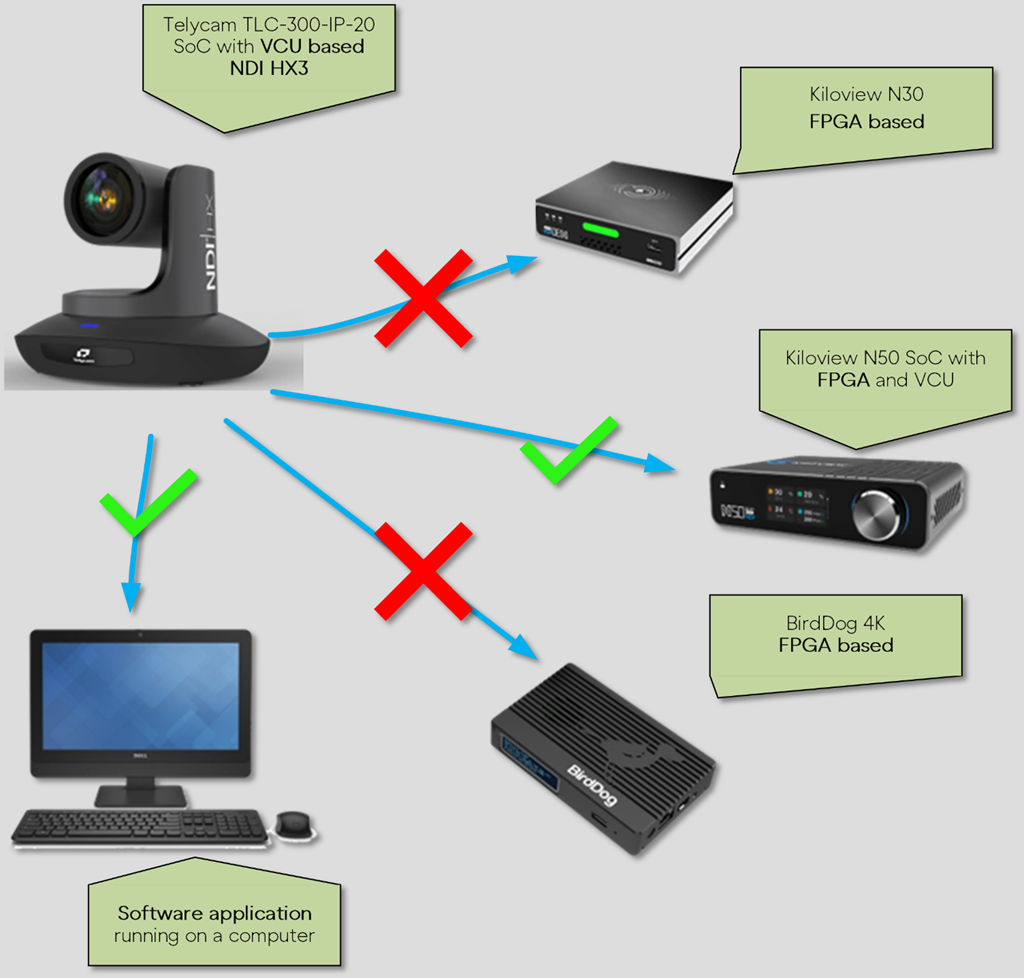
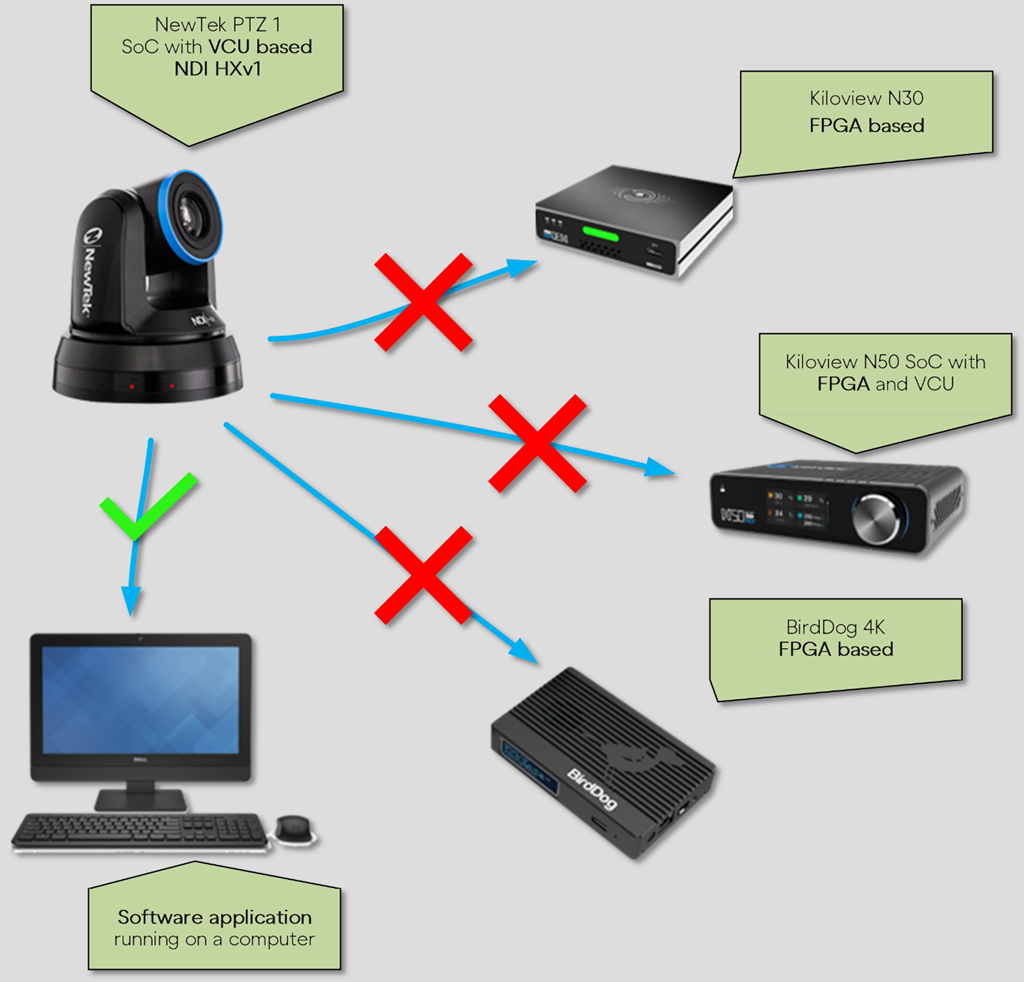

Hardware Video Encoder (VCU)
NO
NO
NO
NO
NO
Hardware Video Decoder
NO
NO
NO
NO
NO
Software Encoding
YES
YES
YES
YES
YES
Software Decoding
YES
YES
YES
YES
YES
NO
NO
NO
NO
NO
FPGA Decoding
NO
NO
NO
NO
NO
NO
NO
Hardware Video Encoder (VCU)
NO
YES
YES
YES
YES
YES
YES
Hardware Video Decoder
YES
YES
YES
YES
YES
YES
YES
Software Encoding
NO
YES
YES
YES
YES
YES
YES
Software Decoding
YES
YES
YES
YES
YES
YES
YES
FPGA Encoding²
YES
YES
YES
YES
YES
FPGA Decoding
YES
YES
YES
YES
FPGA Encoding²
NO
YES
NO

Optionally, enter a username and password.
Click Apply to accept the Turn Server configuration.


Elevate Your Network Display Experience.
NDI Screen Capture HX provides features comparable to NDI Screen Capture, but it uniquely leverages GPU acceleration.
This ensures low-latency video delivery, supporting resolutions up to 4K and frame rates of 120 Hertz or higher, using H.264 or HEVC compression. GPU acceleration significantly reduces your system's CPU workload, enhancing overall efficiency.
Download NDI Tools .
In the , select the configuration gear to choose between two distinct versions of NDI Screen Capture. Select Screen Capture HX.
The application will appear in your system tray with the NDI logo. Upon launch, your computer's desktop video and audio are shared and viewable from any NDI-enabled device on your network.
View the output of Screen Capture on another NDI-enabled device using an application like .
Right-click on the screen and select the device name and corresponding NDI stream.
NDI Screen Capture is an application designed to effortlessly share your computer's desktop video and audio with any other device on your network through an NDI stream.
Whether you're conducting broadcasts and presentations, collaborating on projects, creating tutorials, or engaging in media playback, Screen Capture provides a valuable solution.
and run NDI Screen Capture from the or your applications list.
The tool will appear in your system tray with the NDI logo. Upon launch, your computer's desktop video and audio are viewable from any NDI-enabled device on your network.
View the output of Screen Capture on another NDI-enabled device using an application like .
Right-click on the screen and select the device name and corresponding NDI stream.
Right-click on the NDI Screen Capture icon to access different settings:
Bandwidth This feature enables the selection from three distinct bandwidth presets and specifies the codec used for NDI HX compression, H.264 or HEVC.
Resolution It allows the native screen resolution or downscaling the stream in lower resolutions.
Framerate This option allows to specify the NDI stream
Was this helpful? Please let us know by rating this page; you can also leave a .


A Dr. NDI Tutorial
Recently, I was involved in a live sports video production where I needed to set up a commentary station. It was nothing unusual, as I have used many Dante commentary stations in my NDI productions. However, this time, I wanted to find a solution where a single device could offer the audio functionality of a commentary station and receive video feedback from the production, thus avoiding connecting two devices with two network cables.
I created this project using a small Windows computer and OBS Studio. In this tutorial, I will explain how to create your own NDI commentary station with these simple tools.
Agreeing to this Software License Agreement is a necessary step to install NDI Tools. This step can be completed during the installation process through the NDI Tools Installer.
This Software and Content Data License and Limited Warranty applies to NDI® Tools and other software and/or content data products provided by Vizrt NDI AB. (“NDI”).
PLEASE READ THIS CAREFULLY BEFORE USING THIS SOFTWARE. THIS SOFTWARE IS LICENSED. THE LICENSE AND LIMITED WARRANTY APPLIES TO THE SOFTWARE LISTED ABOVE. BY USING THIS SOFTWARE, YOU AGREE TO BE BOUND BY THESE TERMS OF THE LICENSE AND LIMITED WARRANTY. IF YOU DO NOT AGREE TO THESE LICENSES AND THESE TERMS, YOU MAY RETURN THE SOFTWARE WITHIN 15 DAYS OF PURCHASE TO THE PLACE WHERE YOU OBTAINED IT FOR A FULL REFUND.
Any computer program or content data installed and/or enclosed (the "Software") is licensed, not sold, to you by NDI for use only under the terms of this License, and NDI reserves any rights not expressly granted to you herein. Title to the Software and all copyright rights therein, foreign and domestic, are owned by NDI or its suppliers and is protected by US, EU and other copyright laws and international treaty provisions.
You are hereby granted a worldwide, nonexclusive, nontransferable (other than as expressly set forth herein) and, as applicable, fully paid up license to one copy of the Software. If the Software is an NDI/HX driver, you may use up to five (5), and no more than five, copies on separate machines at one time. The copyright restrictions of this license extend to any further updates, software patches, or bug fixes made available to you by NDI, regardless of how the software is delivered (by downloading, through digital storage media, or other). Any software or content data updates later obtained by you from NDI may only be used to update Software that has a valid and legal license under which the update was obtained. SUCH UPDATES MAY INCLUDE ADDITIONAL OR AMENDED TERMS THAT MODIFY OR CHANGE THIS LICENSE. YOUR ACCEPTANCE AND USE OF SUCH UPDATES WILL CONSTITUTE YOUR CONSENT AND AGREEMENT TO AMEND THIS LICENSE PURSUANT TO SUCH TERMS.
You may make one copy of the Software in machine readable form solely for backup purposes. As an express condition of this License, you must reproduce on the backup copy the NDI copyright notice in the following format: "© <YEAR> Vizrt NDI AB. All Rights Reserved."
EXCEPT WITH REGARD TO ANY PROHIBITIONS ON TRANSFER AND ASSIGNMENT MENTIONED HEREIN, you may permanently transfer all your rights under this License to another party provided that the other party reads and agrees to accept the terms and conditions of this License as amended. Your rights under this license shall immediately terminate upon such transfer. Some of these restrictions may not apply to the LGPL, or other licensed software/libraries referenced in Paragraphs 6, 7, or 8 below.
If the Software was obtained for educational use with an educational price discount, this license is a limited Educational License, and not licensed to be used for any commercial or other use that is not an Educational Use. “Educational Use” means use by students, instructors, educational and/or government facilities directly connected with the user’s employment with, or as a student of, a bona fide educational institution of primary, secondary, graduate, or postgraduate level. “Educational Use” may be further defined from time to time on NDI’s website.
Any additional terms of purchase relating to restrictions to educational uses in effect at the time of purchase shall become part of this license to the extent they are not in conflict with these terms. Any uses falling outside the scope of Education Use are a violation of this license and will be considered copyright infringement. If in doubt, you may determine the nature of your license by calling NDI customer support and providing the serial number and letter code.
The Software contains NDI trade secrets. EXCEPT AS EXPRESSLY AUTHORIZED HEREIN, YOU MAY NOT COPY, DISTRIBUTE, MODIFY OR CREATE DERIVATIVE WORKS, REVERSE ENGINEER, DECOMPILE, DISASSEMBLE, OR OTHERWISE REDUCE THE SOFTWARE TO ANY HUMAN-PERCEIVABLE FORM. YOU MAY NOT MODIFY, ADAPT, TRANSLATE, RENT, LEASE, LOAN, RESELL FOR PROFIT, OR CREATE ANY MODIFICATIONS OR OTHER DERIVATIVE WORKS BASED UPON THE SOFTWARE OR ANY PART THEREOF.
This License is effective until terminated. This License will terminate immediately without notice, if you fail to comply with any provision of this License. Upon termination you must destroy the Software, all accompanying written materials and all copies thereof. You may also terminate this License at any time by destroying the Software, all accompanying written materials, and all copies thereof.
This limited warranty extends to the original purchaser only.
NDI DOES NOT WARRANT THAT THE SOFTWARE WILL BE ERROR FREE, OR THAT IT WILL SATISFY ALL YOUR REQUIREMENTS. NDI WARRANTS THE DISCS OR OTHER TANGIBLE STORAGE MEDIA PROVIDED, IF ANY, ON WHICH THE SOFTWARE IS SUPPLIED TO BE FREE FROM DEFECTS IN MATERIALS AND WORKMANSHIP UNDER NORMAL USE FOR 90 DAYS FROM PURCHASE.
ALL IMPLIED WARRANTIES RELATING TO THE SOFTWARE ARE DISCLAIMED, INCLUDING ANY IMPLIED WARRANTY OF MERCHANTABILITY OR FITNESS FOR A PARTICULAR PURPOSE. YOUR EXCLUSIVE REMEDY FOR BREACH OF WARRANTY WILL BE THE REPLACEMENT OF THE MEDIA OR REFUND OF THE PURCHASE PRICE. IF THIS IS AN EVALUATION OR BETA VERSION, YOU ACKNOWLEDGE THAT THE SOFTWARE AND ACCOMPANYING MATERIALS ARE ACCEPTED “AS IS” AND MAY NOT BE FREE FROM DEFECTS.
THE ABOVE WARRANTY IS EXCLUSIVE AND IN LIEU OF ALL OTHER WARRANTIES, EXPRESS OR IMPLIED. ANY TERM OF THIS WARRANTY OR THE WARRANTY LIMITATIONS THAT IS PROHIBITED BY APPLICABLE LAW SHALL NOT APPLY. ALL ACTIONS ON ANY BREACH OF WARRANTY OF ANY KIND MUST BE BROUGHT WITHIN ONE (1) YEAR OF DATE OF PURCHASE. YOUR SOLE REMEDY IN ANY EVENT SHALL BE TO TERMINATE THE LICENSE.
NDI IS NOT LIABLE FOR LOSS OR DAMAGE FOR INCONVENIENCE OR INTERRUPTION OF SERVICE, LOSS OF BUSINESS, DATA OR ANTICIPATORY PROFITS, OR CONSEQUENTIAL, INCIDENTAL, SPECIAL, OR PUNITIVE DAMAGES RESULTING FROM THE USE (OR OPERATION) OF ANY OF THE SOFTWARE. NDI’S LIABILITY IS LIMITED SOLELY TO THE REPAIR OR REPLACEMENT OF THE DEFECTIVE SOFTWARE. NDI IS UNDER NO OBLIGATION OR RESPONSIBILITY TO ENHANCE OR UPDATE THE SOFTWARE.
If your use of this Software involves MPEG-2, MPEG-4, AVC/H.264 encoding or decoding as discussed below, commercial use of the Software, including the distribution of content media, may require additional licenses:
MPEG-2: ANY USE OF THIS SOFTWARE IN ANY OTHER MANNER THAN CONSUMER PERSONAL USE THAT COMPLIES WITH THE MPEG-2 STANDARD FOR ENCODING VIDEO INFORMATION FOR PACKAGED MEDIA IS EXPRESSLY PROHIBITED WITHOUT A LICENSE UNDER APPLICABLE PATENTS IN THE MPEG-2 PATENT PORTFOLIO, WHICH LICENSE IS AVAILABLE FROM MPEG LA, L.L.C., 250 STEELE STREET, SUITE 300, DENVER, COLORADO 80206.
MPEG-4; THIS SOFTWARE MAY BE LICENSED UNDER THE MPEG-4 VISUAL PATENT PORTFOLIO LICENSE FOR THE PERSONAL AND NON-COMMERCIAL USE OF A CONSUMER FOR (i) ENCODING VIDEO IN COMPLIANCE WITH THE MPEG-4 VISUAL STANDARD (“MPEG-4 VIDEO”) AND/OR (ii) DECODING MPEG-4 VIDEO THAT WAS ENCODED BY A CONSUMER ENGAGED IN A PERSONAL AND NON-COMMERCIAL ACTIVITY AND/OR WAS OBTAINED FROM A VIDEO PROVIDER LICENSED BY MPEG LA TO PROVIDE MPEG-4 VIDEO. NO LICENSE IS GRANTED OR SHALL BE IMPLIED FOR ANY OTHER USE. ADDITIONAL INFORMATION INCLUDING THAT RELATING TO PROMOTIONAL, INTERNAL AND COMMERCIAL USES AND LICENSING MAY BE OBTAINED FROM MPEG LA, LLC. SEE HTTP://WWW.MPEGLA.COM.
AVC/H.264: The use within this Software of any files using AVC/H.264 encoding and/or decoding are subject to the following restrictions: CERTAIN SOFTWARE HEREIN IS LICENSED UNDER THE AVC PATENT PORTFOLIO LICENSE FOR THE PERSONAL AND NON-COMMERCIAL USE OF A CONSUMER TO (I) ENCODE VIDEO IN COMPLIANCE WITH THE AVC STANDARD (“AVC VIDEO”) AND/OR (II) DECODE AVC VIDEO THAT WAS ENCODED BY A CONSUMER ENGAGED IN A PERSONAL AND NON-COMMERCIAL ACTIVITY AND/OR WAS OBTAINED FROM A VIDEO PROVIDER LICENSED TO PROVIDE AVC VIDEO. NO LICENSE IS GRANTED OR SHALL BE IMPLIED FOR ANY OTHER USE. ADDITIONAL INFORMATION MAY BE OBTAINED FROM MPEG LA, L.L.C. SEE HTTP://WWW.MPEGLA.COM.
HEVC/H.265: The use within this Software of any files using HEVC/H.265 encoding and/or decoding are subject to the following restrictions. CERTAIN SOFTWARE HEREIN IS COVERED BY ONE OR MORE CLAIMS OF THE PATENTS LISTED AT PATENTLIST.HEVCADVANCE.COM, LICENSED UNDER PATENT PORTFOLIO LICENSES, AND MIGHT HAVE RESTRICTED RIGHTS OF USE AND/OR DISTRIBUTION. IN THESE CASES, NO LICENSE IS GRANTED OR SHALL BE IMPLIED FOR ANY OTHER USE. ADDITIONAL INFORMATION MAY BE OBTAINED FROM MPEG LA, L.L.C. SEE HTTP://WWW.MPEGLA.COM AND/OR HEVC ADVANCE, L.L.C SEE HTTP://WWW.HEVCADVANCE.COM.
Your use of this Software to distribute CD’s, streaming video, or other media, or certain other commercial uses, may require additional licensing from other appropriate licensing sources, and no warranty is made otherwise.
This Software may include certain software, including libraries, licensed under the Lesser General Public License (LGPL) of the Free Software Foundation and other licenses. Some of the above restrictions may not apply to such software, and no warranties apply to such software. Information on such software, and relevant rights and limitations, is provided for review in the “Licenses” folder installed with the software. To the extent required by such open source license, the terms of such license will apply to such open source component in lieu of the relevant provisions of this Agreement. If such open source license prohibits any of the restrictions in this Agreement, such restrictions will not apply to respective open source component.
NDI® is a registered trademarks of NDI. NDI claims either federal or common law rights in this and the other trademarks found at www.NDI.video. All other brand names, product names, or trademarks belong to their respective holders.
The following terms apply to the use of the Content data that constitutes or is provided with the Software. The computer software, images, printed materials, and other content files, including any files containing photos, video clips, or music (collectively called the "Content Data") distributed with or in connection with the Software or subsequent updates and versions thereof (all such Images and Files), are proprietary and all copyrights are owned by NDI and/or its Licensors. NDI and the parties who granted NDI special permission to include their respective material as part of the Content Data own and reserve all rights. The Content Data is for your use only, and not to be distributed in whole or in part by you, whether or not incorporated into any other content or work, unless you have been expressly granted such right to incorporate the Content Data into your content or work. Certain specific Content Data may have express permissions granted with it. You agree to indemnify and hold harmless NDI and its officers, directors, employees and agents ("Indemnitees") for any and all losses, damages, liabilities, claims, costs, or expenses, including reasonable attorneys' fees, incurred directly or indirectly by the Indemnitees in connection with your use of the Content Data for any unlawful, unauthorized, or prohibited purpose. You may not sell, sublicense, loan, give, or transfer any part of the Content Data or any copies thereof (except in accordance with the aforementioned permitted use in a work created by you), to another person or company. Under no circumstances shall the Content Data be transferred to third parties through the use of on-line services or networks. In the event of a conflict between the terms of this License and this Limited Content License, the latter terms shall control.
You agree to comply with all applicable export/import laws and regulations when using or transferring this Software. You agree that neither the Software or any product including the Software is being or will be shipped, transferred or re-exported, directly or indirectly, into any country, or any organization or individual prohibited by any applicable export sanctions law. Any violation of this provision will terminate the license and void the transfer.
The software licenses, limited warranties, and all other terms contained herein shall be construed under the laws of Sweden, notwithstanding its conflicts of law provisions.
If any provision herein shall be held by a court of competent jurisdiction to be contrary to law, that provision will be enforced to the maximum extent permissible and any remaining provisions will remain in full force and effect.
The warranties provided herein give you specific legal rights. The warranties provided herein may be modified by applicable state or national laws; in some cases, you may have additional warranty rights that are mandated by the laws of a particular state or country. The above warranty limitations will not apply in case of personal injury where and to the extent that applicable law requires such liability.


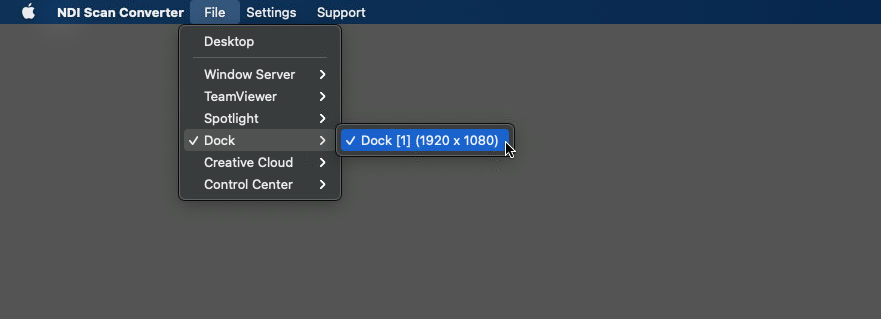
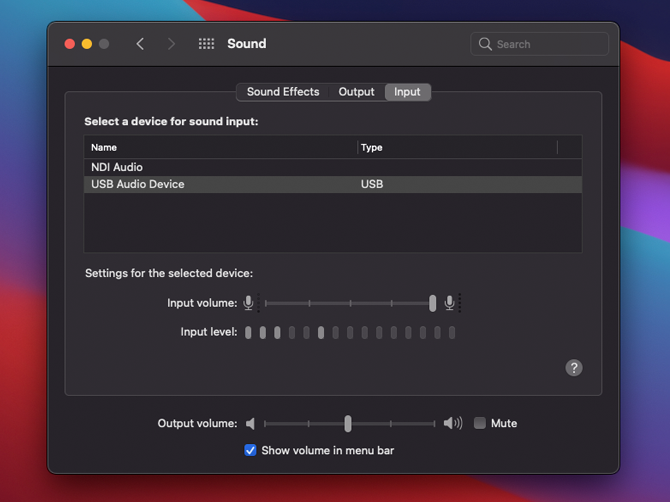
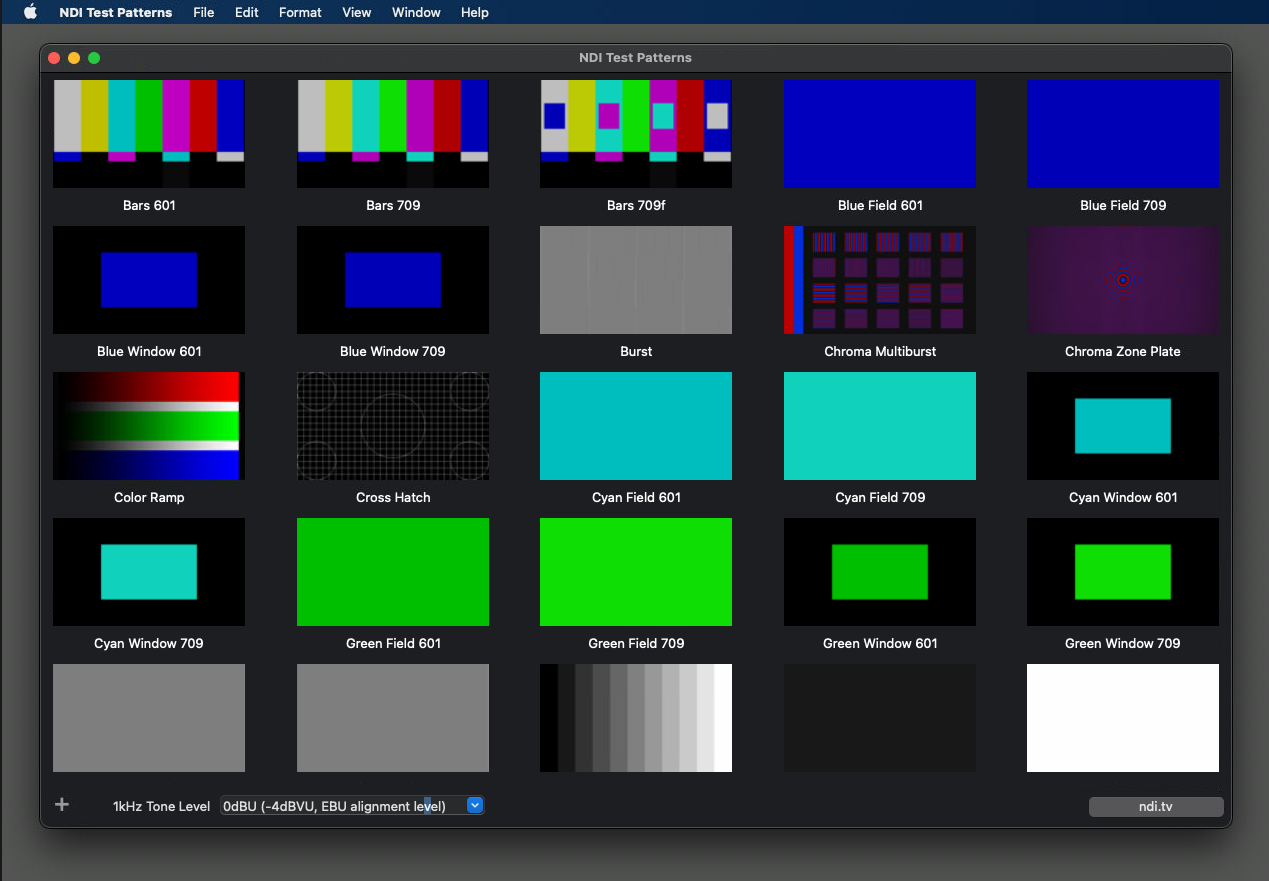
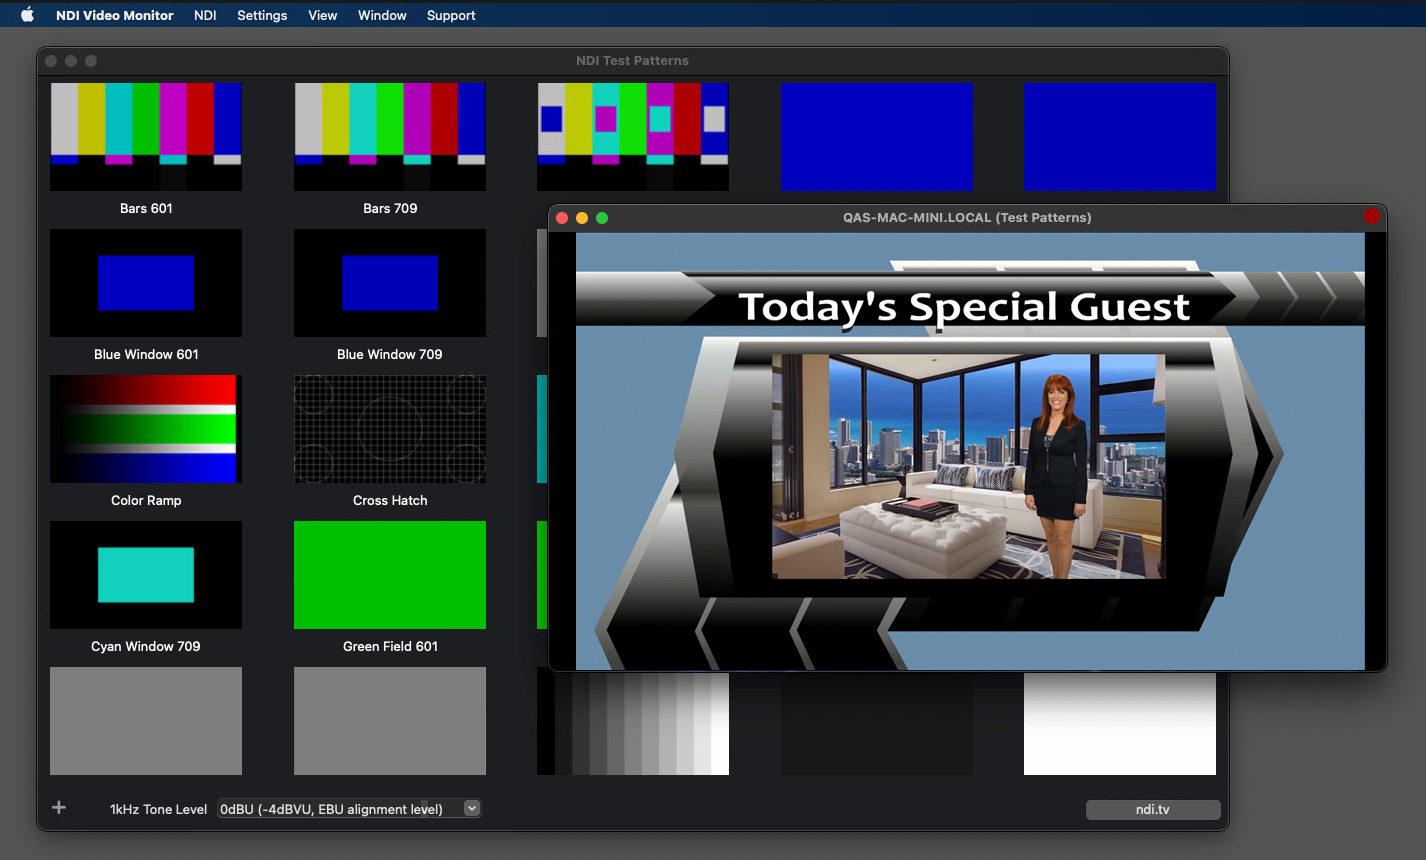

Audio Source Specify a particular audio source to be embedded into the NDI stream created by the NDI Screen Capture.
Capture Mouse Pointer
KVM Control The KVM option in NDI Screen Capture allows for remote computer control over a network. When this feature is enabled, you can not only capture and send the computer's screen over the network using NDI but also remotely control the computer's keyboard and mouse inputs from another device.
Help Access the Screen Capture Help Assistant and a quick web link to ndi.video for more information about NDI and NDI Tools.
A Windows computer. I used the LattePanda 3 Delta.
https://www.lattepanda.com/lattepanda-3-delta. This computer is compact, powerful, and very affordable.
An audio interface with Side Tone functionality.
This feature is essential in a commentary station, as it allows the commentator to hear themselves without delay, helping them avoid straining their voice in a noisy environment. I used the Focusrite Vocaster Two audio interface.
A control surface to manage the commentary station functions. The Elgato Stream Deck is a great choice.
OBS Studio and the following plugins:
Distro AV for NDI support
OBS Mute Filter
OBS-Asio
Transmitting the commentator's microphone signal to the production
Sending and receiving talkback audio for coordination between the commentator and production
Receiving and displaying the program video feed from the production with specific audio (usually international audio or an N-1 mix)
Install the drivers for your audio interface on your Windows computer. ASIO driver support is preferable.
Install NDI Tools.
Download and install OBS Studio from this link: https://obsproject.com/
After the installation, OBS will prompt you with some options
No specific selections are necessary as we will not be streaming or recording. You can click Cancel and proceed.
Set the video format in OBS to match the video production format, which in my case is 1080 P50.
Go to Settings and then Video.
Download and install the necessary plugins:
Distro AV to add NDI support to OBS Studio - https://github.com/DistroAV/DistroAV/releases/download/6.0.0/distroav-6.0.0-windows-x64-Installer.exe
ASIO drivers support for OBS - https://github.com/Andersama/obs-asio/releases/download/v3.2.1f/obs-asio-3.2.1-windows-x64-Installer.exe
This plugin doesn’t have an installer, so you’ll need to install it manually in OBS Studio by following the developer’s instructions. - https://github.com/norihiro/obs-color-monitor/wiki/Install-Windows
Now that OBS Studio and the plugins are installed, configure the commentary station:
Create the audio channel for live commentary:
Select Asio Input Capture as the source and rename it to MIC-LIVE. Configure this source by selecting the Focusrite USB Audio in MONO mode with the Host Microphone as OBS Channel 1. Then, close the source panel.
Set up the talkback channel:
Select Asio Input Capture again and rename it to MIC-TALKBACK. Configure this input the same way as MIC-LIVE.
Add the intercom (talkback) audio channel from the production:
Select NDI® Source as the source and rename it INTERCOM. In the configuration panel, select the NDI source the director or production team will use to communicate with the commentator. In my case, this source is generated by a computer named PRODUCTION-PC, and the NDI stream is called TALKBACK_TO_COMM.
Add the NDI feed the commentator will view, called PGM_MIX_MINUS, also generated by PRODUCTION-PC.
Organize the audio workflow:
Select the MIC-LIVE source and click on Filters.
Add the following filters:
Discard Audio by UI
Dedicated NDI® output (Audio Only)
Configure the NDI stream as MIC-LIVE.
Repeat for MIC-TALKBACK, naming this stream MIC-TALKBACK.
The Discard Audio by UI plugin lets users control the audio channel to broadcast commentary or talk with production. It ensures that muting the audio channel in the mixer also mutes the NDI output.
Route the PGM and INTERCOM NDI sources to the commentator’s headphones:
Ensure the Windows audio interface is the same as used in OBS.
In OBS Audio Mixer, under Advanced Audio Properties, enable monitoring for the PGM and INTERCOM channels.
Customize the OBS Studio interface:
In the Docks menu, disable Scenes, Sources, Scene Transitions, and Controls.
Hide the Desktop Audio source in the audio mixer as it’s not needed.
Then, move the audio mixer to one side of the interface. Changing the layout direction gives more space to the preview window showing the PGM return feed.
Step 10
Set up and configure the Stream Deck and OBS Studio plugin to manage the LIVE, TALKBACK channels, and PGM and INTERCOM levels.
Create a TALKBACK button that mutes MIC-LIVE and enables MIC-TALKBACK, using the Multi Action Switch function.
First action disables MIC-LIVE and enables MIC-TALKBACK, and the second reverses the process.
Add a Push to Mute button for the MIC-LIVE channel for a cough button.
Add a toggle mute button for MIC-LIVE.
Use two rotary controls to adjust the PGM and INTERCOM channel volumes.
And that’s it! You now have a fully functional commentary station with NDI.


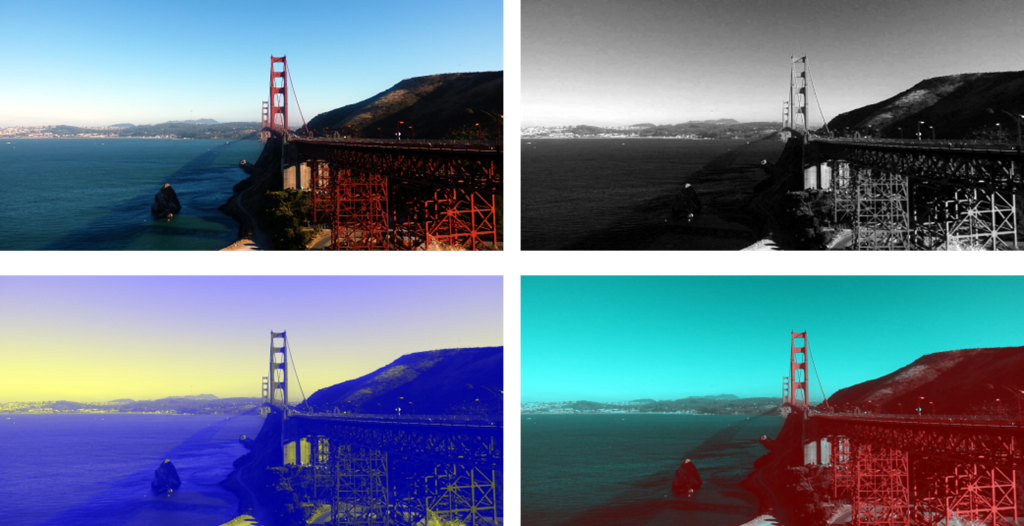
The NDI configuration settings are stored in JSON files. The location of these files varies per platform and is described in the next section of the manual.
When using the NDI Advanced SDK, all settings are per instance and so entirely separate settings may be used for every finder, sender, and receiver; this is incredibly powerful by allowing you to specify per sender or receiver which NICs are used, formats are used, what the machine name is, etc...
Please pay extra attention to the value types, as it is important that these match what is listed here (e.g., true rather than “true”). Also, please note that all these parameters have default values that are the recommended best configuration for most machines; we only suggest you change these values if there is a very specific need for your installation.
The following is example of a JSON configuration file that illustrates the parent/child relationship between the hierarchy of objects. Some of these settings such as vendor are only relevant to the Advanced SDK.
In NDI, administrative settings can be used to limit the rights of almost all NDI tools and also enable NDI settings to be specified by a system administrator without any ability for a user to override them. Here is an overview of these settings and how a system administrator can set them to configure specific machine settings.
The NDI configuration settings are documented in the Advanced SDK documentation, and we refer to that to get the full description of each setting.
If any registry key value is missing, it will use the global configuration file on the system, which NDI Access Manager normally configures.
All NDI Tools settings are stored under the registry location HKEY_LOCAL_MACHINE\SOFTWARE\NDI\Pemissions and are of type DWORD. When set to 1, they indicate that a feature is allowed, and when they are set to 0, that feature is disallowed.
Was this helpful? Please let us know by rating this page; you can also leave a .
Time, timecode, and synchronization of NDI streams
While it seems like the concept of time and a timecode value for a given audio or video frame should be fairly straightforward, various real-world issues can quickly make time, timecode, and timing very complicated. This document attempts to codify how the NDI library handles time values and proposes best practices of how to handle time values in various situations.
All time values in the NDI SDK are represented as 64-bit integer values with units of 100 ns. Time values for a frame can be synthesized by the SDK or provided by the application layer. When synthesized by the SDK, both the timecode and timestamp field use the same logic to synthesize a time value, however this logic varies between platforms (discussed in more detail below).
The NDI timecode value has no specified epoch so the use and interpretation of timecode values is somewhat workflow dependent.
NDI expressly does not define an epoch for the timecode value, with the idea that SMPTE timecode values converted into 100 ns units are legal, including 0 which would represent the legitimate 00:00:00:00 hh:mm:ss:ff SMPTE timecode value. As with SMPTE timecode, the NDI timecode may increment in step with real or "wall-clock" time or it may increment faster or slower than real time (eg: fast-forward or slow-motion), potentially even stopping or decrementing (eg: paused or rewinding). It is also possible for the timecode value to be counting (normal playback) but not incrementing every frame, as legacy SMPTE timecode formats cannot represent frame rates over 30 fps.
Timecode values for live sources, however, should generally increment in step with real time. While not mandatory, it is recommended that the epoch used for timecode values for live sources use either the Unix epoch for timecode values which also include date information or zero for SMPTE style timecode that does not include any date information and "wraps" after 24 hours.
While not explicitly specified by the documentation, timecode values should be considered to represent the end of the associated audio or video data. This way implementations that are capturing real world data (eg: video camera or screen capture) will have similar timecode values to applications which are having the NDI SDK synthesize the timecode. The NDI SDK generates the timecode for a frame when that frame is passed to the SDK.
When the NDI library synthesizes timecode, the timecode value depends on the previous context of the stream. If the first frame passed to the NDI library has the timecode value set to NDIlib_send_timecode_synthesize, the initial timecode value will be derived from the current UTC time. Subsequent frames submitted to the NDI library will be advanced by the frame time as determined by the frame_rate_N and frame_rate_D values for video frames and the sample_rate and no_samples values for audio frames.
If the application provides a timecode value other than NDIlib_send_timecode_synthesize and subsequently requests that timecode be synthesized, new timecode values will be calculated from the last user-provided timecode value, incremented by the frame time determined by the frame details as above.
Additional details can be found in the
NDI timestamp values represent the time a frame was passed to the NDI SDK and are referenced to the UNIX time epoch (00:00:00 UTC on 1 January 1970).
The timestamp value will be generated by the NDI SDI if the timecode value passed with the NDI frame is either zero or NDIlib_send_timecode_synthesize.
Applications are strongly encouraged to allow the NDI library to synthesize the timestamp value.
Conversion between SMPTE timecode, NDI timecode values, MPEG-2 PCR time base values, and absolute (or "wall clock") time can be confusing and complex. The guidelines and formulas from SMPTE Engineering Guideline 40-2002 are recommended for anyone wishing to convert between these formats. To convert to or from NDI timecode values, use the conversion routines for absolute time and convert absolute time (in seconds) to or from NDI timecode (in 100 ns units) using the following formulas:
NDI time = absolute time / 100e-9
absolute time = NDI time * 100e-9
Note that like NDI time values, absolute time values can represent more than 24 hours. The conversion formulas in EG 40 account for this.
Note that for some formats, conversion between SMPTE and NDI timecode values requires information that is not necessarily easily available. For instance fractional frame rates (eg: 29.97 or 59.94 fps) may use drop-frame or non-drop-frame timecode. If this distinction is critical for a particular use case, the application should provide a means to select the appropriate option.
The logic used to determine the current UTC time is platform specific and has changed over time as operating systems have provided improved APIs.
UTC time is generated using GetSystemTimePreciseAsFileTime() with the return value adjusted to the Unix epoch. The time values will track system time, including any potential corrections made by clock synchronizing code such as NTP or PTP clients.
UTC time is generated using QueryPerformanceCounter() with the epoch anchored to UTC using getSystemTimeAsFileTime() when the NDI instance is created.
NOTE: GetSystemTimeAsFileTime() has approximately 10 millisecond precision which is why QueryPerformanceCounter() is used. The performance counter timebase is typically a free running clock that is not corrected by NTP or PTP and is often not particularly accurate (frequency errors of 1-2% or more are common).
UTC time is generated using std::chrono::high_resolution_clock with the epoch anchored to UTC using gettimeofday() when the NDI instance is created. The high resolution clock is typically a free running clock that is not corrected by NTP or PTP and is often not particularly accurate (frequency errors of 1-2% or more are common).
Versions following NDI 6.3 will switch to using clock_gettime() with CLOCK_REALTIME to more closely match the behavior of NDI on modern Windows platforms.
When synthesizing timecode values and "clocking" audio or video sending, the NDI library (up to and including version 6.3.0) uses an integer time value in units of 100ns for the frame duration. This means for example that a frame rate of 59.94 fps which should be 166,833.333... will instead be 166,833 meaning that the NDI timecode values and clocked frame rate will show some drift from the expected values and times over a long period of time (approximately 0.173 seconds every 24 hours for 59.94 fps).
Note that frame rates that can be exactly represented by 100 ns units (such as 25 and 50 fps) are not affected by this issue.
Versions following NDI 6.3 will switch to using a running frame count along with the frame_rate_N and frame_rate_D fields to avoid this drift, which is mentioned here for those concerned with absolute accuracy or long term drift.
All NDI senders should follow some basic best practices whenever possible:
The system clock should be synchronized to UTC via NTP, PTP, GPS, or similar
Best practice when the user application is generating time values for live sources:
The timebase should based on “wall clock” time, as used by the NDI SDK when synthesizing timecode/timestamp values
All frame types sent to a given NDI sender should use the same timebase
All NDI senders on a given system should use the same timebase
Sources which are "live", or being dynamically generated (such as a rendered graphics overlay, virtual 3D enviornment, or similar) should generate timecode values based on the current UTC time.
Applications without an inherent sample timebase should generally set “clocking” to true and allow the NDI SDK to generate timecode values, or alternately use the Genlock API (see below) to pace sending.
Applications with an inherent timebase (eg: live screen capture of a GPU output) should be treated as a hardware source.
Applications which are playing back recorded content such as a media player or video editing application preview should generally use a timecode value related to the specific media clip or project. For media which has no inherent timecode, convention is to start timecode values with 00:00:00:00 at the start of the clip or project.
This API is designed for software based NDI senders with no inherent video or audio timebase, such as a graphics rendering engine or perhaps a media player or DDR. The Genlock API allows a sender that would otherwise use the “clocked” feature of the NDI SDK to pace sending to instead pace sending based on a reference NDI source. This allows software defined workflows (eg: virtual machines or cloud instances) to synchronize without the need for traditional genlock signals and video I/O cards. This API cannot be used to synchronize a source with an inherent timebase of its own, such as a video camera or video capture card. These hardware devices need to be synchronized with more traditional methods (eg: traditional genlock via black-burst).
To turn a free-running NDI sender into a genlocked NDI sender, the clock_video and clock_audio flags are set to false when creating the NDI sender and a call to NDIlib_genlock_wait_video or NDIlib_genlock_wait_audio is added into the sending loop to pace the generation of video or audio frames. These calls will block until it is time to send the next frame and the return value identifies whether a valid NDI genlock signal is present and being used (true) or if timing is being driven by the local system clock (false).
Hardware sources such as video capture cards have an inherent video and audio timebase that is typically not configurable via software but is instead driven by the upstream video timing. In this case, the applications should set “clocking” to false and allow the hardware to pace the frame sending.
Best practice for generating timecode values for these devices is to generate a UTC based timecode value as close as possible to the reception of the complete frame of audio or video data, ideally as close to the hardware callback as the OS allows. If there is a known latency in the input chain (eg: a known delay in a camera’s signal processing pipeline) that offset can be subtracted to provide a timecode value more representative of exactly when that audio or video data existed in the real world.
Alternately, a live production environment may have a specific workflow dictating how timecode values should be generated (perhaps being distributed via serial link, black-burst with VITC, LTC, or some other method). In this case, the production specific workflow requirements should be followed.
The NDI library encodes and transmits audio and video frames from the sender to the receiver as quickly as possible. The amount of time it takes to send any given frame is dependent on multiple variables, including the format, sender and receiver CPU/system performance, network architecture, network traffic, and other factors. Typically, audio frames require less processing than video frames resulting in slightly lower NDI transport latency for audio vs. video frames (on the order of a few milliseconds).
In order for downstream NDI receivers to be able to properly synchronize received audio and video streams, it is important for the NDI sender to pass aligned audio and video data to the NDI library. This does not mean that audio frames need to exactly match the length of a video frame and be submitted at the same time as a video frame (although this is perfectly acceptable), but the timecode values for audio packets need to accurately represent the audio timing relative to the video frame.
In addition to any delay mismatch potentially added by NDI, capture and playback pipelines often have significantly different delays for audio vs video paths. Measuring and accounting for any audio to video offset outside of NDI is outside the scope of this paper. All following content regarding synchronization assumes the audio and video data are properly aligned when passed to the NDI sender instance.
Since the difference between audio and video latency in NDI is typically small, simply passing the received NDI audio and video frames directly to the application for processing or output as soon as they are received will often maintain sufficient synchronization between the streams for practical use cases. In those cases where the latency difference added by NDI is significant (UHD resolutions can exhibit significant video encode and decode delay on lower-powered systems) or when audio and video alignment is critical, applications may wish to delay the audio or the video stream to restore alignment.
Timecode or timestamp values can be used to determine the relative timing between the audio and video streams and some additional delay can be added to the earlier stream (the stream with lower latency) to bring them into alignment. Timecode values are typically more accurate for this than the timestamp value, but note that applications need to be able to handle cases where the timecode value does not increment uniformly as discussed in the "NDI timecode" section, above. The AVSync API (below) can also be used to obtain the audio data which corresponds to a particular video frame.
Broadly speaking, the AVSync API is used for aligning audio and video data at the receiver when the audio is not being resampled. This would be useful for example when recording an NDI source into a multimedia file, or when mixing multiple NDI streams with synchronized timing between the NDI senders and receiver such that no frame synchronization or audio resampling is needed.
The AV Sync API is used by an NDI receiver to pull aligned frames of audio and video data from the NDI stream and its functionality is essentially summarized as “Provide me the audio samples which align in time with this specific video frame”. Note that no resampling of any sort is performed, so users of this API need to be able to handle both clocking differences between the NDI sender and receiver as well as the case when the audio sample rate is not exactly locked to the video frame rate.
With NDI, the sender determines all stream details, including frame timing and audio sample rate. While some receiver applications are able to follow the sender frame timing, frequently an NDI receiver will need to process the received audio and video frames on a local timebase which is not synchronized to the sender. This process is performed by a frame synchronizer.
Audio and video frame timing in NDI is driven by the sender, however NDI receivers often have a local audio or video timebase for signal outputs and the received NDI frames need to be synchronized to these output timebases. The NDI library provides the frame synchronizer API to assist with this task.
There are several details that are important to understand when using the NDI frame synchronizer to retime audio and video data at the receiver. First, the basic operating principle of the frame synchronizer is that an NDI receiver application should be requesting audio and video frames from the frame synchronizer based on its local timebase, typically derived from physical audio and video output hardware. The application should try to request frames (especially audio frames) with as consistent timing as possible, ideally driven by something like a hardware interrupt.
When a frame is requested, the frame synchronizer returns the most appropriate recent video frame or retimed audio samples. If no recent video or audio is available, null frames (video) or silence (audio) will be returned.
NOTE: When using the NDI Advanced SDK, the frame synchronizer only supports compressed SpeedHQ video. The H.264 and H.265 video formats used by NDI HX as well as the AAC and Opus audio formats do not function properly when passed through the frame synchronizer.
It is critical to note that the frame synchronizer does not modify the video frames in any way, including the timecode, timestamp, and frame_format_type fields which remain unchanged. If the receiver asks for a progressive frame but the NDI source is sending interlaced video, the frame_format_type returned will be either NDIlib_frame_format_type_field_0 or NDIlib_frame_format_type_field_1 and not NDIlib_frame_format_type_progressive. Similarly, if the receiver is operating with an interlaced output and asks for a NDIlib_frame_format_type_field_0 or NDIlib_frame_format_type_field_1 but the NDI sender is sending progressive video, the frame_format_type returned by the frame synchronizer will be NDIlib_frame_format_type_progressive.
Additionally, if the video source is interlaced and the receiver application requires the normal alternating sequence of frame 0 and frame 1 types from the frame synchronizer, it is important to explicitly request either NDIlib_frame_format_type_field_0 or NDIlib_frame_format_type_field_1 when asking for a frame. If the application instead requests a NDIlib_frame_format_type_progressive or NDIlib_frame_format_type_interleaved frame, the frame synchronizer will return the frame nearest in time regardless of its field, meaning the receiver could see consecutive field 0s or field 1s.
If the receiver application needs a different format (progressive or interlaced) than is currently being sent by the NDI sender, it is up to the application to perform any needed conversion.
The NDI framesync instance tracks the effective audio sample rate of both the sender (based on received audio frames) and the receiver (based on audio frames requested by the application) and uses a sample rate converter (SRC) to synthesize audio appropriate for playback on the receivers timebase. While the tracking logic does account for jitter, the SRC performance improves with more consistent timing of application requests for audio frames.
Unlike video, where the original video format can be identified by the frame_format_type field, audio is dynamically resampled and the frame synchronizer generates new audio frames with the requested number of audio samples and channels. To identify the original source details, the receiver application can call the NDIlib_framesync_capture_audio() routine with sample_rate, no_channels, and no_samples set to zero and the original sender sample rate and number of channels will be returned.
Note that it is possible for audio format details (sample rate and number of channels) to change dynamically. Applications wishing to track sample rate or channel number changes in the original source should periodically request the original source details via the above method to monitor for changes.
It might be useful for NDI receivers to have some knowledge about the sender which is not currently communicated, such as:
The format of timecode values
System clock synchronization status
System clock synchronization reference
This information could potentially be passed as connection metadata Anyone with an application that would benefit from this and an interest in developing real-world use cases should contact the NDI team via the .
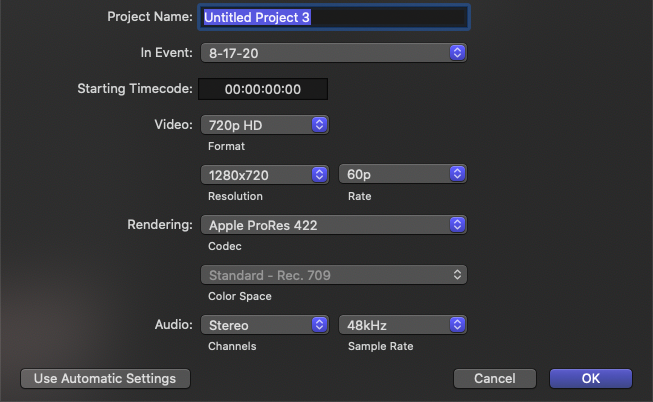
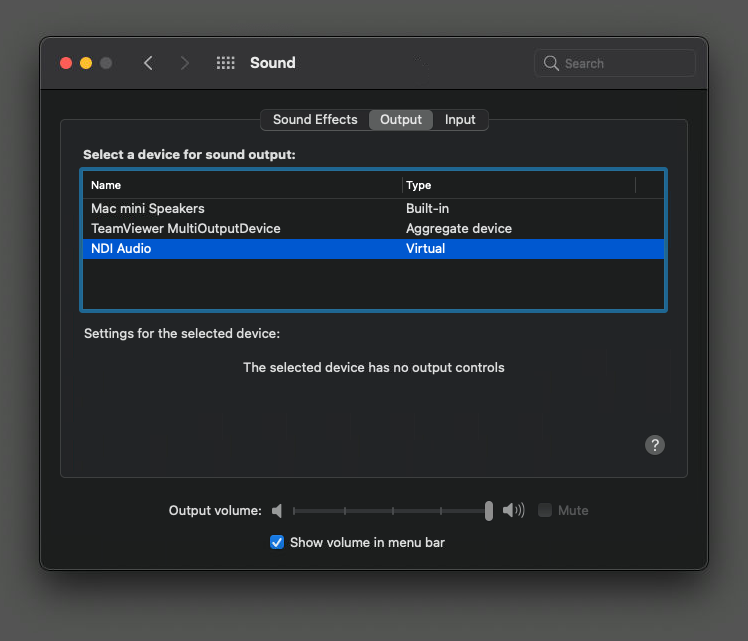

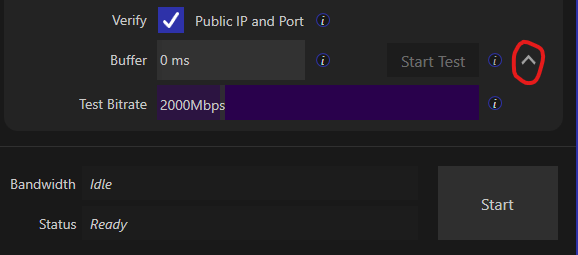
Audio and video timebase reference
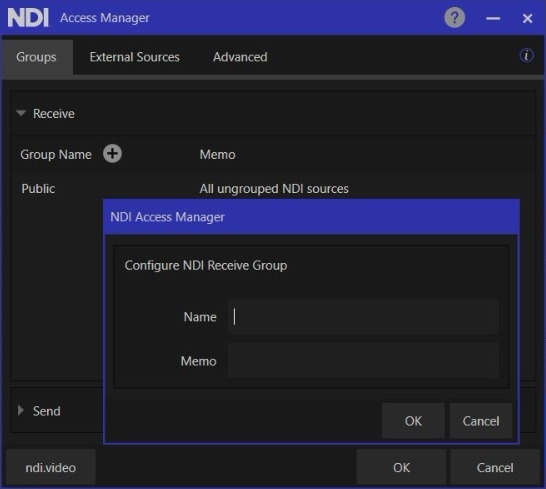


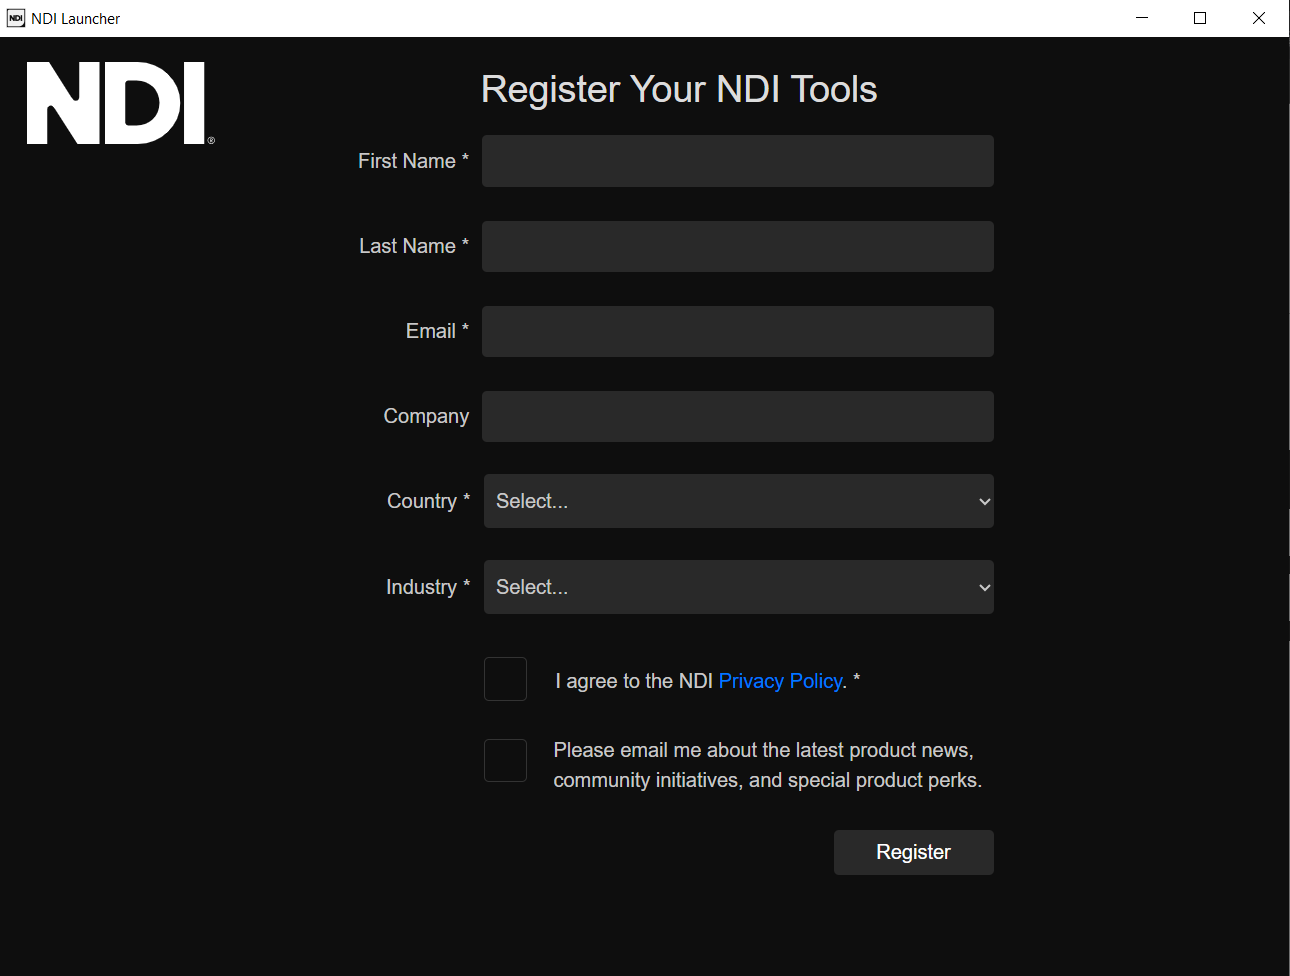
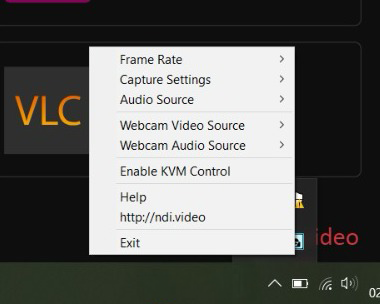
NDI is essentially codec-agnostic, meaning it is compatible with various codecs. Officially, it supports PCM, AAC, and Opus for audio.
An individual NDI stream can transport multiple audio channels. The number of channels supported depends on the codec used. PCM allows unlimited channels; in NDI, AAC can support 2 channels, while Opus can support up to 255 channels.
Multiple audio channels are multiplexed into a single NDI stream to maintain synchronization.
NDI Audio supports any sample rate; the standard for live production is 48 kHz.
The audio processing in NDI is 32-bit floating point, Internally, the processing is handled as 32-bit. On the sending side of NDI, APIs are available to accept audio in various formats, which are then converted to floating-point.
Currently, NDI technology does not allow for latencies similar to those offered by technologies such as Aes67, Ravenna, or Dante Audio. However, an NDI audio transmitter is capable of delivering a stream over the network in 6 ms. This latency might not be acceptable for some cases such as where a captured audio source, like a microphone, is simultaneously listened to in the same environment. Still, there are many use cases where this amount of latency may be acceptable.
The NDI protocol does not employ PTP-based clock synchronization internally, although it may be possible to employ external PTP synchronization software that's available on the market. NDI delivers all sent audio samples exactly and they can be captured to storage without loss, or if they need to be retimed at the receiver for real-time playback or processing, they will be resampled with high quality to adjust for small clock rate differences that may exist between the sender and receiver.
For some use cases such as driving line array loudspeakers or multitrack recording, clock synchronization between endpoints for sample-accurate synchronization between outputs is essential and protocols like Dante or Ravenna would be recommended. However, NDI audio is suited for a vast number of other use cases for networked audio.
Also note, there are scenarios where PTP-based clock synchronization is difficult or impossible to implement, and NDI is an excellent solution. This is because PTP is a multicast protocol, and clock synchronization using PTP also requires tight hardware integration. NDI has the advantage of being a pure software implementation that can run without multicast, making it suitable for functioning in environments like the cloud or across WANs or the Internet, where multicast is not available.
It's important to remember that, unlike other technologies, NDI allows for creating multichannel streams in which all audio channels are multiplexed while maintaining synchronization between them.
Comma-separated list of additional NDI Source Ips.
SOFTWARE\NDI\Adapters
Allowed
String
Comma-separated list of local NIC IP addresses that NDI will attempt to use.
SOFTWARE\NDI\Groups
Receive
String
Comma-separated list of NDI groups that any sources discovered (finder and receiver) will be within.
SOFTWARE\NDI\Multicast\Send
Mode
DWORD
1 when Multicast sending is enabled.
SOFTWARE\NDI\Multicast\Send
NetPrefix
String
The prefix for the IP address range that will be used.
SOFTWARE\NDI\Multicast\Send
NetMask
String
The network mask for multicast sending.
SOFTWARE\NDI\Multicast\Send
TTL
DWORD
The network TTL for multicast sending.
SOFTWARE\NDI\Multicast\Receive
Mode
DWORD
1 when multicast receiving is enabled.
SOFTWARE\NDI\Unicast\Send
Mode
DWORD
1 when sending over UDP mode is enabled
SOFTWARE\NDI\Unicast\Receive
Mode
DWORD
1 when receiving over UDP mode is enabled.
SOFTWARE\NDI\TCP\Send
Mode
DWORD
1 when sending over Multi-TCP is enabled.
SOFTWARE\NDI\TCP\Receive
Mode
DWORD
1 when receiving over Multi-TCP is enabled.
SOFTWARE\NDI\RUDP\Send
Mode
DWORD
1 when sending over Reliable UDP is enabled.
SOFTWARE\NDI\RUDP\Receive
Mode
DWORD
1 when receiving over Reliable UDP is enabled.
Is Screen Capture HX allowed to be run on this machine.
app.scanconverter
Is Screen capture allowed to be run on this machine.
app.scanconverter.kvm
Is the KVM functionality of Screen Capture allowed to be run on this machine.
app.remote
Is NDI remote allowed to be run on this machine?
app.remote.incoming
Are incoming NDI remote connections allowed on this machine, when this is disabled, the machine can only provide links that others can connect to.
app.vlc.video
Is VLC video output enabled on this machine?
app.vlc.audio
Is VLC audio output enabled on this machine?
app.testpatterns
May the test pattern tool be run on this machine?
app.bridge
Is NDI bridge allowed to be run on this machine?
app.accessmanager
Can Access Manager be run on this machine?
app.adobecc.transmit
Can the NDI output plugin be used with Adobe CC
app.adobecc.fileio
Can the NDI file IO plugin be used with Adobe CC
app.vst3
Can NDI Audio Direct be used on this machine?
SOFTWARE/NDI
MachineName
String
A replacement for the local machine name.
SOFTWARE/NDI/Networks
Discovery Service
String
One or more discovery servers to use. Comma-separated.
SOFTWARE/NDI/Networks
IPs
app.studiomonitor
Is Studio Monitor allowed to be run on this machine
app.studiomonitor.web
Is the web server within studio monitor allowed to be run on this
app.webcamera
Is the webcam tool allowed to be run on this machine?
String
app.scanconverterhx


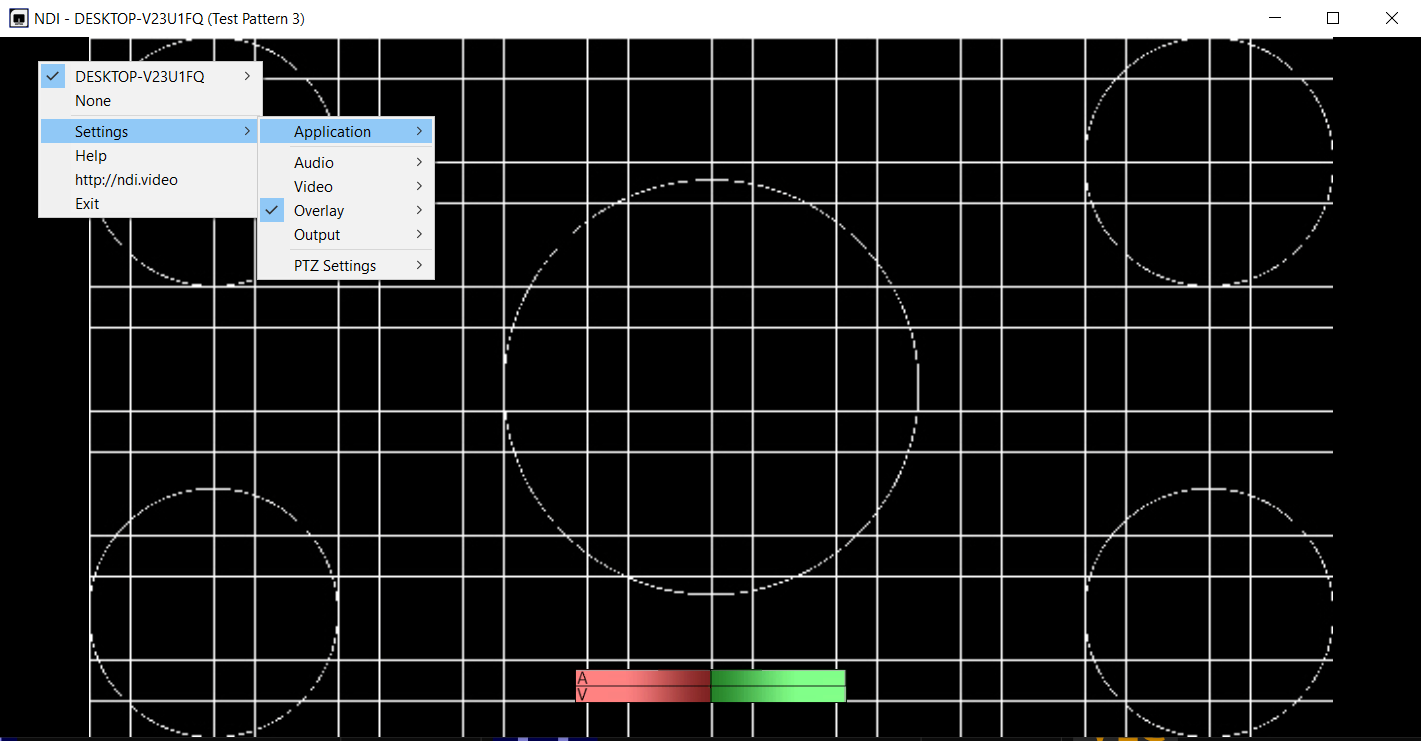
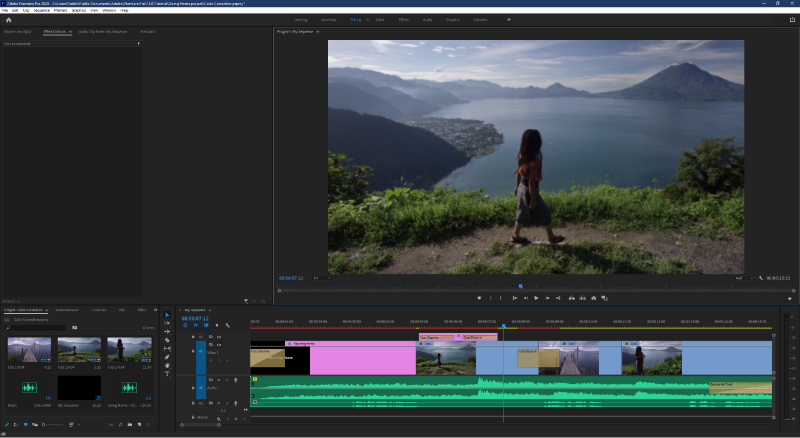
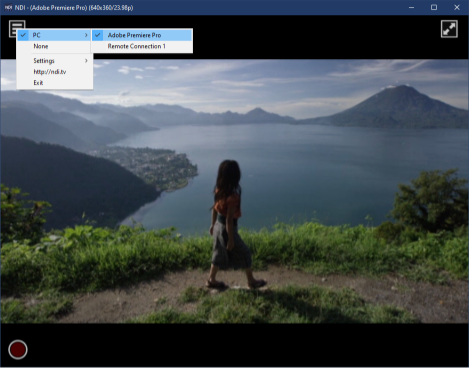
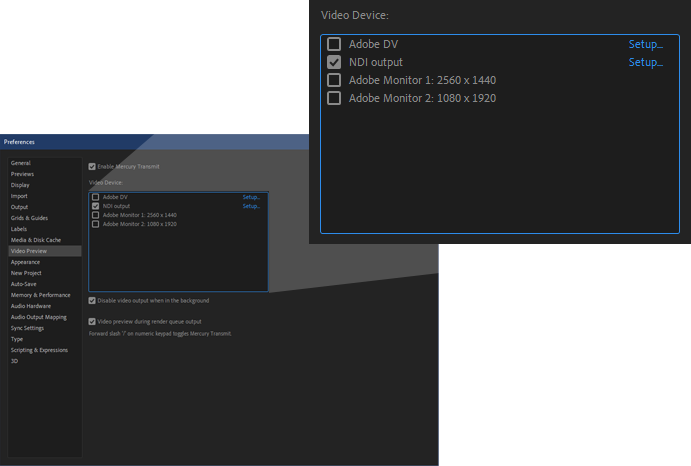
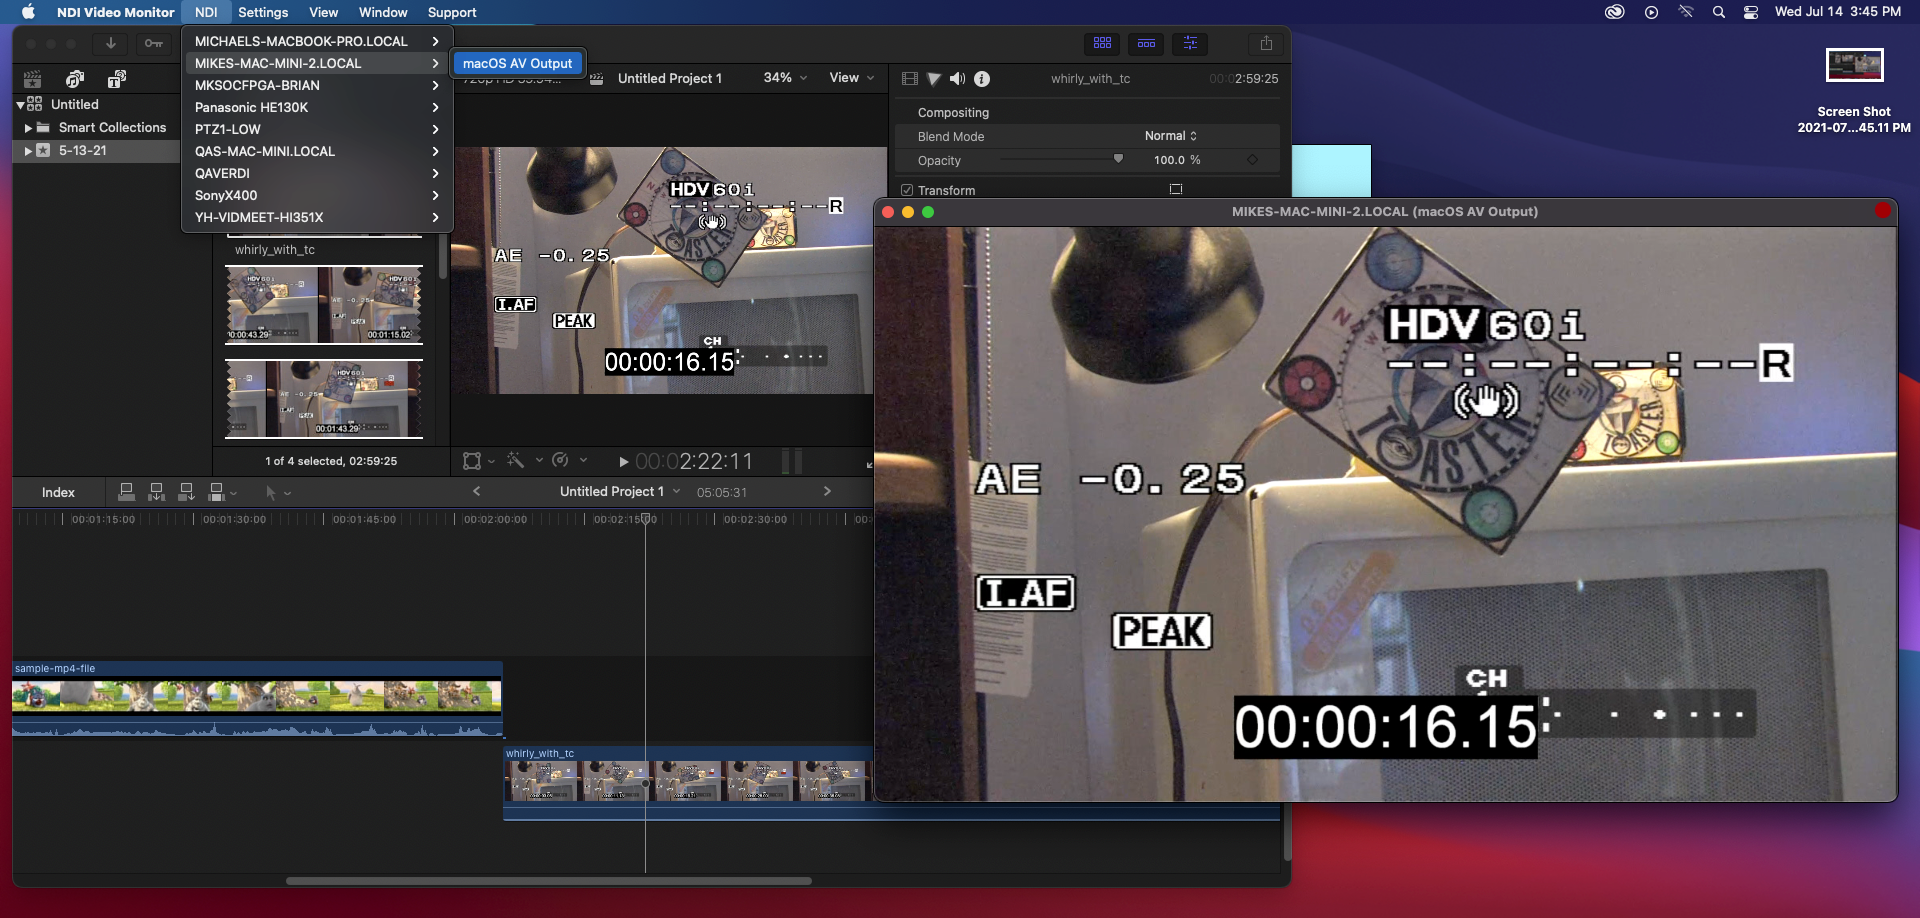
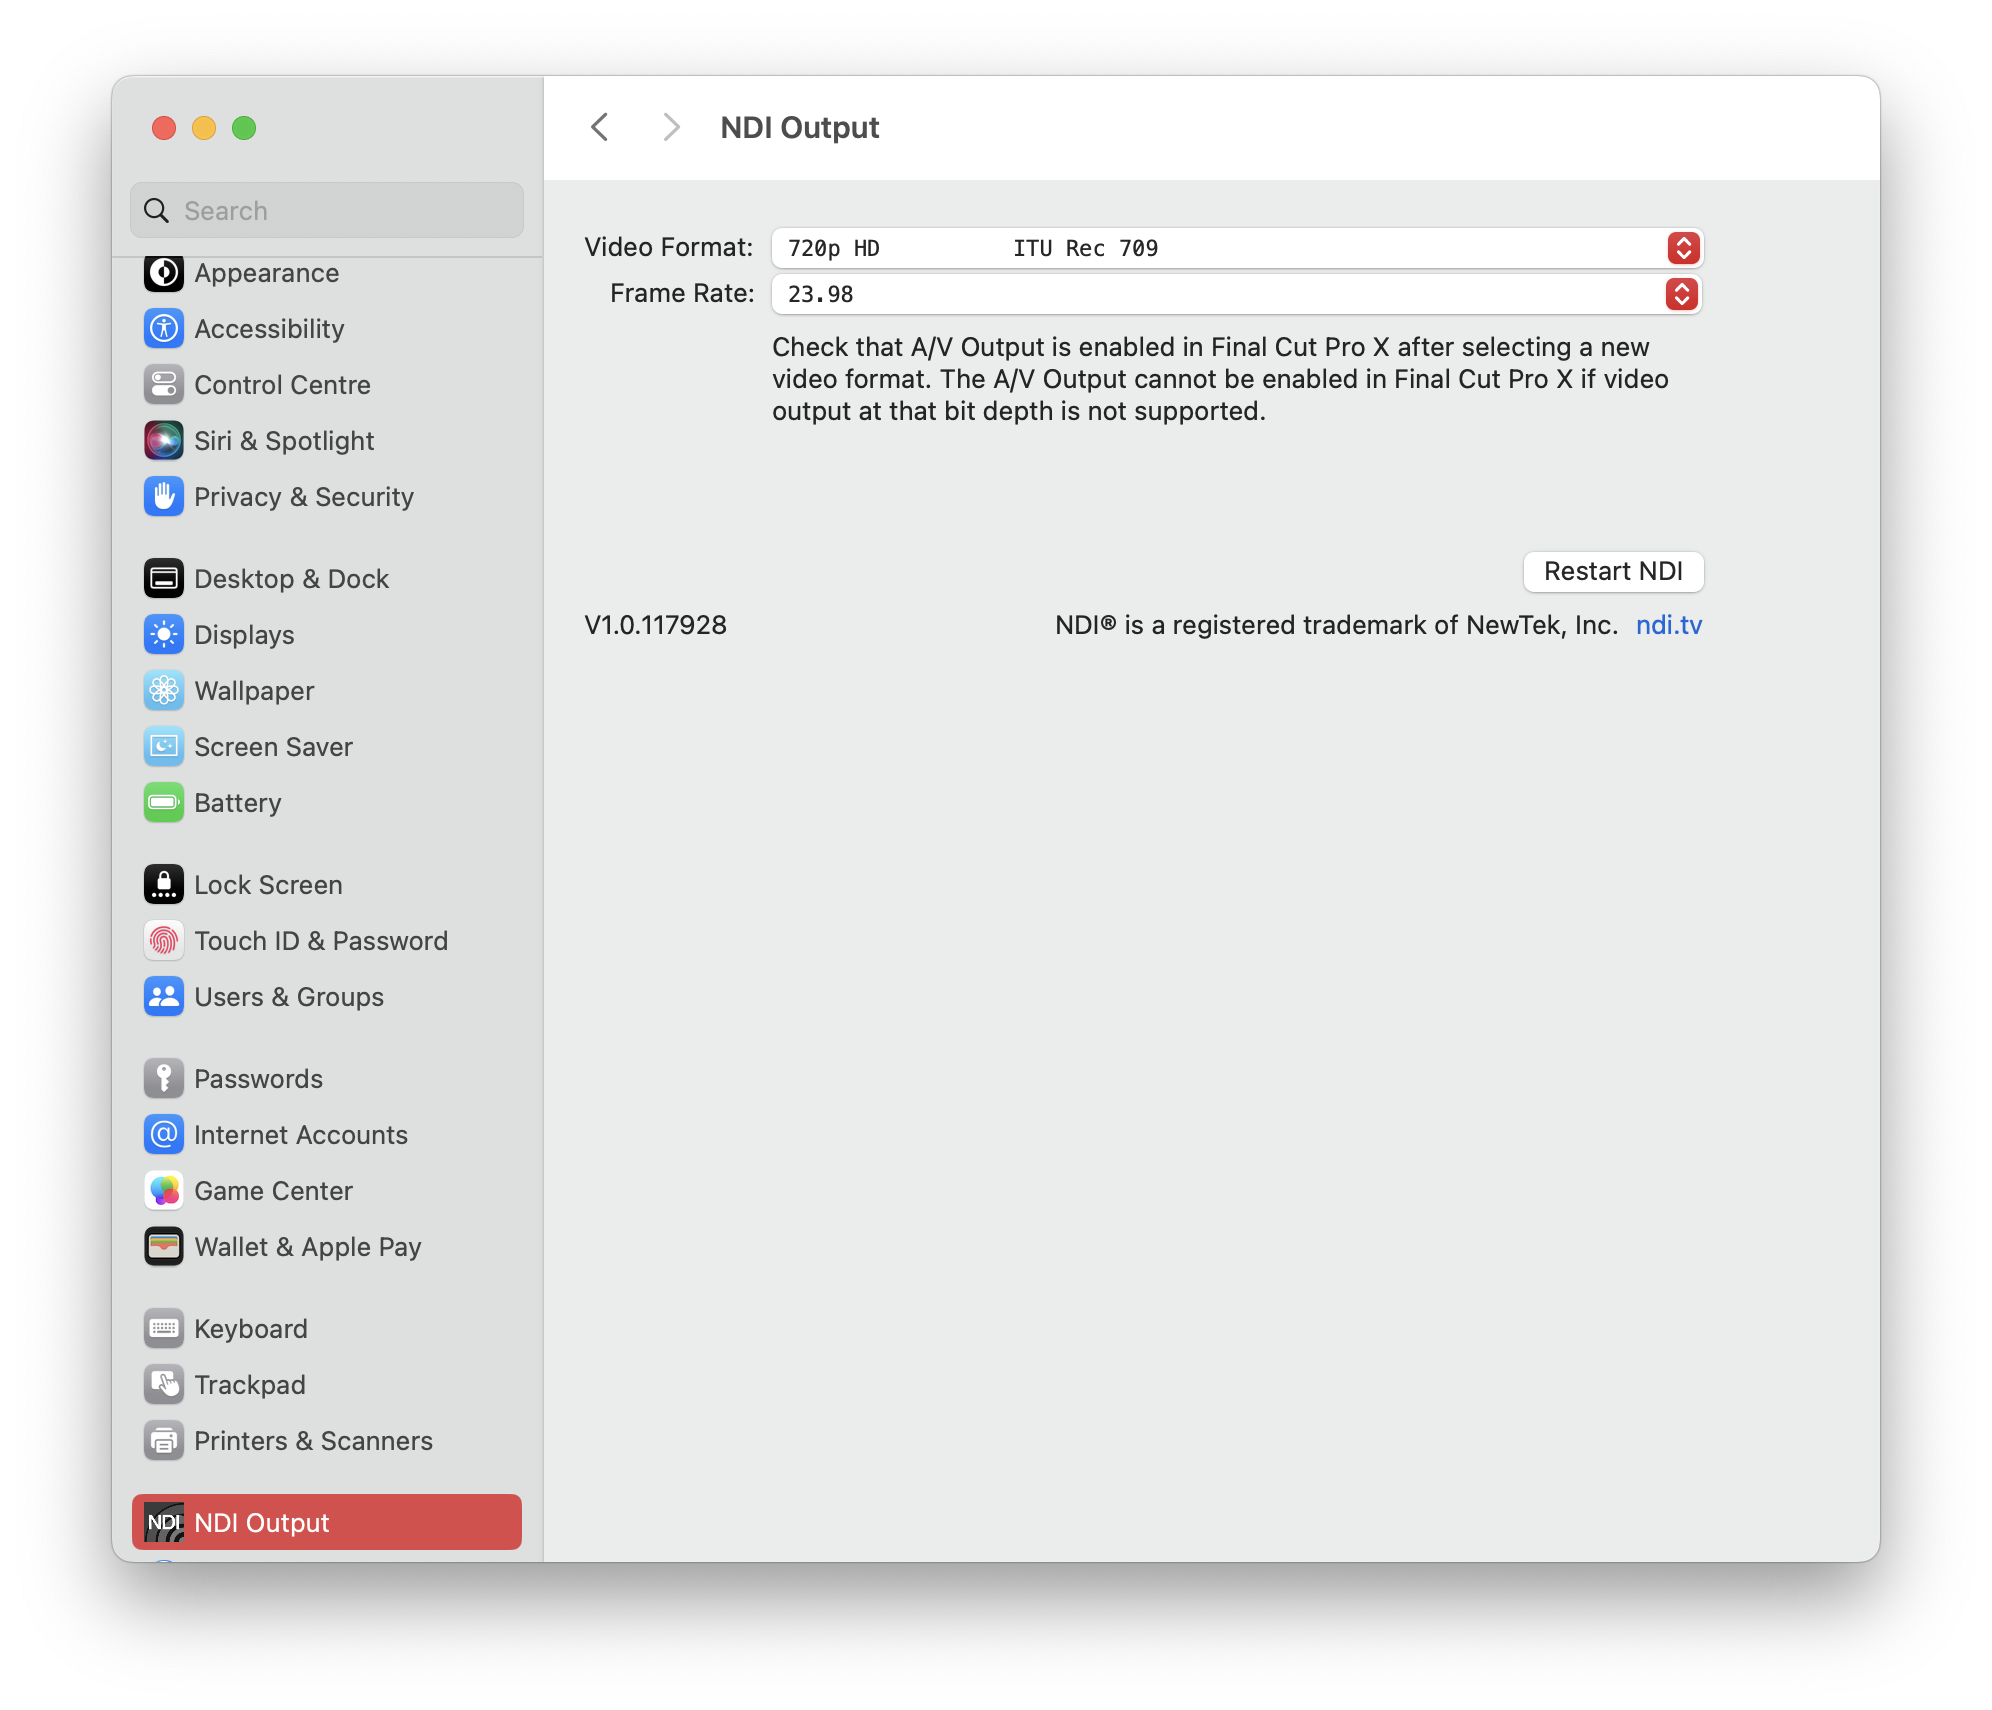
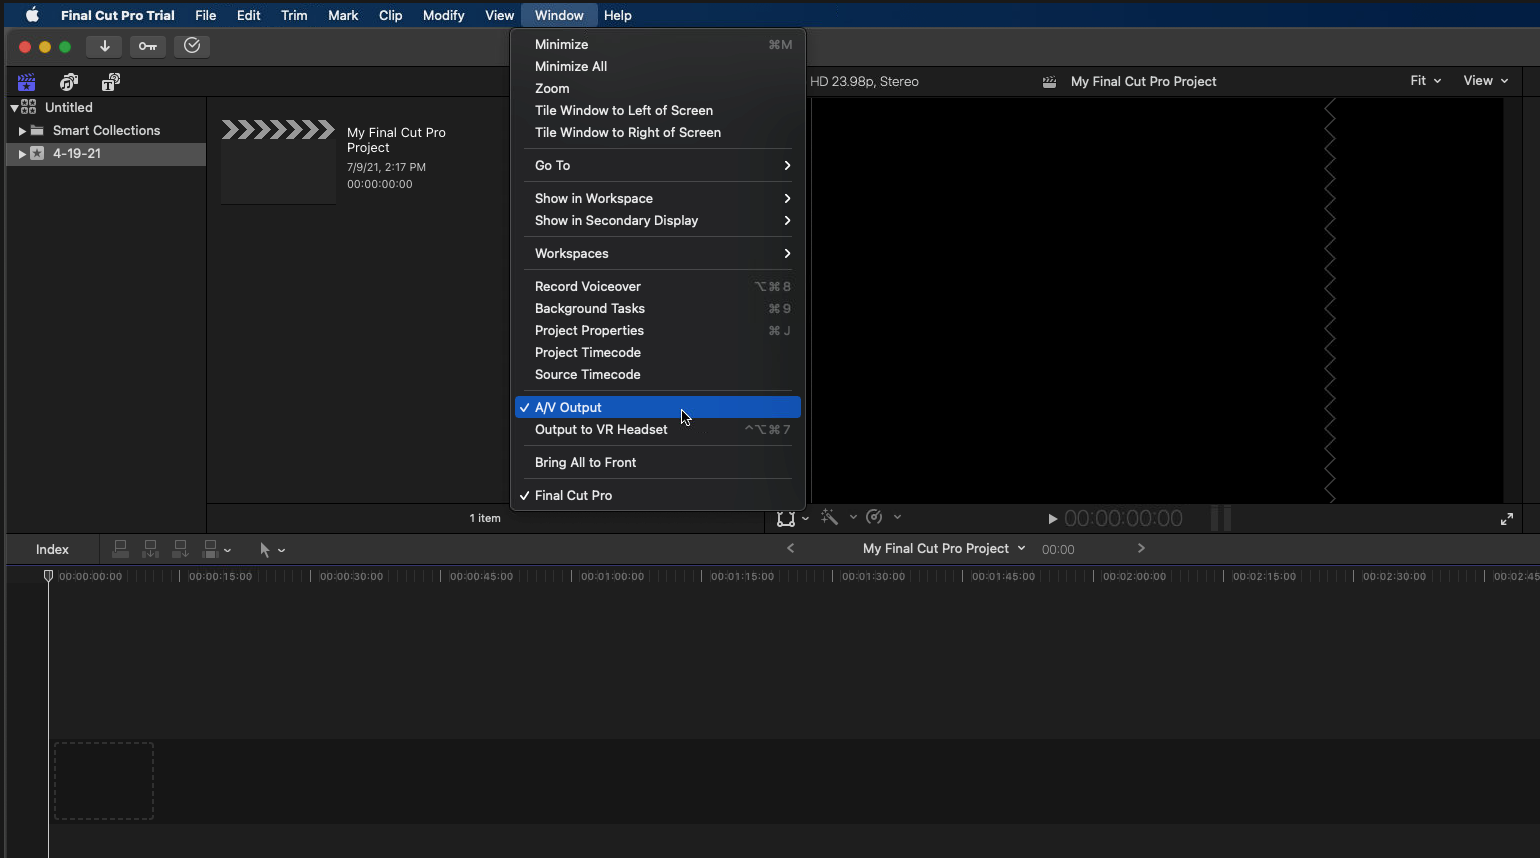


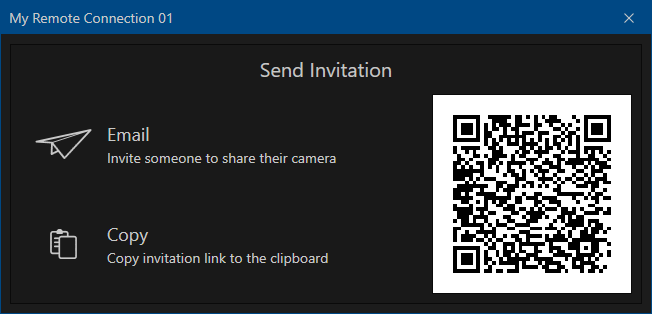

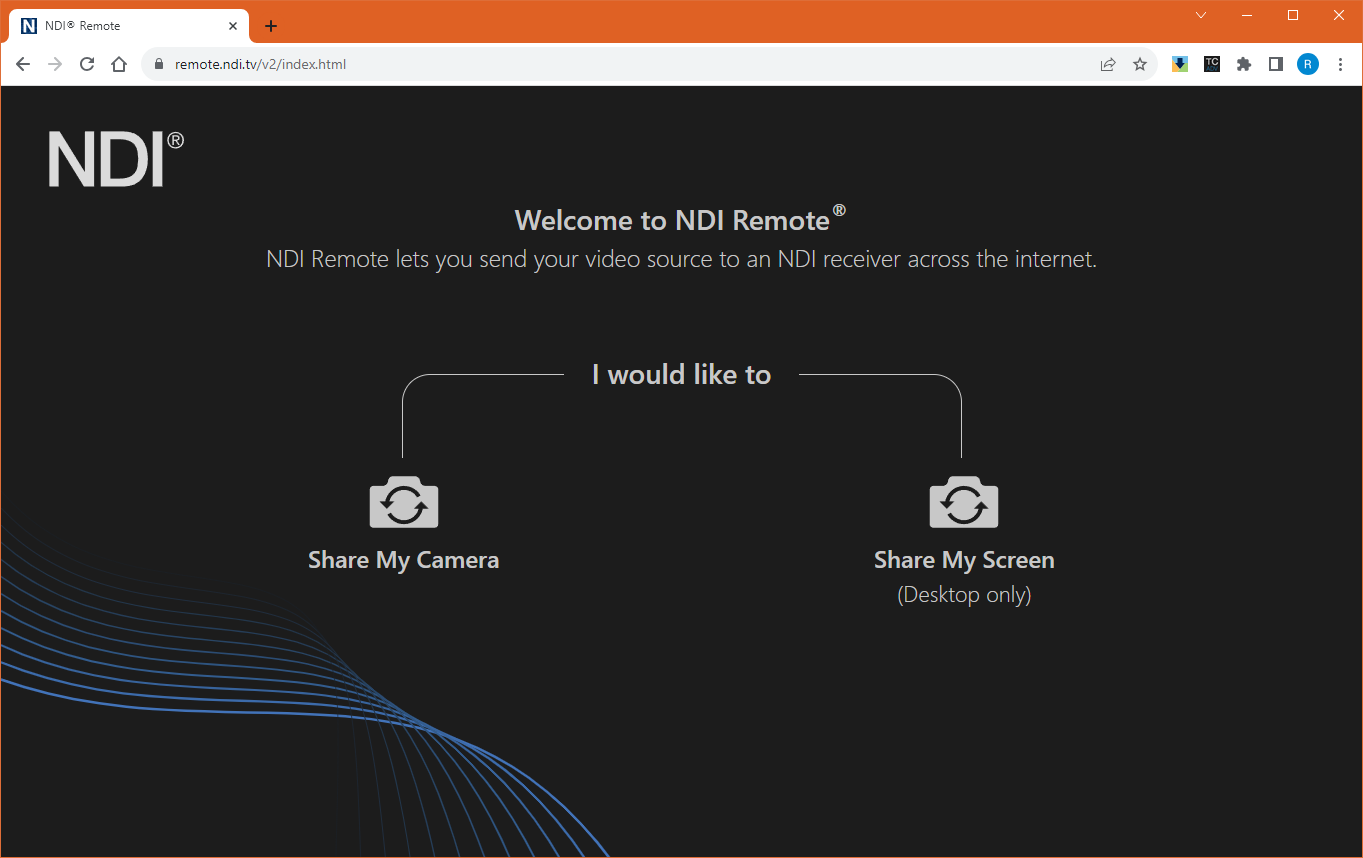
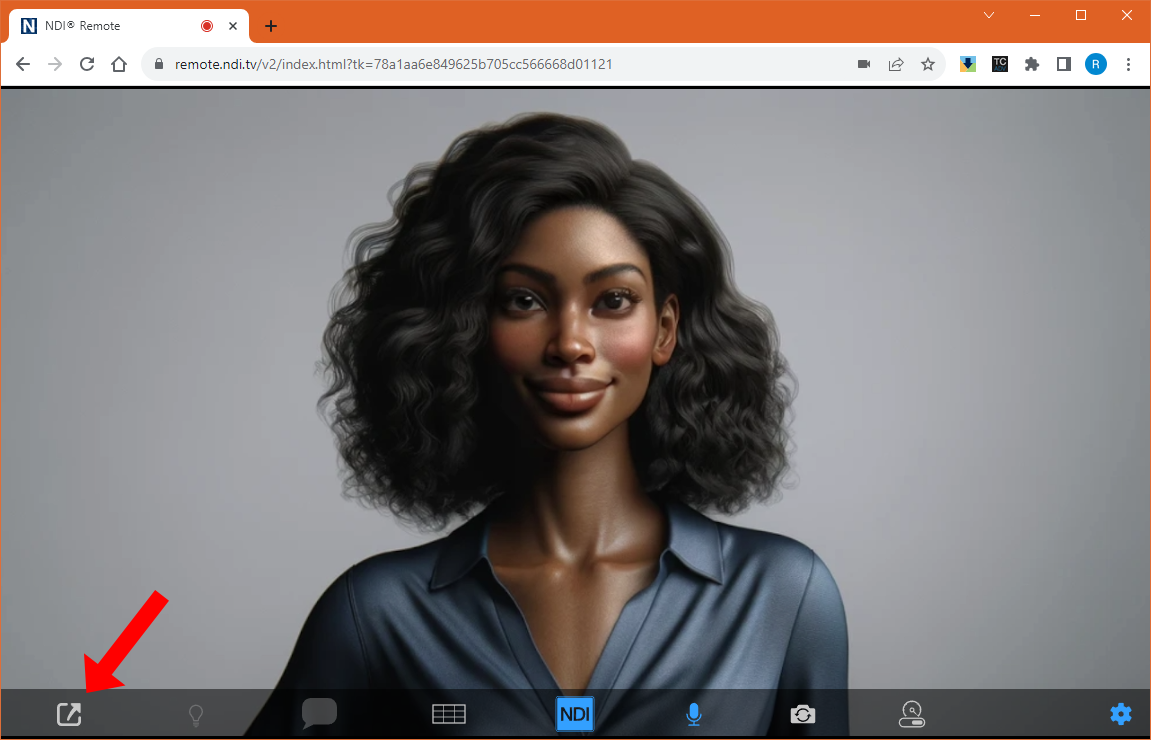
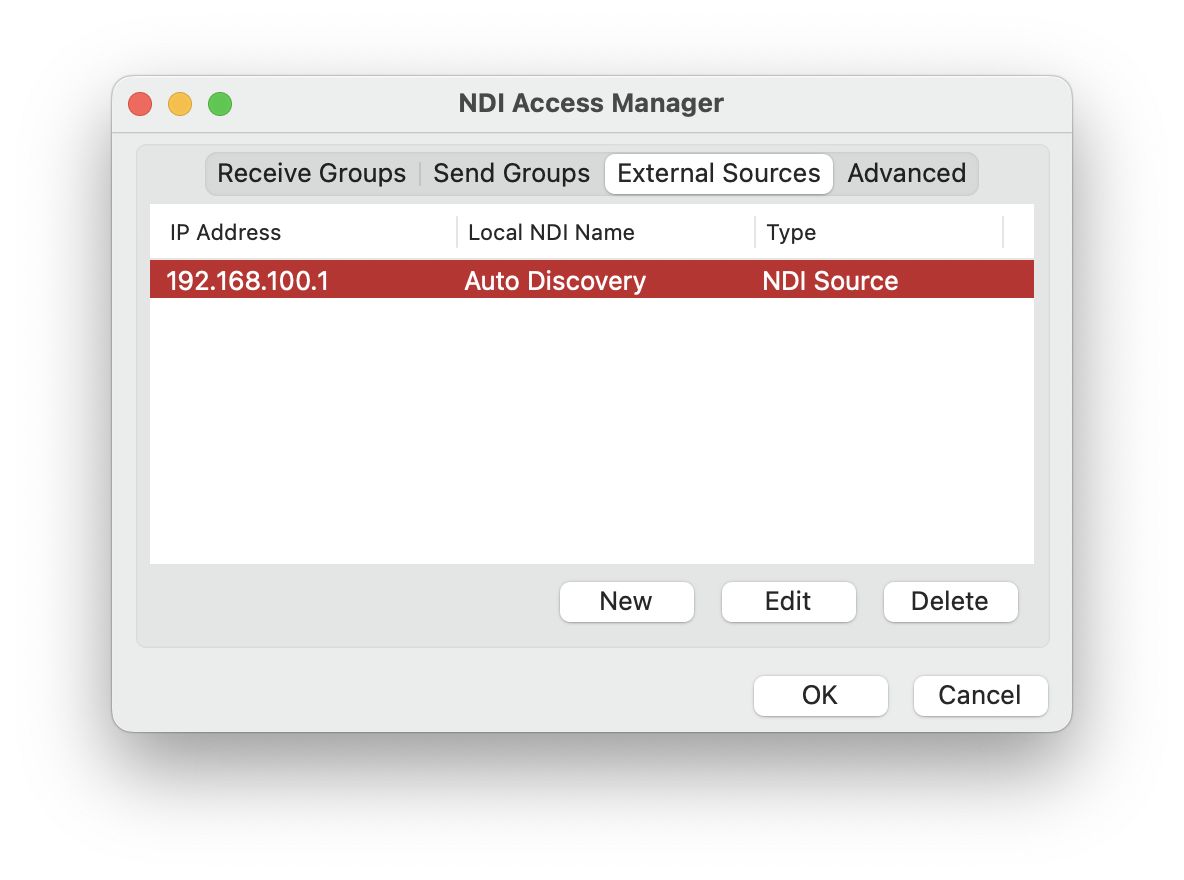
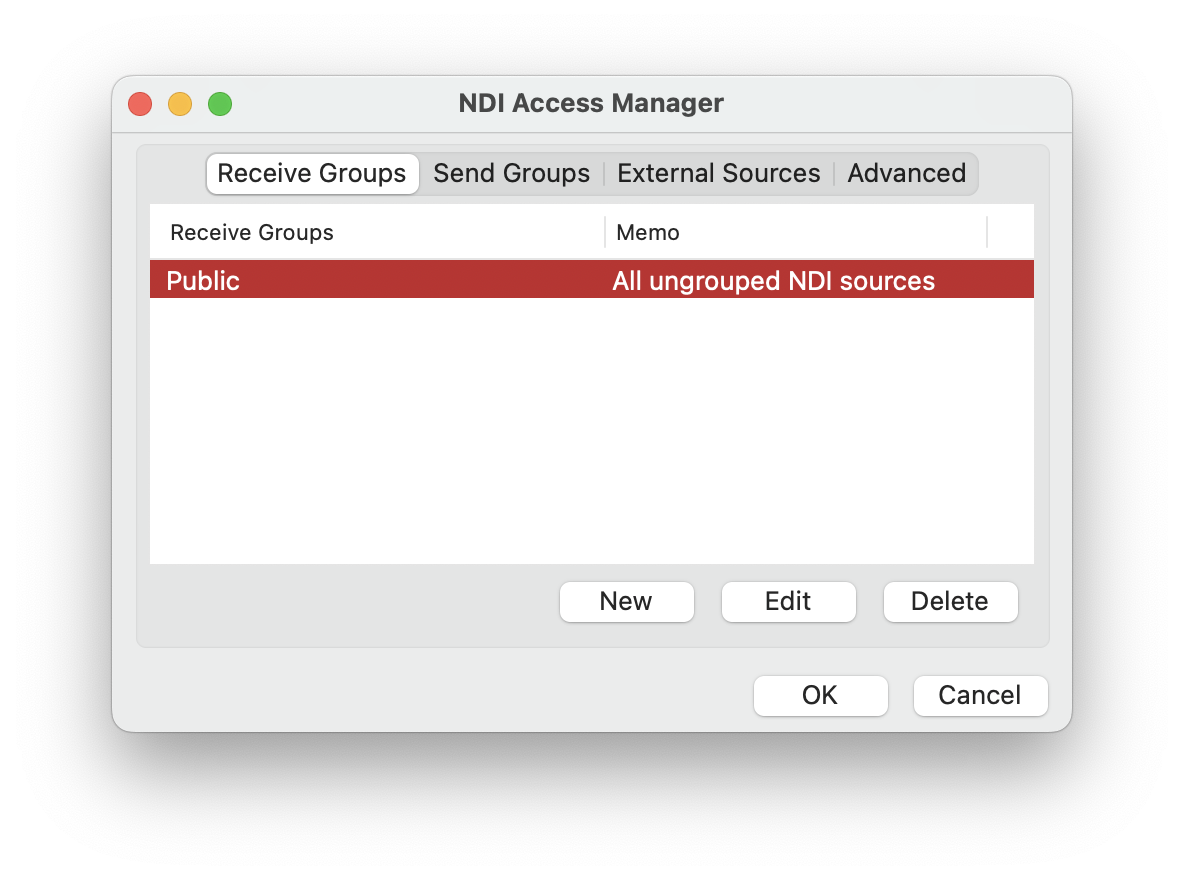
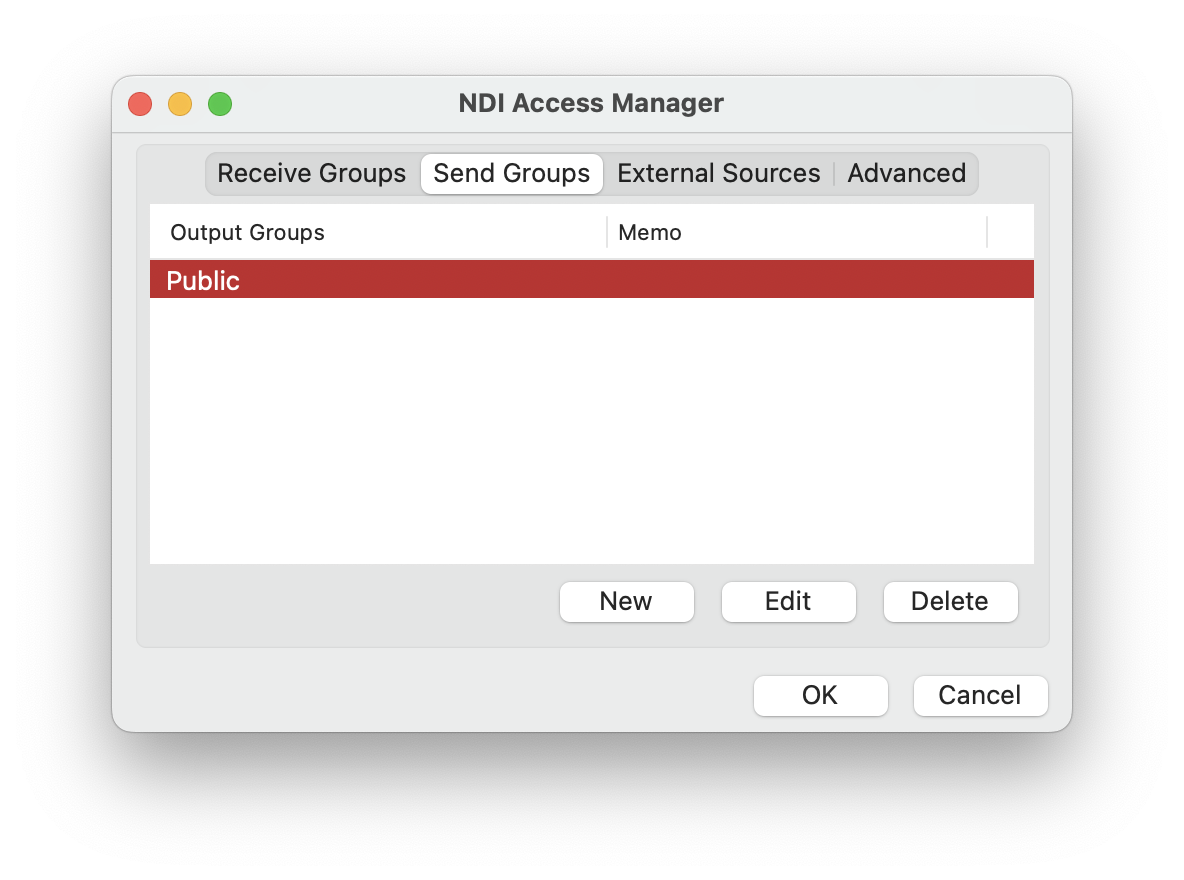
This is an option that allows you to change how your machine is identified on the network using NDI, overriding the local name of the machine. This option should be used with great care since a clash of machine names on the network is incompatible with mDNS and can cause all other sources not to work correctly. When using this, it is essential to ensure that all machine names on the network are unique. We recommend avoiding using this parameter when at all possible.
In NDI 5, it is possible to specify metadata for the current source when creating an NDI sender with the Advanced SDK. When using the NDI finder, it is then possible to receive this metadata in order to receive any number of properties about the source. Please note that you should always make your meta-data in XML format and be careful to escape it correctly when adding it to the JSON configuration file.
These are extra IP addresses for machines from which you wish to discover NDI sources. Each local machine runs a service on port 5960, which is then connected to the machine this configuration is run on. This allows sources to be discovered on those IP addresses without needing mDNS to discover it. Hint: When a Discovery server is used, receivers combine the list of sources found on the discovery server with those discovered via mDNS. Senders, however, will avoid using mDNS when a discovery server is configured, allowing you to run entirely without network multicast if you desire. Starting in NDI 5, it is possible to use a comma-delimited list of discovery servers for full support for redundancy. For more information, please review the section of the manual regarding the discovery server.
The discovery server list may include port numbers. If you do not list the port numbers, the default port of 5959 will be used.
This is the list of groups that the senders on this system are going to be part of by default. If groups are not specified, senders will be part of the public group by default.
In NDI 5, there is the ability to specify a regular expression that will be used to filter further the set of sources that will be visible to NDI finders. This is an advanced option that allows you to specify exactly which sources are going to be visible to the local machine. If your regular expression is not valid, then it will not be applied.
Starting in NDI version 5, this lists all the network adapters that will be used for network transmission. One or more NICs can be used for the transmission and receiving of video and audio data. This capability can be used to ensure that the NDI primary stream data remains on a group of network adapters, allowing you to ensure that dedicated audio is on a separate network card from the NDI video.
It is generally preferred that you let NDI select the network adapters automatically, as it can smartly select which to use and how to choose the ones that result in the best bandwidth. While in some modes, NDI can automatically balance bandwidth across multiple NICs, it is normally better for you to use NIC teaming at a machine configuration level which can result in much better performance than what is possible in software.
If this setting is configured incorrectly to specify NICs that might not exist, then NDI might fail to function correctly. Also please note that the operation of computer systems that are separately on entirely different networks with different IP address ranges is often not handled robustly by the operating system, and NDI might not fully function in these configurations.
The following connections are available in NDI version 5 and allow the force enabling and disabling of the reliable UDP mode, which is the default connection type on NDI version 5 and later. The full details of this connection type are described in the section for “Performance and Implementations” section of this manual.
There are separate settings for sending and receiving. Both sides need to allow this mode to be applied; sources and receivers have it enabled by default.
This is the default connection type and represents the preferred type for most network configurations, and we recommend its use where possible.
These settings enable or disable the use of multicast for receiving. If you explicitly disable it on a machine then, even if the sender is configured for multicast, it will use unicast. When multicast receiving is enabled, and a sender is available in the same local network, the receiver can negotiate for a multicast stream to be sent. If the sender is not on the same local network, this negotiation does not occur (since it could lead to a multicast stream being sent but never able to arrive at the receiver). If you have a correctly configured network and can ensure a multicast stream can route reliably from a different network to the receiver’s local network, you can specify the sender’s subnet in the “subnets” setting to allow multicast negotiation to occur. These settings pertain to the multicast NDI setting on this machine. The first setting determines whether multicast sending is enabled or not. By default, multicast sending is disabled. Next is the IP address prefix and mask. In this example, multicast IP addresses will be chosen in the range 239.255.0.0 - 239.255.255.255. NDI will attempt to use different multicast addresses to ensure that the streams can be filtered efficiently by the network adapter. NDI senders need a range of multicast addresses available. The TTL value controls how many “hops” the multicast sending traffic will take, allowing it to move outside of the local network. There are separate settings for sending and receiving. Both sides need to allow this mode to be applied; sources and receivers have it enabled by default.
We generally discourage the use of Multicast since configuration and ensuring that high performance is achieved is very difficult at a network level; in most cases, the default protocols (particularly reliable UDP) perform much better.
These settings enable or disable multi-TCP sending or receiving. If multi-TCP is disabled, then unicast UDP will be used. If unicast UDP is also disabled, then the base TCP connection will be used.
There are separate settings for sending and receiving. Both sides need to allow this mode to be applied; sources and receivers have it enabled by default.
Multi-TCP is not the default mode in NDI 5, which performs better with Reliable UDP.
These settings enable or disable unicast UDP sending or receiving. If unicast UDP is disabled, then the base TCP connection will be used.
Unicast settings determine whether UDP with forwards- error correction is used for sending. While configurable, we recommended that this be enabled by default and not changed. Our experience has been that our UDP implementation handles poor networks and packet loss more robustly than TCP/IP, which can encounter timeout problems when acknowledgment packets are dropped (while rare, this can happen over a period of hours).
The UDP implementation also fully implements paced network sending with zero memory copy scatter-gather lists and jittered timing to reduce the chance of packet loss on networks with many synchronized video streams. By default, 4Kb UDP packets are used, although jumbo packets do not need to be enabled on the network.
These settings are only available in the NDI Advanced SDK and allow you to override the default codec quality settings of NDI. The “quality” setting is a percentage scale to apply to the bit-rate control; for instance, a value of 200 would mean that NDI targets a bitrate that is double the NDI default. Be careful when specifying high bitrates because the CPU usage required for compression and decompression might increase, and the strain on the network and the OS networking stack is correspondingly increased. Once the bitrate hits a maximum level for a particular media type (e.g., the codec q value becomes the maximum), then increasing it further might have no impact. The “mode” allows you to force NDI into a particular color mode. The default is “auto,” which uses heuristics to best allocate bits between the luminance and chroma fields. You may specify “4:2:2” or “4:2:0” here to force the codec into a particular chroma-subsampling mode. Please note that often forcing it into a particular mode will cause the codec to be less high quality than letting the codec choose the bit allocation that results in the best PSNR.


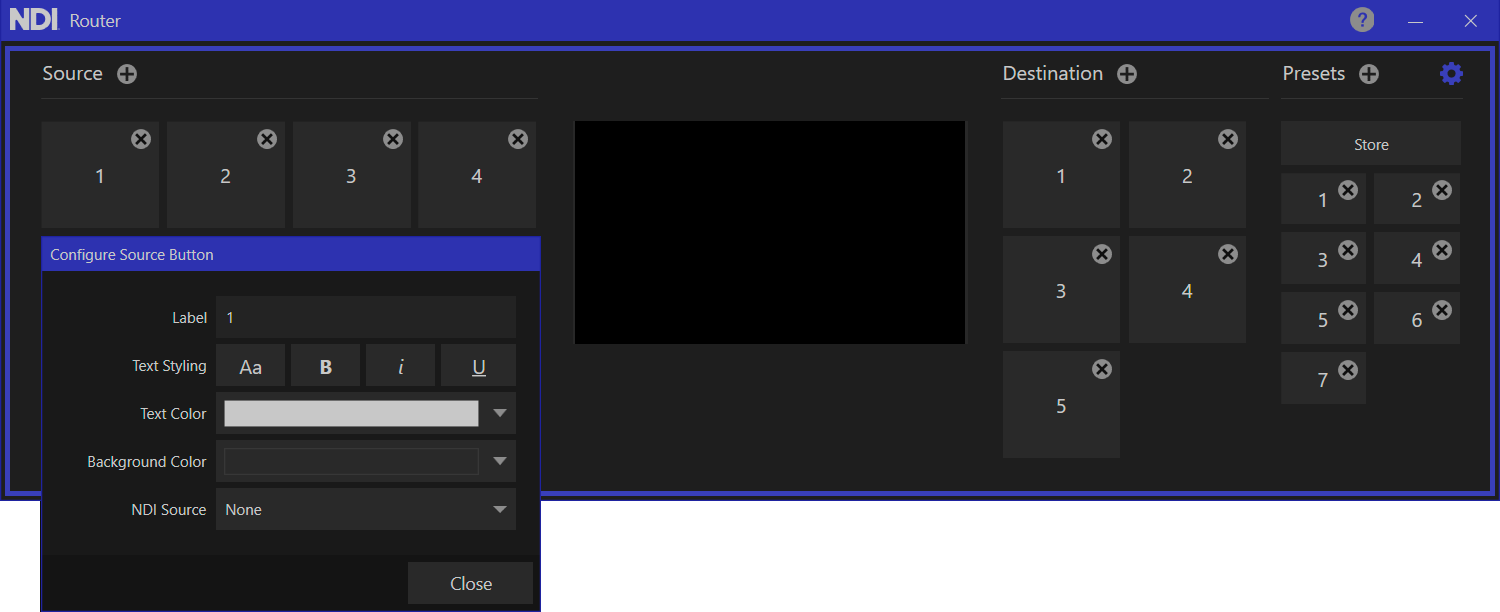

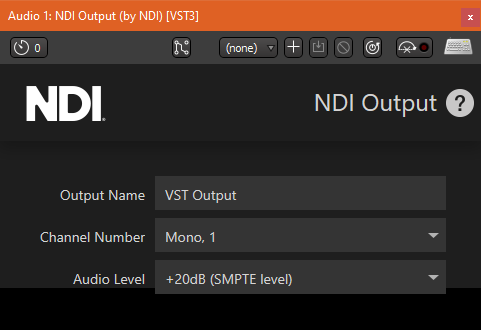

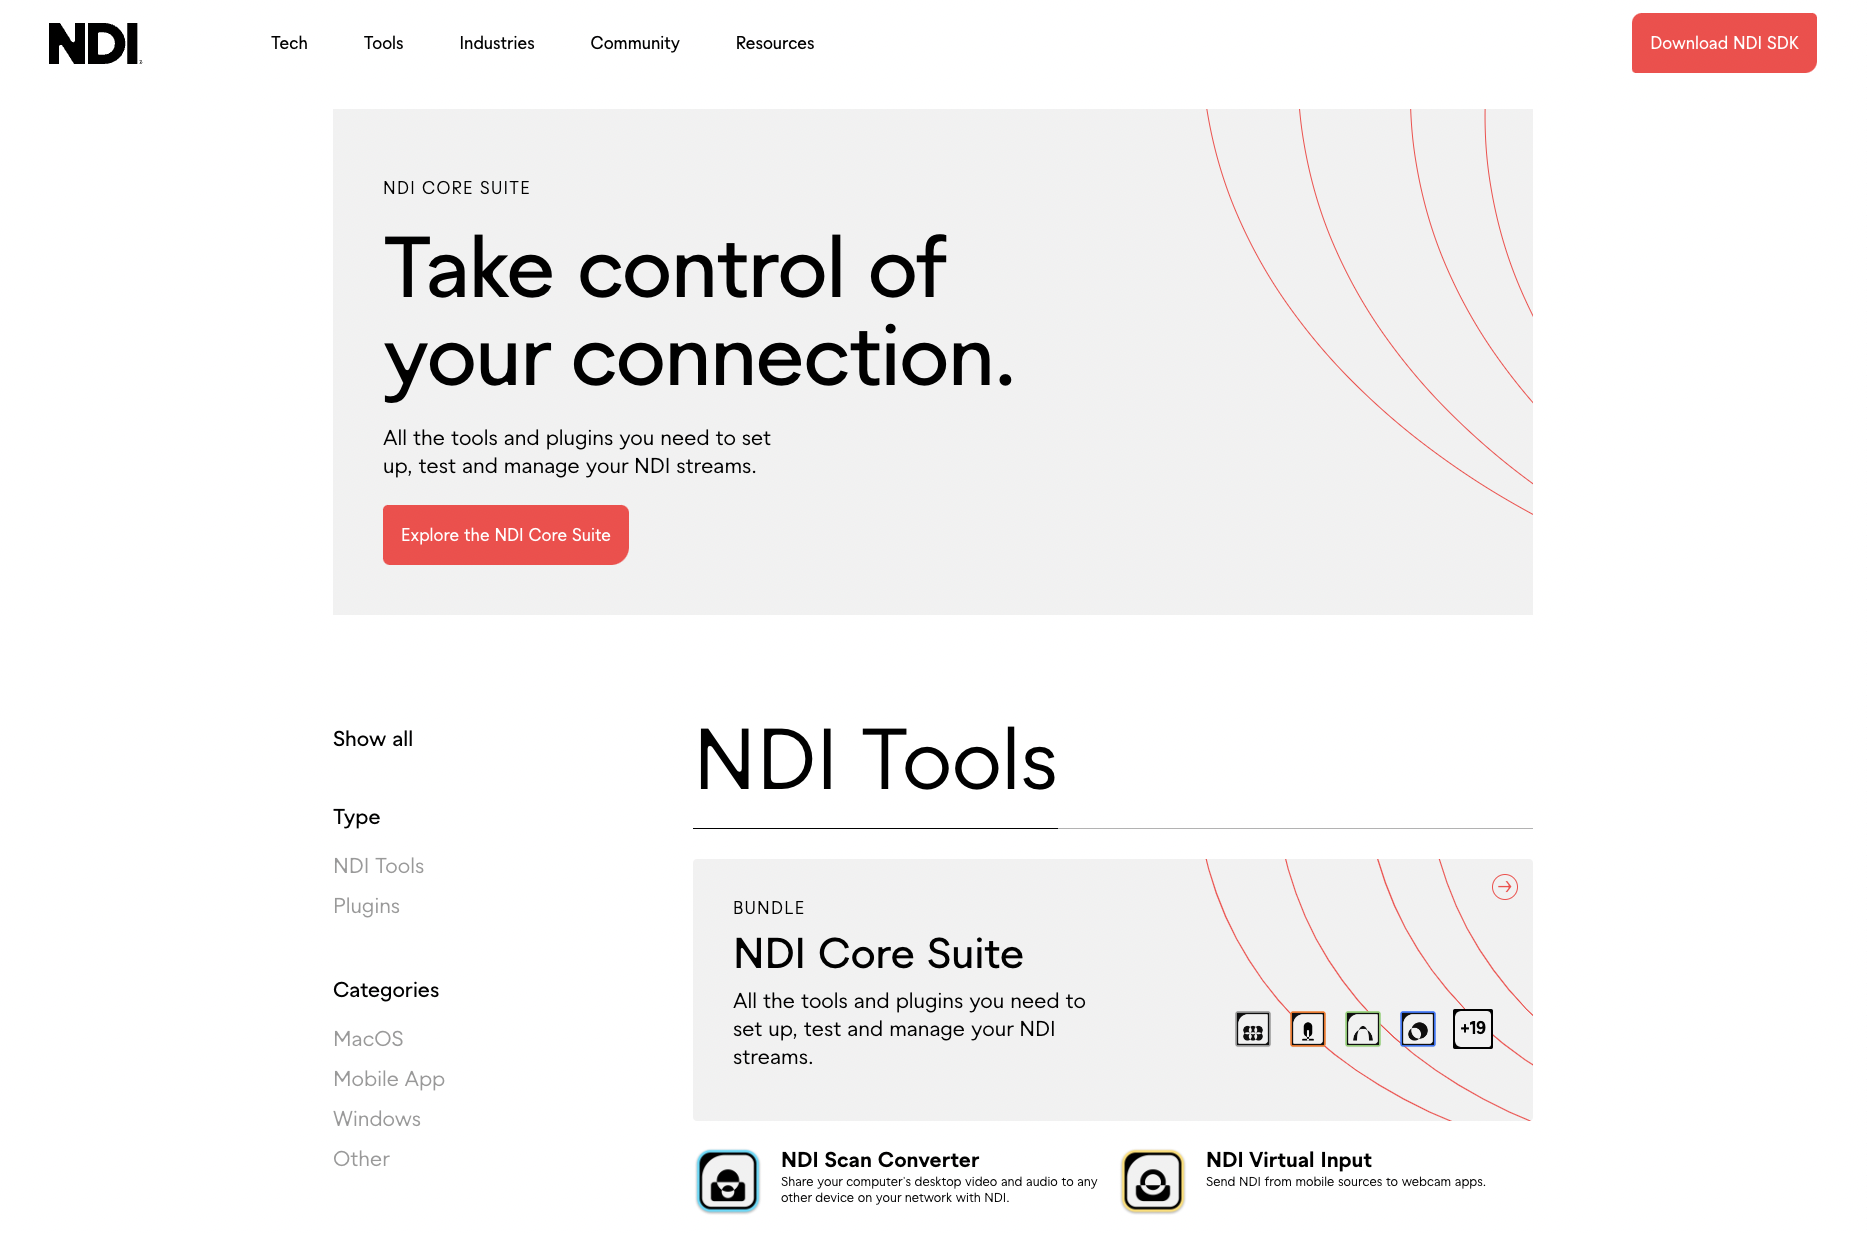
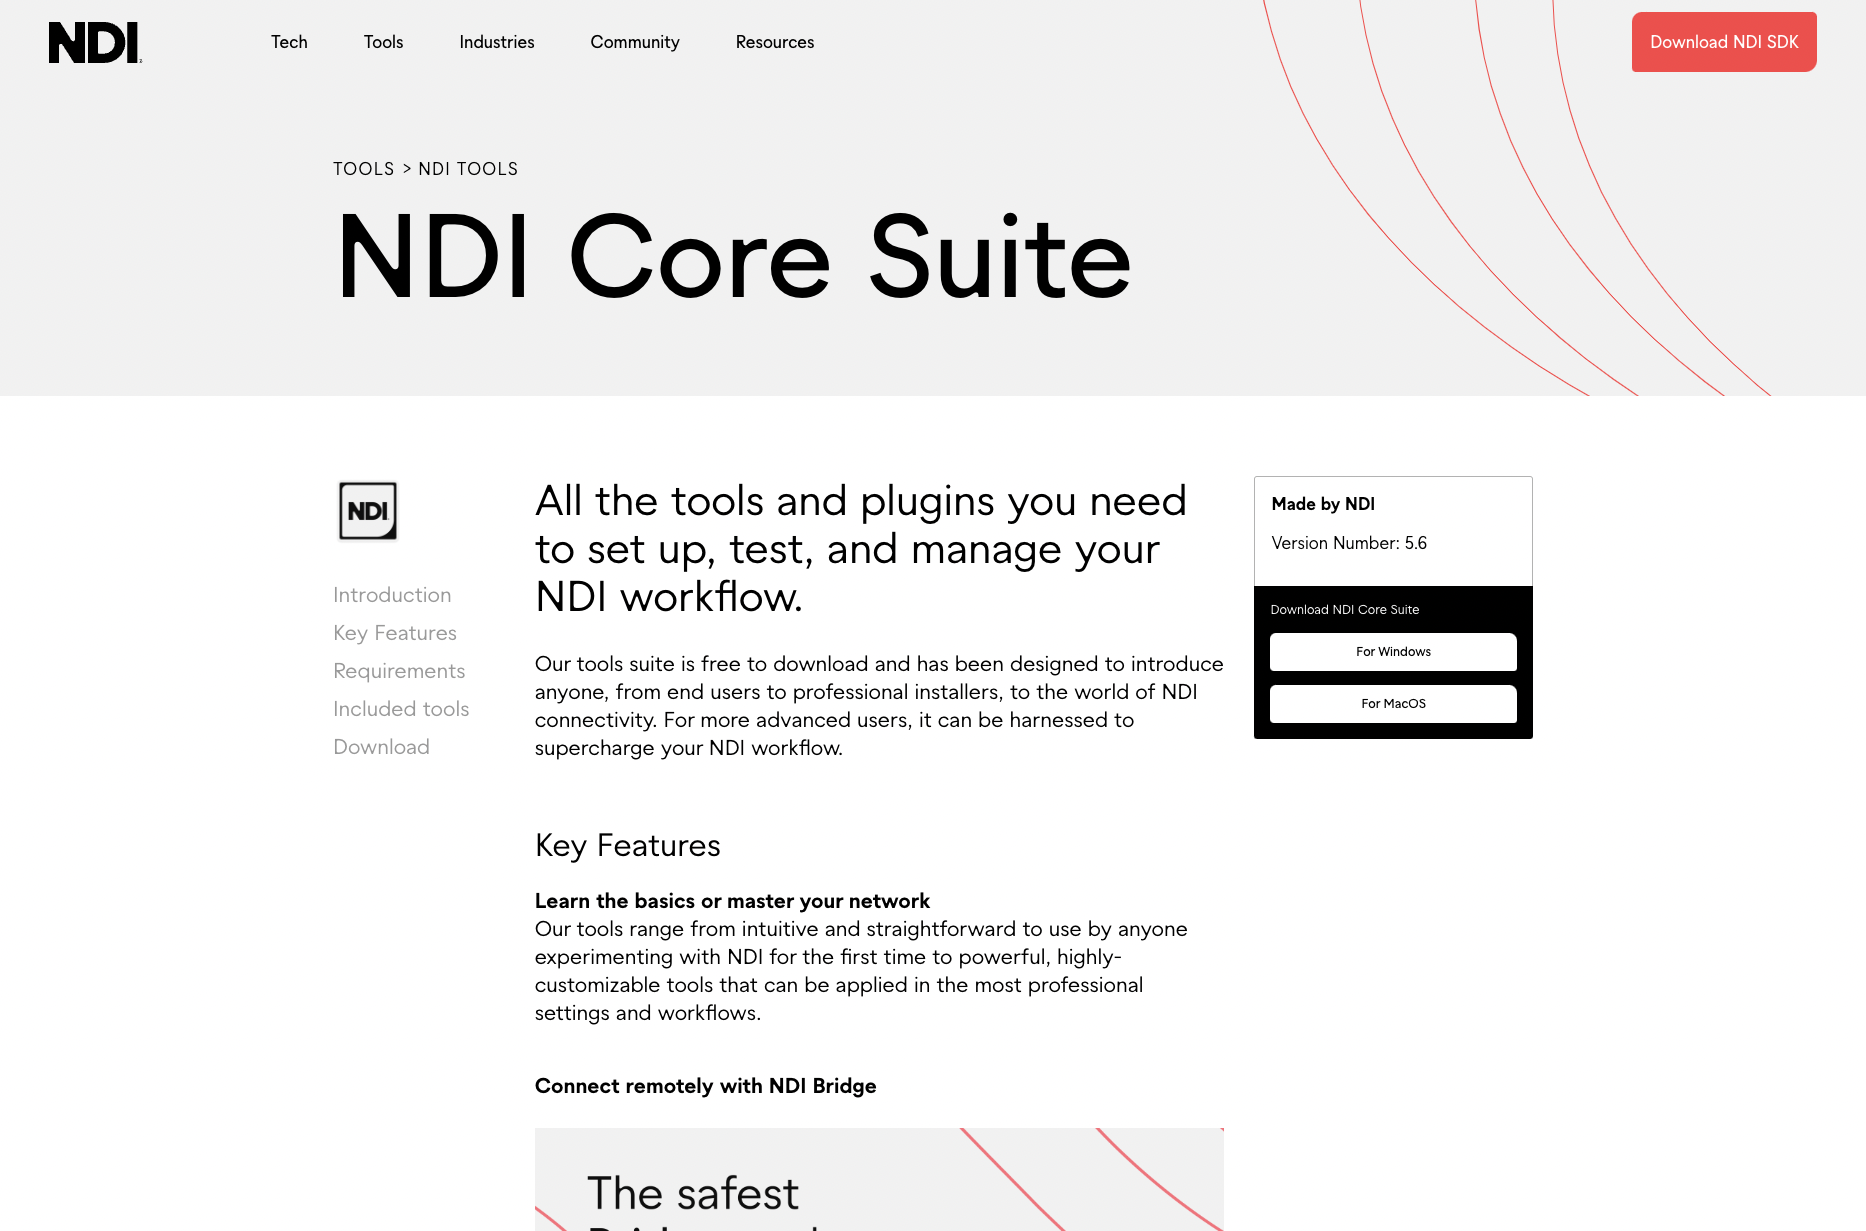
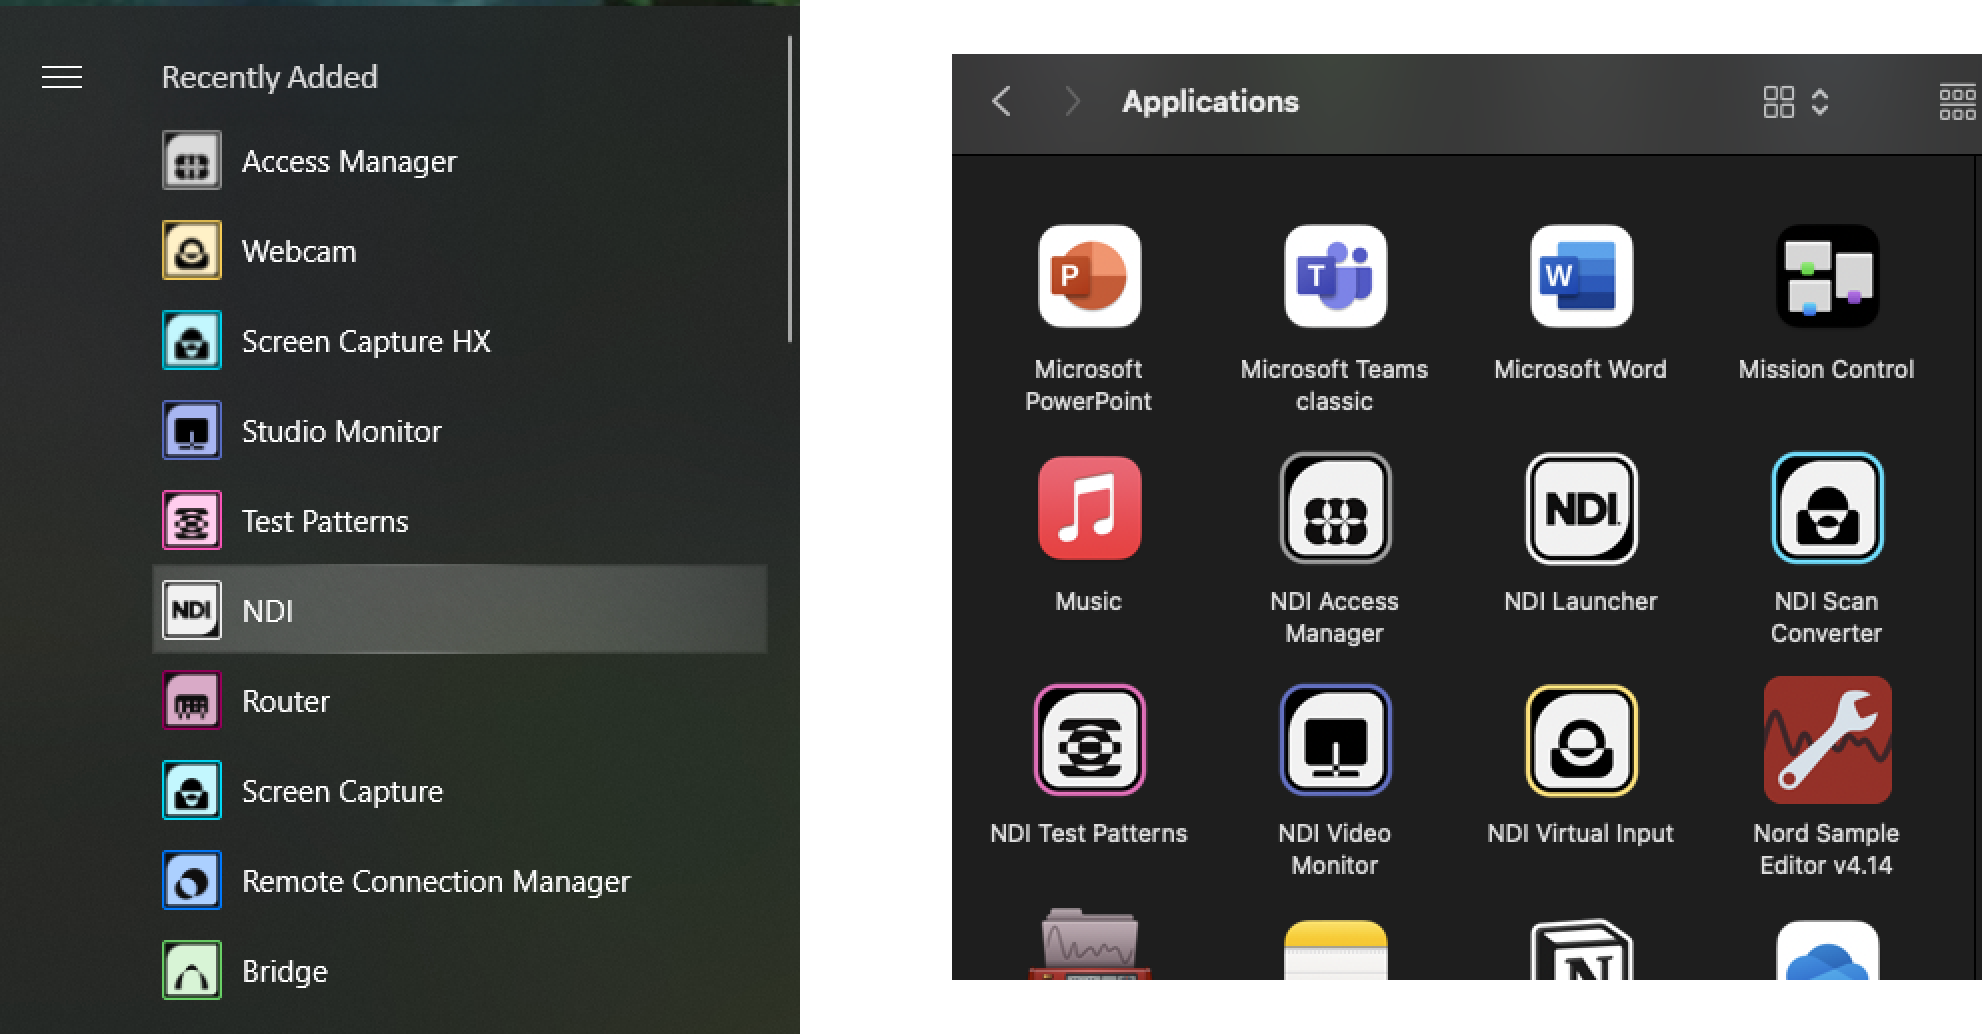


Simplify Remote NDI Workflows.
Download NDI Tools .
NDI Bridge enables the interconnection of remote NDI infrastructures, incorporating multipoint capabilities. It delivers local convenience on a global scale as it handles all the complexity of remote sources, supporting all of the benefits of NDI, including:
Video Transcoding
VERSION 6.2
In modern networked media workflows, efficient discovery and management of audio and video sources are essential. The NDI Discovery Service is a dedicated server and protocol designed to facilitate seamless search, monitoring, and control of NDI receivers and indexing of respective sources within a network. This can run as a service (on a remote server) or an application (on your local machine) that accepts incoming connections with senders, finders, and receivers, and coordinates amongst them all to ensure they are all visible to each other. By providing a centralized registry, the service enables devices to automatically announce their presence, retrieve real-time status updates, and establish low-latency connections with minimal configuration. In NDI version 6.2, this new NDI Discovery Service adds new capabilities of discovery, monitor and control for NDI receivers, compared to previous versions, that only supported advertising and listing
{
"ndi": {
"vendor": {
"name": "SKU LAST 4, Customer name first4,dateofissuance 6digits mmddyy",
"id": "Generated License"
},
"machinename": "MachineName",
"send": {
"metadata": "<My very cool source/>"
},
"networks": {
"ips": "192.168.1.92,",
"discovery": "65.52.14.139,65.52.14.138"
},
"groups": {
"send": "Public",
"recv": "Public"
},
"sourcefilter": {
"regex": "MACHINE .*"
},
"adapters": {
"allowed": [
"10.28.2.10",
"10.28.2.11"
]
},
"tcp": {
"recv": {
"enable": true
}
},
"rudp": {
"recv": {
"enable": true
}
},
"unicast": {
"recv": {
"enable": true
}
},
"multicast": {
"send": {
"ttl": 1,
"enable": false,
"netmask": "255.255.0.0",
"netprefix": "239.255.0.0"
}
},
"codec": {
"shq": {
"quality": 100,
"mode": "auto"
}
},
"bridge": {
"host": true,
"join": false,
"address": "127.0.0.1",
"port": 5990,
"secure": "123abc",
"ntk": true,
"reflect": true,
"srcgroups": "0ca7b4fd-4bbe-41d8-b263-b8cbeec1188c",
"bufferdelay": 0,
"diag": "info",
"id": "NiceCamera"
}
}
}
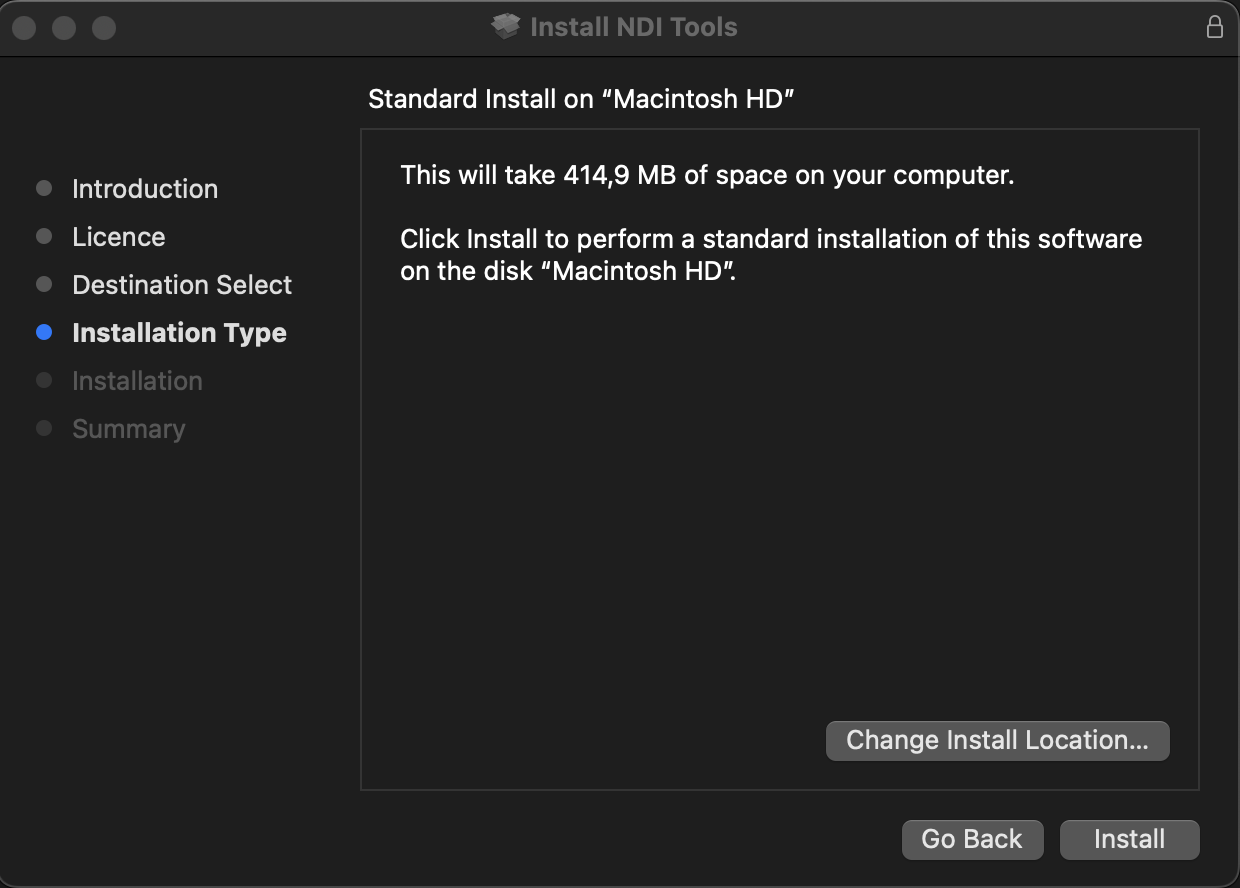
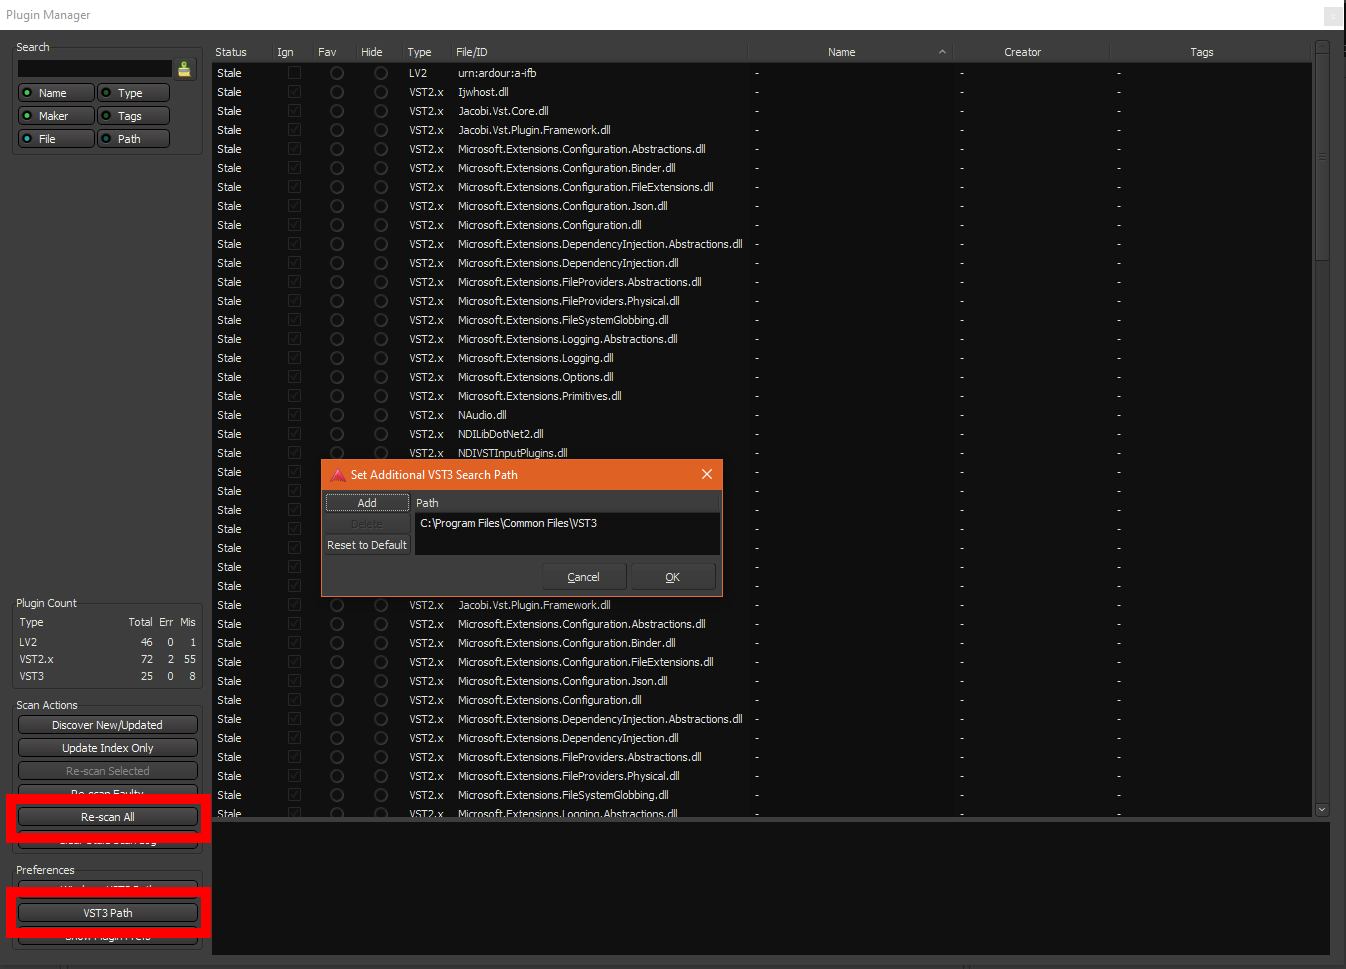

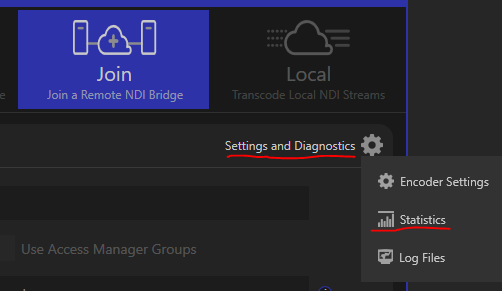
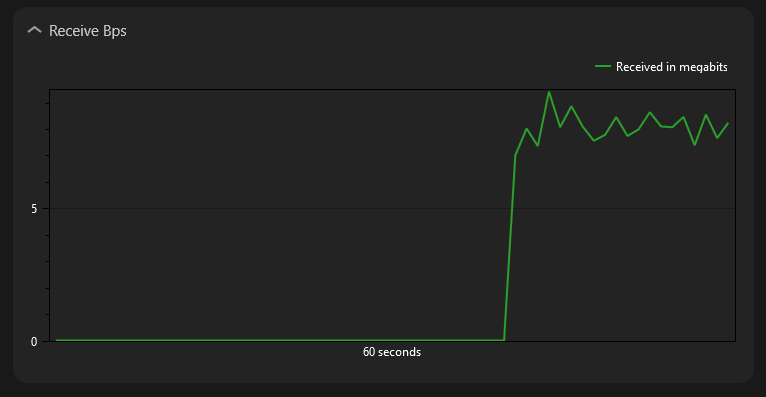
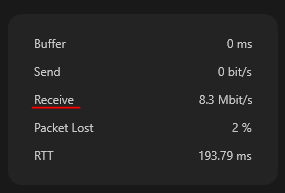
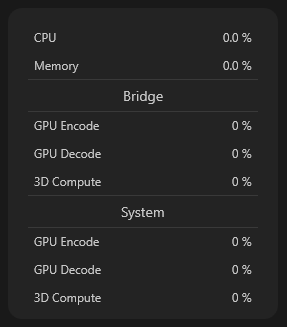
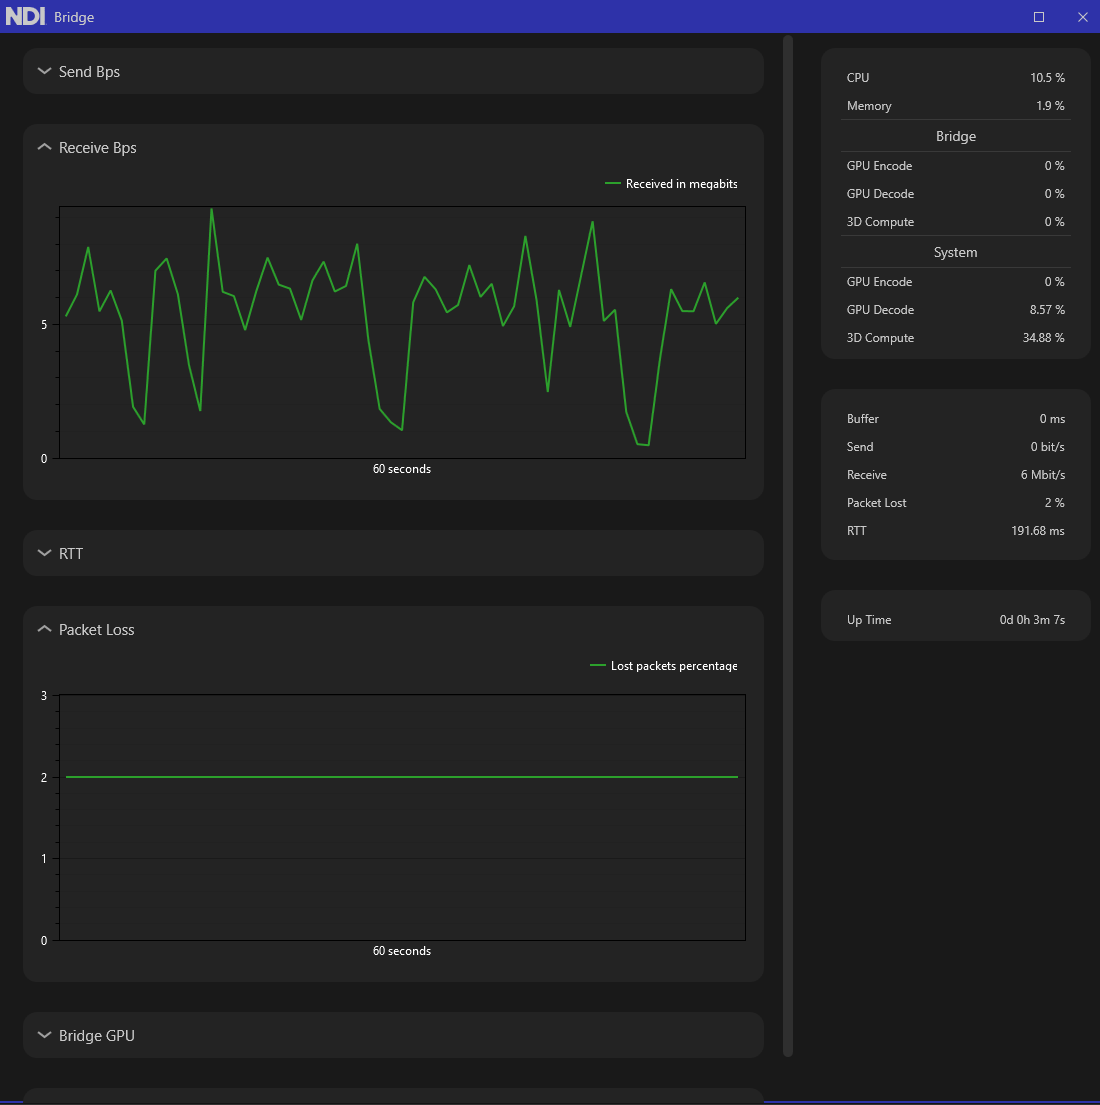
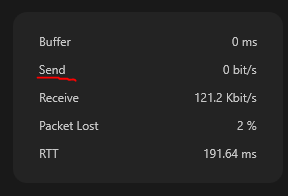
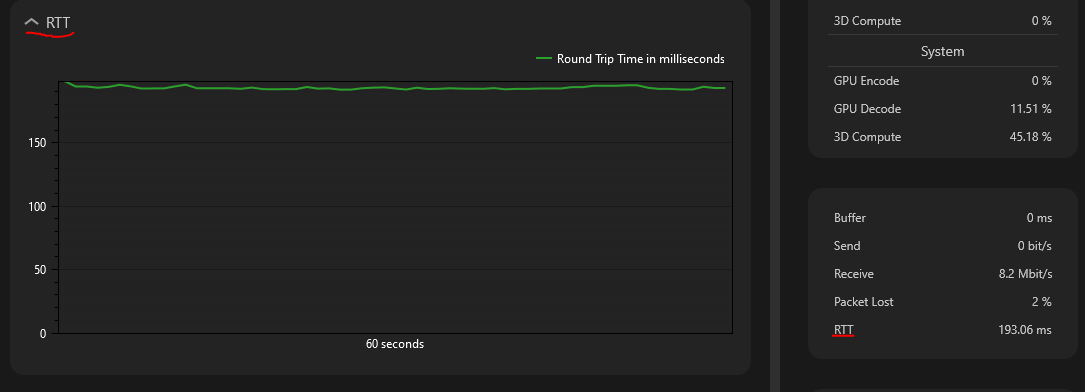
There are separate UDP unicast settings for sending and receiving. Both sides need to allow this for UDP mode to be applied; sources and receivers have it enabled by default.
Unicast UDP is not the default mode in NDI 5, which performs better with Reliable UDP.
{
"ndi": {
"machinename": "Hello World","send": {
"metadata": "<My very cool source/>"
},"networks": {
"ips": "192.168.86.32,",
"discovery": "127.0.0.1,127.0.0.1"
},"groups": {
"send": "Public",
"recv": "Public"
},"sourcefilter": {
"regex": "MACHINE .*"
},"adapters": {
"allowed": ["10.28.2.10","10.28.2.11"]
},"rudp": {
"send": {
"enable": true
},
"recv": {
"enable": true
}
},"multicast": {
"send": {
"ttl": 1,
"enable": false,
"netmask": "255.255.0.0",
"netprefix": "239.255.0.0"
},
"recv": {
"enable": true
}
},"tcp": {
"send": {
"enable": false
},
"recv": {
"enable": false
}
},"unicast": {
"send": {
"enable": false
},
"recv": {
"enable": false
}
},"codec": {
"shq": {
"quality": 100,
"mode": "auto"
}
},
}
}Alpha channel support (due to h.264 compression's resolution limitations, it is only possible to use HD resolution with an alpha channel or UHD without it. HEVC supports all reasonable resolutions with and without alpha)
Multichannel audio support
PTZ controls
Tally support
KVM (Keyboard, Video, Mouse) support
Custom metadata
This system is comprised of three key components:
In Host mode, you can configure the following settings:
Groups to Share: Share specific NDI Groups defined in the NDI local network by the NDI Access Managers.
Bridge Name: Define a specific name for the connected bridge system. This name helps to identify the sources shared through a remote Bridge.
The Bridge Name specified must be unique.
Server IP Address: This field is automatically populated by default on Bridge startup; the application automatically discovers the public IP address of the wan connection. However, NDI Bridge Host/Join can be used inside a local area network or over an existing VPN; a local Bridge Join can connect to a local Host using the physical Host IP Address.
Port: Define the network port used by the remote Bridge Join to establish the connection with the Host through a port forwarding (NAT).
Encryption Key: Encryption ensures that only authorized parties can access the connection and data transmission between Bridge applications.
The strength of the key, determined by its length and complexity, is crucial to the security of the encrypted data.
Resolve Public IP and Port: This option allows the Bridge Application to automatically find and verify the public IP address and the port forwarding configuration.
Buffer: The buffer setting in NDI Bridge is a configurable option that determines the amount of video data the system temporarily stores (or buffers) during transmission. This setting helps manage the data flow and can improve the stability of the video stream, especially over networks with varying latency or bandwidth. By adjusting the buffer, you can find a compromise between lower latency and smoother video playback, depending on the network conditions and performance requirements.
Adjust encoder settings to define how signals are shared across the wide-area network.
Check Compatibility: Verifies if the system can support h.264 and h.265 (HEVC) encoding and decoding.
In Windows 10 and above, the HEVC decoder is an additional license that can be purchased through the Microsoft Store App.
Output: Configure how NDI Bridge manages the stream transcoding:
NDI HX
H.264 or HEVC
Opus (Max. 255 audio ch per stream)
NDI High Bandwidth
SpeedHQ
Passthrough PCM Uncompressed
Through Join mode, you can connect your local NDI network to a remote Host. On the menu, you can configure the following settings:
Groups to Share: Share specific NDI Groups defined in the NDI local network by the NDI Access Managers.
Bridge Name: Define a specific name for the connected bridge system. This name helps to identify the sources shared through a remote Bridge.
The Bridge Name specified must be unique.
Server IP Address: define the public IP address of the remote Bridge Host.
Port: Define the network port used by the remote Bridge Join to establish the connection with the Host through a port forwarding (NAT).
Encryption Key: Encryption ensures that only authorized parties can access the connection and data transmission between Bridge applications.
The strength of the key, determined by its length and complexity, is crucial to the security of the encrypted data.
Resolve Public IP and Port: This option allows the Bridge Application to automatically find and verify the public IP address and the port forwarding configuration.
Buffer: The NDI Bridge buffer setting is a configurable option that determines the amount of video data the system temporarily stores (or buffers) during transmission. This setting helps manage the data flow and can improve the stability of the video stream, especially over networks with varying latency or bandwidth. By adjusting the buffer, you can find a compromise between lower latency and smoother video playback, depending on the network conditions and performance requirements.
NDI Bridge can be used inside a local area network using the Local mode for the following use cases:
Transcoding NDI High Bandwidth to NDI HX, which can be useful for distributing NDI streams with a lighter codec (h.264 or h.265).
Unicast repeater: By default, NDI transmitters use unicast, and the network interface's capacity limits their output capability. When an NDI stream needs to be shared with multiple receivers, NDI Bridge can be employed to leverage a larger network capacity by using Bridge in local mode. In the encoding settings, the "Do Not Transcode" option can be selected. This allows the NDI Bridge to replicate the requested stream to multiple receivers, overcoming the limited unicast capacity of the original NDI transmitter.
Here's how to configure Local Mode:
Select the Local tab.
Enter the NDI Access Manager groups and bridge name.
Adjust the Encoder Settings.
Click Start to activate the NDI Bridge in Local mode.
To troubleshoot common issues hover your cursor over the yellow exclamation point for a tool tip of the issue
To enable seamless integration with third-party applications, a C API is available for integration, allowing developers to communicate directly with the NDI Discovery Service. This API provides functionalities for querying available NDI sources, subscribing to real-time updates, and managing connections efficiently, ensuring interoperability across various applications and workflows.
As a final note, the NDI Discovery is an alternative to using mDNS, which allow a quite significant reduction in network traffic compared to the latter.
The Server will be a standalone application or as a system service, named NDI Discovery Service, and will provide flexibility for different deployment needs (platforms).
Both 32-bit and 64-bit versions of the NDI Discovery Service are available, although the 64-bit version is recommended. The server will use very little CPU usage although, when there are a very large number of connections (representing sources, receiver listeners and receiver advertisers), it might require RAM and some network traffic between all sources to coordinate source lists.
To configure the discovery server for NDI clients, you can use NDI Access Manager (included in the NDI Tools bundle) to enter the IP address of the machine running the discovery server.
Alternatively, you can run the discovery server with a command-line option to specify the network interface (NIC) it should use:
"NDI Discovery Service.exe" -bind 192.168.1.100
This ensures that the discovery server advertises only on the specified IP address. Similarly, you can specify a port number for the discovery server using:
"NDI Discovery Service.exe" -port 5400
This enables you to use a non-default port or run multiple discovery servers for different groups of sources on the same machine. If a port number of 0 is specified, the operating system will automatically assign a port, which will be displayed at runtime.
"NDI Discovery Service.exe" -bind <ip_address> -port <port_number> -config <json path> -help
-bind <ip_address> - This is an optional argument that specifies the IP address to bind the service to (default: 0.0.0.0).
-port <port_number> - This is an optional argument that sets the port number (default: 5959).
-config <json path> - This is an optional argument that loads configuration from a JSON file. This option will override both -bind and -port options as it will take precedence
-help - Displays available command-line options.
-service - Runs the NDI Discovery in service mode for background execution.
JSON configuration file:
The default paths for the configuration file are:
Linux:
/etc/ndi/ndi-discovery-service.v1.json
/usr/local/etc/ndi/ndi-discovery-service.v1.json
Windows:
C:\ProgramData\NDI\ndi-discovery-service.v1.json
An example of the JSON configuration file can be seen below:
When executed as a standalone application, the NDI Discovery will provide a console output with some relevant information regarding the number of registered sources, listeners and advertisers, that connect or disconnect at a given time. This console will not show up when the application is running in service mode
Log explanation:
Underlined in red, is the notification when a new receiver listener connects.
Underlined in green, is the notification when a new receiver advertiser connects and the respective NDI receivers it advertises.
Underlined in orange, a notification of a newly advertised NDI source.
The “Listening…” is just a progress to signal that the service is working properly, waiting for new connections, either from receiver or source clients.
We will now simultaneously support legacy and new advertisable sources. Consequently, the output will show when a legacy source connects to the discovery service, as well as when a legacy source listener is added.
Clients are entities that communicate with the NDI Discovery Server. They can be categorized as follows:
Source clients should be configured to connect with the discovery server instead of using mDNS to locate sources. When there is a discovery server, the SDK will use both mDNS and the discovery server for finding and receiving to locate sources on the local network that are not on machines configured to use discovery. In the future, Sources will also have the capability to be monitored and controlled by the NDI Discovery protocol
For Source senders, if an NDI Discovery server is specified, the mDNS mechanism will not be used; these sources will only be visible to other finders and receivers that are configured to use the NDI Discovery server.
Source Senders (legacy): These clients advertise or register NDI sources with the server, making them easily discoverable. These use the old method without support for monitoring. Support was still maintained to allow for backward compatibility.
Source Finders (legacy): These clients query the server to locate sources that have been advertised by any Source Sender. They use the old method without support for monitoring. Support was still maintained to allow for backward compatibility.
Source Advertisers:
New implementation of the source advertisement functionality, like their new Receiver counterparts. These new advertisers now allow proper source monitoring
Source Listeners:
New implementation of the source finding functionality. These now can request and monitor source properties.
Receiver Advertisers: Like their source counterpart, Receiver Advertisers can also accept a comma-separated list of servers (e.g., "192.168.10.10,192.168.10.12"). In this case, the receivers will be announced to all specified servers simultaneously.
Receiver Listeners: The current implementation relies on the user to instantiate the listener and implement logic that enables the Receiver Listener to detect when the server is no longer operational. Once detected, it should then connect to an alternative, redundant Discovery Service server available on the same network.
All of the above is also true for the new Source Listeners and Advertisers
Receiver clients are a new addition to NDI Discovery, beginning from NDI version 6.2, as earlier versions only supported source discovery. In addition to discovery, these new clients can also be used to monitor and control remote NDI receivers.
Receiver Advertisers: Advertise NDI receivers
Receiver Listeners: Monitor and Control NDI receivers
Monitoring is related to getting instant or more static information from a given receiver. In Version 1, we currently support events for the following receiver properties:
source-name: NDI Source to which the receiver is connected to
source-url: The URL of the NDI Source
connection-state: Connected or Disconnected
audio-present : True of False
audio-channels: Number of audio channels
audio-sample-rate: Audio sample rate
audio-receive-mode
video-present: True or False
video-codec: Video codec name (i.e. shq2)
video-resolution: i.e. 1920x800
video-frame-rate: i.e. 24000/1001
video-frame-type: i.e. progressive
video-color-primaries: i.e. bt_709
video-transfer-function: i.e. bt_709
video-matrix-coefficients: i.e. bt_709
video-has-alpha: True or False
video-receive-mode: i.e. single_tcp
In the future the number of properties to be monitored will be expanded. Receiver clients only connect to the Discovery Server directly, and unlike source clients, they rely solely on the server to advertise and to listen/query for receivers in the network. The new APIs can be consulted in the NDI SDK documentation for more details.
Receiver Advertisers: Like their source counterpart, Receiver Advertisers can also accept a comma-separated list of servers (e.g., "192.168.10.10,192.168.10.12"). In this case, the receivers will be announced to all specified servers simultaneously.
Receiver Listeners: The current implementation relies on the user to instantiate the listener and implement logic that enables the Receiver Listener to detect when the server is no longer operational. Once detected, it should then connect to an alternative, redundant Discovery Service server available on the same network.
All of the above is also true for the new Source Listeners and Advertisers
The Discovery Server (DS) installer is available for both Windows and Linux, ensuring broad compatibility across different environments.
We provide pre-built DS installer binaries for the following architectures:
Intel x86 / x86-64 (commonly used in desktops, servers, and cloud instances)
ARM (suitable for embedded systems and energy-efficient computing)
Raspberry Pi (optimized for low-power SBCs)
The Windows installer for the Discovery Server (DS) provides flexible installation options to suit different deployment needs.
The installer supports silent installation via command-line arguments, enabling automated deployments without user interaction.
Example usage:
setup.exe /verysilent /port=1234 /binding=127.0.0.1
/verysilent installs Discovery Service without displaying any UI prompts.
/port=<port number> specifies the listening port.
/binding=<ip address> restricts DS to listen only on the local machine.
After starting the installer, you’ll be greeted with the following:
If the you want NDI Discovery to run as a service, you must select the corresponding checkbox. Otherwise, it will be installed as a standalone application that can be launched manually like any other program.
It’s also possible through the application itself, to register it later as a service by running the following commands:
NDI Discovery.exe install - Installs the service. (or in this case re-installs it)
NDI Discovery.exe remove - Uninstalls the service. (from the command line)
NDI Discovery.exe start - Starts the service. (from the command line)
NDI Discovery.exe stop - Stops the service. (from the command line)
This screen allows the user to configure the port where the service will be launched and the IP address to which it will be bound (useful if the machine has multiple network interfaces). If left unchanged, the address will be selected automatically, and the service will bind to the first available network device and IP detected on the system.
There’s also a Linux installer available that will universally install binaries for all supported platforms, being those:
aarch64-newtek-linux-gnu
aarch64-rpi4-linux-gnueabi
arm-newtek-linux-gnueabihf
arm-rpi1-linux-gnueabihf
arm-rpi2-linux-gnueabihf
arm-rpi3-linux-gnueabihf
arm-rpi4-linux-gnueabihf
i686-linux-gnu
x86_64-linux-gnu
The installer is an automated installation script named "Install_NDI_Discovery_Server_v6.sh". Upon
execution, the user will be presented with a license agreement document that must be accepted for the
installation to proceed automatically. The installation process is straightforward, with all binaries being
placed in the Install_NDI_Discovery_Server_v6/bin directory, located within the folder where the
installation script was initially executed.
To run NDI Discovery as a service on Linux using systemd, the user must use the provided
template, fill it out appropriately, and save it as /etc/systemd/system/ndi-discovery.service.
It then needs to replace the ${INSTALL_PATH} with the actual path of the binary to be launched.
To enable and start the service, the user needs to run the following commands:
This setup allows users to simply edit the /etc/default/ndi-discovery file to specify their
installation directory, making it flexible without modifying the service file itself.
Create the following script and save it at /etc/init.d/ndi-discovery
Make it executable with:
sudo chmod +x /etc/init.d/ndi-discovery
Change $INSTALL_PATH to the path where the binary is located
Register the service with:
sudo update-rc.d ndi-discovery defaults
Start the service
sudo service ndi-discovery start
Enable the service to start on boot
sudo update-rc.d ndi-discovery enable
NDI 6.2.0
3/06/2025 - Initial creation


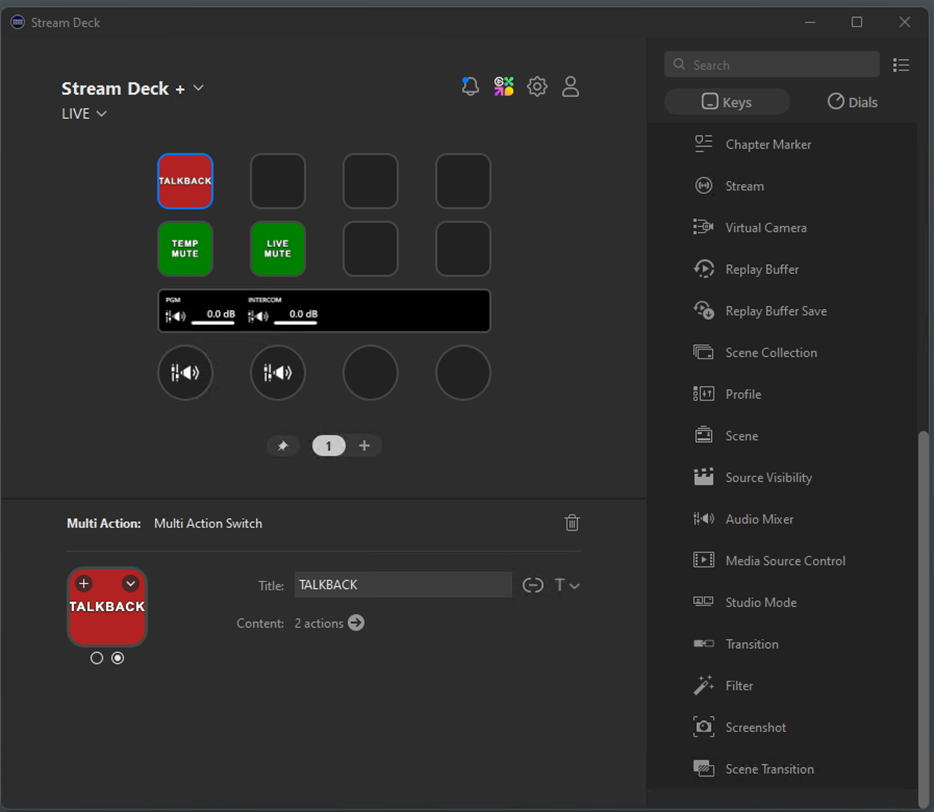

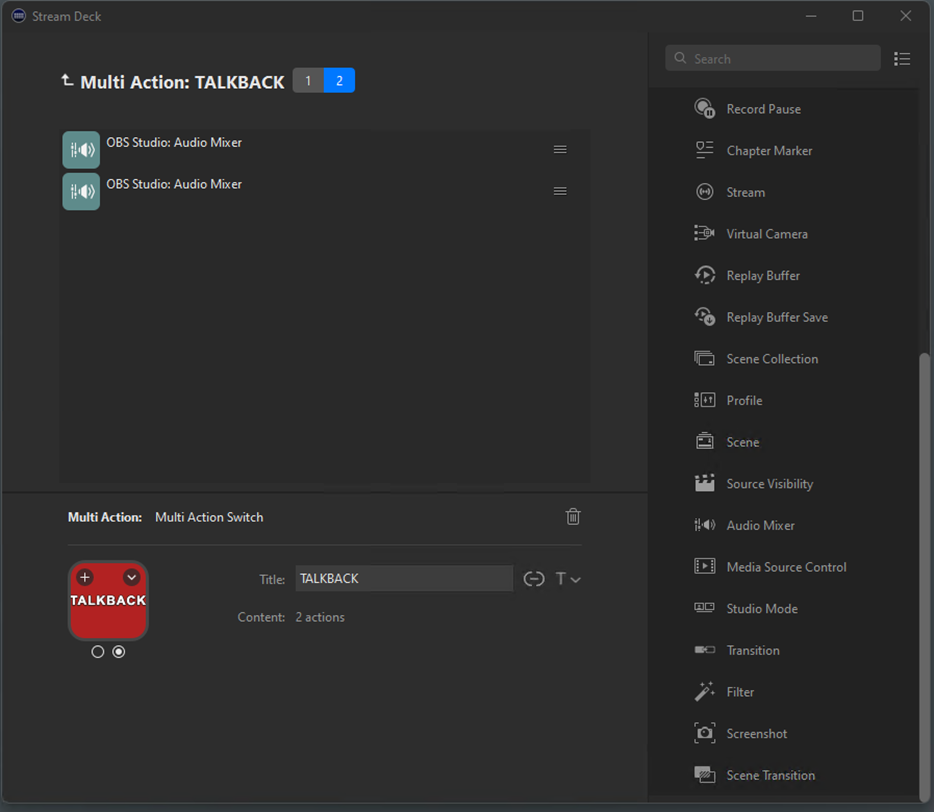
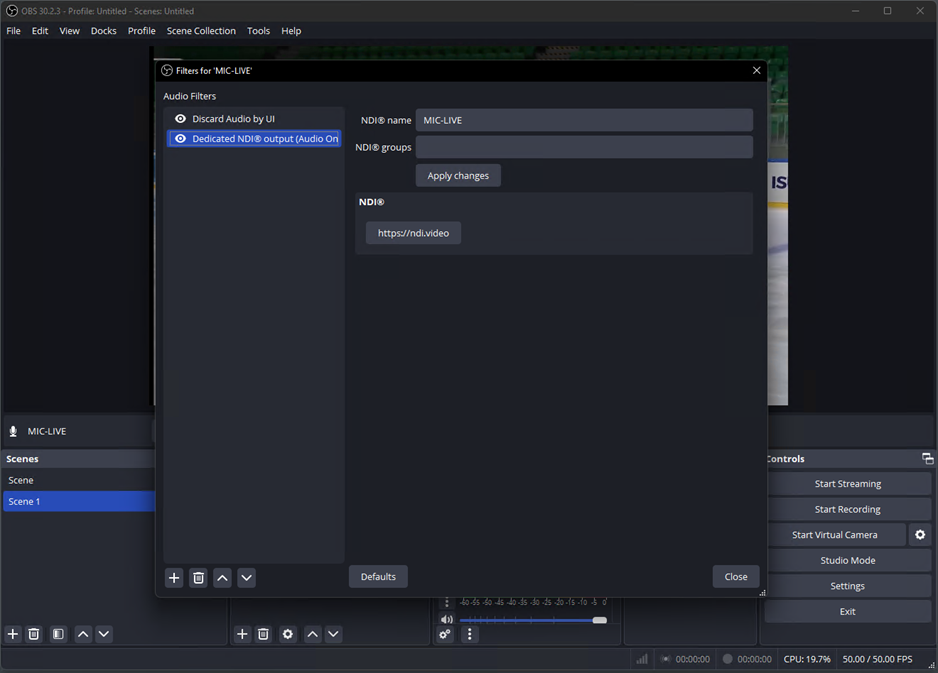
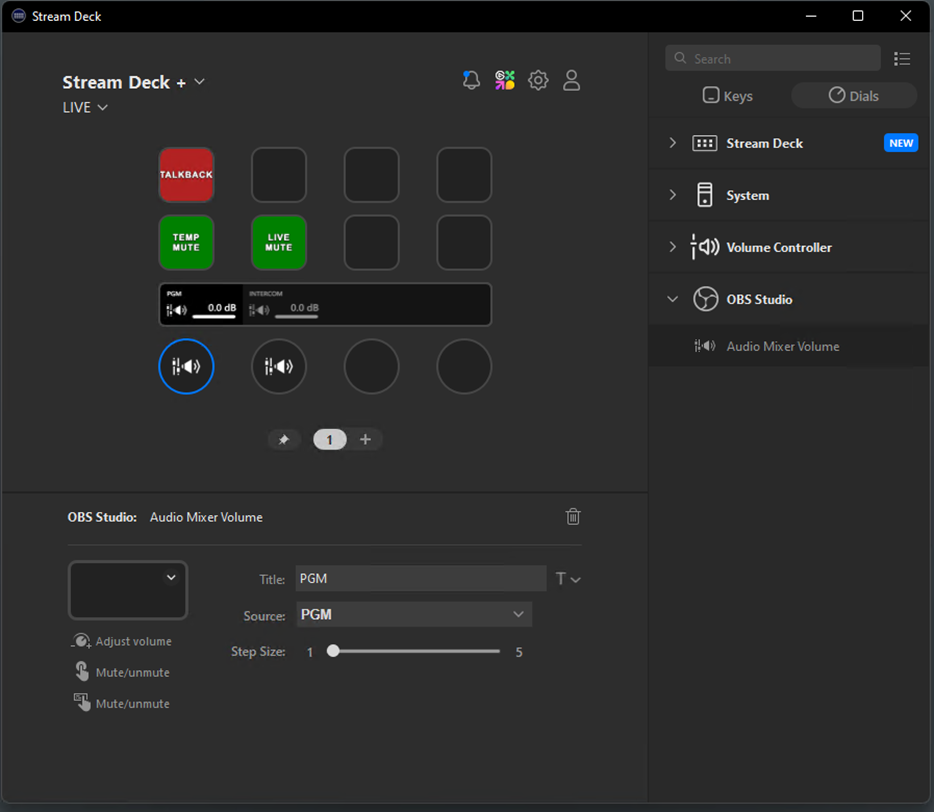
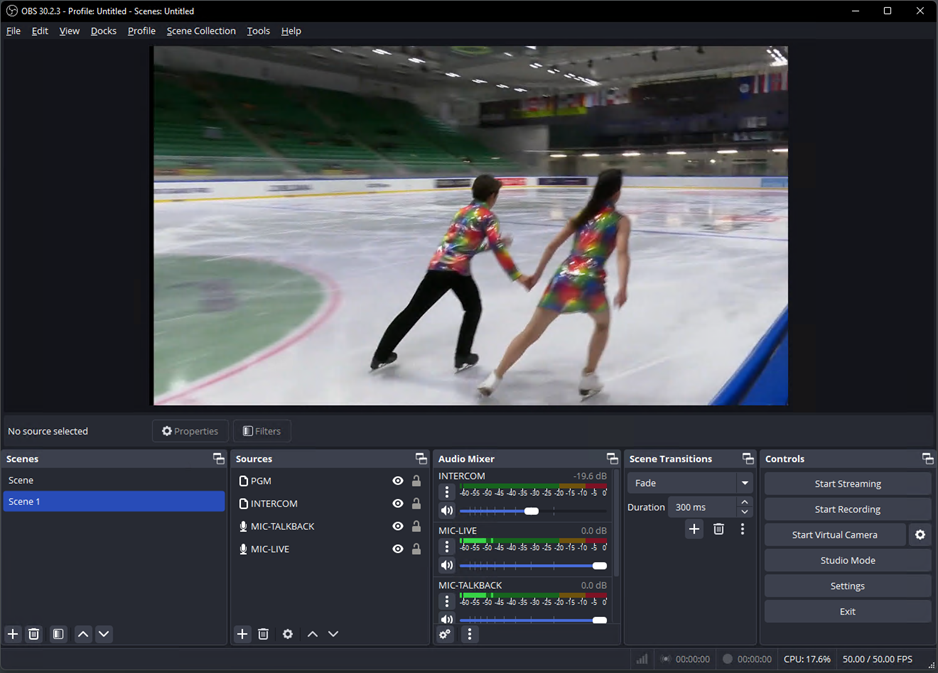
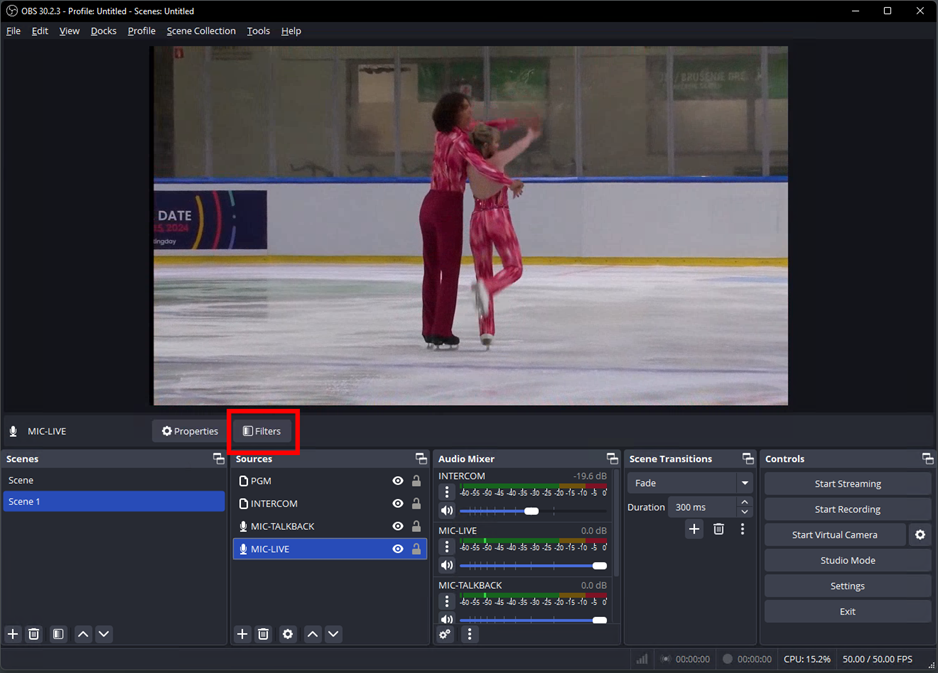

Last Updated: 6th May 2025.
This Privacy Policy covers information collected by Vizrt NDI AB (“NDI”, “we” or “us”) on its website www.ndi.video and subdomains (referred to as NDI Website or Website). This Privacy Policy is part of the Terms of Use of NDI Websites.
PLEASE KNOW YOU ARE NOT OBLIGATED TO USE OUR WEBSITE OR DOWNLOAD OUR PRODUCTS, SO BY USING OUR WEBSITES OR BY DOWNLOADING ANY NDI PRODUCTS, YOU ACKNOWLEDGE THAT YOU HAVE READ AND UNDERSTOOD THE CONTENT OF THESE TERMS, THE WEBSITE TERMS OF USE.
This Privacy Policy explains what and how we may gather, track or use information about you through your use of the Website (“Information”). NDI may collect personal data as well as non-personal data. Protecting your data is a top priority for us. The term “personal data” includes any information that enables the identification of a natural person, such as name, physical address, IP address, email address, phone number or behavior. NDI does not sell personal data to third parties.
In this policy, User Data means (i) technical information, including IP address, login information, type and version of operating system and device, time settings, language settings, screen settings, etc.; and (ii) information about your use of any of our services, including what features you have used and when, the duration of transactions, what pages and features you have used, etc. This Privacy Policy is applicable to all Information gathered or used by NDI at the Website.
{
"binding": "127.0.0.1",
"port_no": "5959"
} 


If you visit the Website and consent to the placing of cookies, we may process your IP address to find out where in the world you are visiting the website from. The purpose of the processing is to collect data for statistical purposes and to enable security. The processing is based on the legal basis of balancing of interests as the processing is necessary to meet our legitimate interest to improve our services by using statistics on visitors to the website and to facilitate the security of the website and its visitors.
Please note that your IP address does not directly identify you as an individual. However, by cross-referencing your IP address with additional available information, your identity may be revealed. NDI will not attempt to identify you as a website user.
NDI may also process your activity on the website provided that you have given your consent to the placement of cookies. The purpose of the processing is to measure and analyze your use of the NDI website, deliver targeted advertisements and promotions, deliver commercial and transactional messages, and improve the Website, services and marketing. We may also process data you provide via pop-ups and similar dialog tools to provide relevant marketing to you. The processing is based on the legal basis of balancing of interests as the processing is necessary to meet our legitimate interest of being able to market our services and products and improve our website and services.
We further process the personal data you register via your registration and/or use of user account (such as name, address, company name, job title, telephone number and e-mail address) and any User Data when you create and use a user account with us.
We process your data for the purposes of managing your registration and/or termination of your user account, allowing you to log in and use your user account, ensuring your identity, maintaining accurate and up-to-date information about you and to enable and facilitate your prompt use of our community, assisting you with support issues and inquiries regarding your use of our community. The legal basis for processing such data is that the processing is necessary for NDI to fulfill its contractual obligations to you as a user of our services.
Your IP address will be deleted no later than one year and thirty-five days after your last visit to our website, or anonymized to be used for statistical purposes. It is necessary for NDI to store the information for two weeks in order to produce event logs in case of security incidents.
We process your personal data that is necessary for us to be able to manage your registration of your user account, authorize you to log in and use your user account until you delete your user account with us.
Your user data will be deleted or anonymized no later than three (3) months after you have deleted your user account with us, if the personal data is not necessary to retain in order for us to comply with our obligations under legal requirements or if the data is otherwise needed to defend legal claims. Any data that is not required for the performance and development of the services or for statistical and quality assurance purposes will be anonymized after the purpose of the data has been fulfilled or deleted automatically.
“Cookies” are files which store certain information on your computer. When you visit the Website via your computer, it is possible that we will place a cookie on your computer that maintains certain information so that your computer is automatically recognized the next time it visits the Website.
Cookies are usually divided into four categories:
Necessary cookies – these cookies are essential for the functioning of the website.
Preference cookies – these cookies allow the website to save a visitor’s preferences in relation to, for example, language, currency or where the user is visiting from.
Analytical cookies – these cookies are used to analyze how a visitor uses the website, for example, which parts of the website they visit or which links they click on, in order to improve the design and functionality of the website.
Marketing cookies – these cookies are used to track a visitor’s use of the website. The information is used for marketing purposes. For example, by knowing what articles you have previously viewed, we can refine our marketing in a way that we think would be more interesting to you.
If you do not want us to deploy cookies on your computer, you can set your browser to reject cookies or to notify you when a website tries to put a cookie in your browser software. If you do not reject cookies, we assume that you consent to the use of cookies. Rejecting cookies, however, may affect your ability to use this Website including the online store.
In the event you request not to be tracked, an anonymous cookie without any personal information will be placed on your computer to prevent another permissions request. If your computer, however, automatically removes cookies, you will be presented the permission request each time you access the Website. If you chose to share content via Social Sharing buttons, Facebook, Google+, LinkedIn, or Twitter you agree to the privacy policies of those individual sites. The actions of social sharing are not covered under the terms of this Privacy Policy.
elementor
The website’s WordPress theme uses this cookie. It allows the website owner to implement or change the website’s content in real-time.
wpEmojiSettingsSupports
WordPress sets this cookie when a user interacts with emojis on a WordPress site. It helps determine if the user’s browser can display emojis properly.
__cf_bm
This cookie, set by Cloudflare, is used to support Cloudflare Bot Management.
bcookie
In addition to personal data, NDI may automatically track general Information such as Internet browser and operating system used, domain name of the Website you are coming from, number of visits, average time of use and pages accessed. We use this Information to analyze aggregate traffic patterns throughout this Website to continually improve our online offerings, the Website’s user friendliness, its efficiency, etc. Your identity cannot be determined from this Information and this Information will only be used by NDI to offer you a product or the service of the Website and to improve it.
It should be noted that we may anonymize your personal data to use it for statistical purposes. The processing is based on the legal basis of balancing of interests as the processing is necessary to meet our legitimate interest to use anonymized personal data for product development purposes and to analyze customer behavior to improve our services and our Customers’ customer experience. By anonymizing data relating to you, we also ensure that we use personal data as little as possible.
We are committed to continuously improving our products and services. To achieve this, we collect and analyze device-related data on the usage of our applications. This section outlines how we collect, process, and use this data in a manner that ensures your privacy is protected.
The device-related data we collect is de-identified (by means of irreversible hashing) and cannot be linked back to any individual user.The types of device-related data we may collect and de-identify include:
Application Usage: Information on which of our applications are run, the frequency of use, start and stop times, and specific features utilized (e.g., buttons clicked, menu items selected).
Device Information: General technical information about the device used, such as operating system, system hostname or similar device identifier and IP address (used only to determine approximate location, and then deleted)
Location Data: General geographic information, such as the city, country, or region from where the application is accessed.
The device-related data collected is used for the following purposes:
Product Improvement: To enhance the performance, functionality, and user experience of our applications based on how they are used.
Analytics: To understand overall usage patterns and trends, which helps us make data-driven decisions.
Marketing: To better understand the global reach of our products and identify areas where targeted marketing efforts may be beneficial.
Information submitted via our certification request forms is maintained in our certification database and is used for evaluating and processing certification requests, as well as for internal statistical analysis and operational purposes. When submitting a certification request, we collect the following personal data of you: your name, company, email address, and address. Only the information marked as required on the form is necessary to complete your certification request.
By providing your email address, you acknowledge that we may contact you with updates regarding your certification request and other information related to our services. You may contact us at [EMAIL] to request the removal of your information from our database or to opt out of receiving such communications.
This Privacy Policy exclusively addresses the activities of the Website. Other sites (including those that we link to from our Website, and third party sites or services which we co-brand) may have their own policies, which we do not control, and thus are not addressed by this Privacy Policy.
Information submitted via our product registration forms is maintained in our registration database, and is used for statistical analysis and internal operations, as well as to update our subscriber lists. When registering your product, only the information that appears with an asterisk is required from you. By providing your email address, you are acknowledging that we may send you periodic product announcements, and other information related to NDI. You may contact us at [email protected] to remove your email information from our database.
We partner with Microsoft Clarity and Microsoft Advertising to capture how you use and interact with our website through behavioral metrics, heatmaps, and session replay to improve and market our products/services. Website usage data is captured using first and third-party cookies and other tracking technologies to determine the popularity of products/services and online activity. Additionally, we use this information for site optimization, fraud/security purposes, and advertising. For more information about how Microsoft collects and uses your data, visit the Microsoft Privacy Statement.
We use the following permissions on Facebook: Publish video – The publish video permission allows your app to publish live videos to an app user’s timeline, group, event, or Page. The allowed usage for this permission is to live-video stream to an app user’s timeline, group, event or Page.
Publish pages – The pages manage posts permission allows your app to create, edit and delete your Page posts. If you have access to pages read user content, you can also use pages manage posts to delete Page posts created by a user. The allowed usage for this permission is to create and delete content on a Page.
Publish to groups – The publish to groups permission allows your app to post content into a Group on behalf of a person if they’ve granted your app access. The allowed usage for this permission is to allow people to publish content from your app to their Facebook group or to help people manage the content published to their group
These permissions are used to collect a list of groups or pages that the user has permission to post to.
The names, IDs, and access tokens of the pages and groups are used to post live videos or upload videos on the user’s behalf.
NDI may also use this permission to request analytics insights to improve this integration, and for marketing or advertising purposes, using aggregated and de-identified or anonymized information (provided such data cannot be re-identified).
NDI uses the Website to better educate customers about our products. For this reason, we may have forms on our site that can be used to request specific information. In such forms, you may provide us with your name, address, company name, job title, email address and other requested information. If you request information, you will receive it in the manner described on the form (postal mail, email, telephone contact, etc.). We will use the information you provide to contact you in the method you prefer. We may use that information for other purposes including marketing, but we will not sell that information to third parties. By providing your email address to us, you are acknowledging that we may send you periodic product announcements, and other information related to NDI.
Your email address will be deleted, or anonymized for statistical purposes, when you choose not to receive NDI’s communication anymore by exercising your right to unsubscribe by clicking on the link provided in each mailing or by contacting NDI at [email protected] to inform us of your desire to stop receiving our communication and for us to delete your personal data.
Sometimes we may provide for registering for events on our website. When you register for an event, your contact information may be added to our database for future communication, or for statistical purposes.
Your email address will be deleted, or anonymized for statistical purposes, when you choose not to receive NDI’s communication anymore by exercising your right to unsubscribe by clicking on the link provided in each mailing or by contacting NDI at [email protected] to inform us of your desire to stop receiving our communication and for us to delete your personal data.
It is important to remember that whatever you transmit or disclose online can be collected and used by others or unlawfully intercepted by third-parties. No data transmission over the Internet can be guaranteed to be 100% secure. While we strive to use commercially reasonable means to protect your information, we cannot warrant the security of any information you transmit to us.
You have several rights when we process personal data about you. If you wish to exercise any of the rights listed below or if you have any questions regarding our processing of your personal data, please contact us at [email protected]. If you have any objections or complaints about the way we process your personal data, you have the right to file a complaint with the data protection authority in your jurisdiction within the EU/EEA.
You may request to be informed whether we are processing personal data about you and, if so, to receive a copy of it, together with other supplementary information on the purposes of the processing, the categories of personal data concerned by the processing, the recipients to whom the personal data have been or will be disclosed, the retention period and the existence of the right to request rectification and erasure as well as to request restriction and to object to processing. You also have the right to be informed of the right to lodge a complaint with IMY and of the source of the personal data, as well as of the existence of automated decision-making together with certain additional information.
If you believe that the personal data we process about you is inaccurate or incomplete, you can request that the data be rectified or completed.
When we process personal data based on our legitimate interest, you have the right to object to the processing at any time. If we cannot demonstrate compelling legitimate grounds to continue processing the data, we must stop the processing of the personal data. You also have the right to object to processing of personal data for direct marketing purposes, including profiling.
Right to restriction of processing
In certain cases, for example if you have objected to our processing of your personal data, contested the accuracy of the personal data or if the processing is unlawful, you have the right to request the restriction of the processing of your personal data. By requesting a restriction, you have the possibility, at least for a certain period of time, to stop us from using the data other than to, e.g., defend legal claims, for example. You can also prevent us from erasing the data, for example if you need the data to claim damages.
You have the right to have your personal data deleted if it is no longer necessary for the purposes for which it was collected, if you have withdrawn the consent on which the processing was based, if you object to the processing and there are no overriding legitimate grounds for the processing, if the personal data has been processed unlawfully, or if the personal data must be deleted in order to fulfil a legal obligation.
You have the right to obtain the personal data that you have provided to us in a structured, commonly used and machine-readable format and transfer this data to another controller if the processing is based on your consent or an agreement between us
Where we process personal data based on your consent, you have the right to withdraw the consent at any time. We are then obliged to stop processing your personal data on the basis of your consent with future effect.
NDI may update this Privacy Policy from time to time. If so, NDI will make the revised Privacy Policy available through this Website. We cannot provide you with any separate notice of that fact, so please check back regularly for any updates.
Do Not Transcode
N/A
Opus (Max. 255 audio ch per stream)


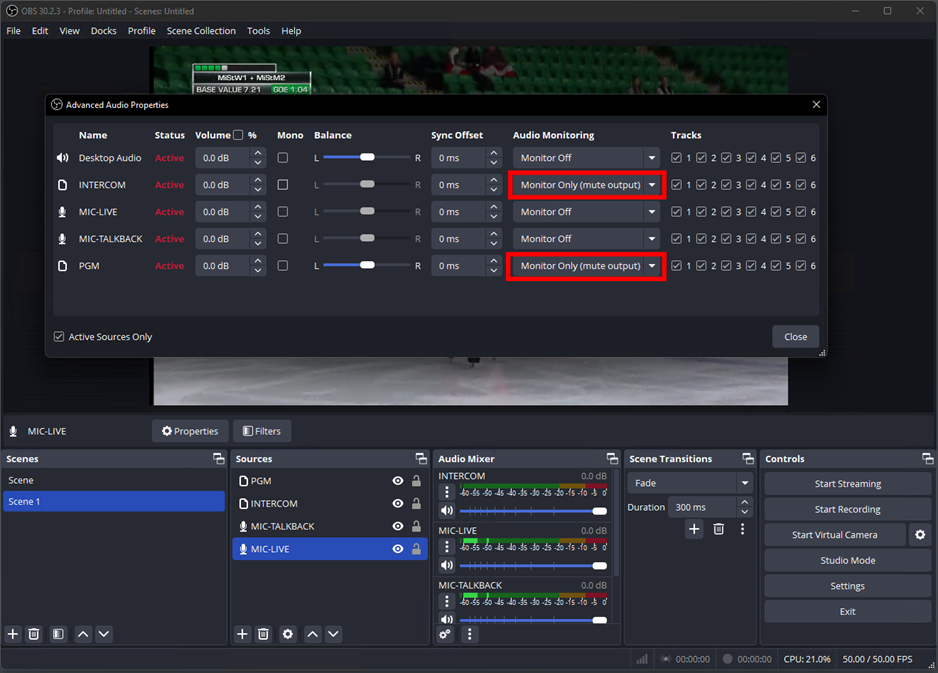
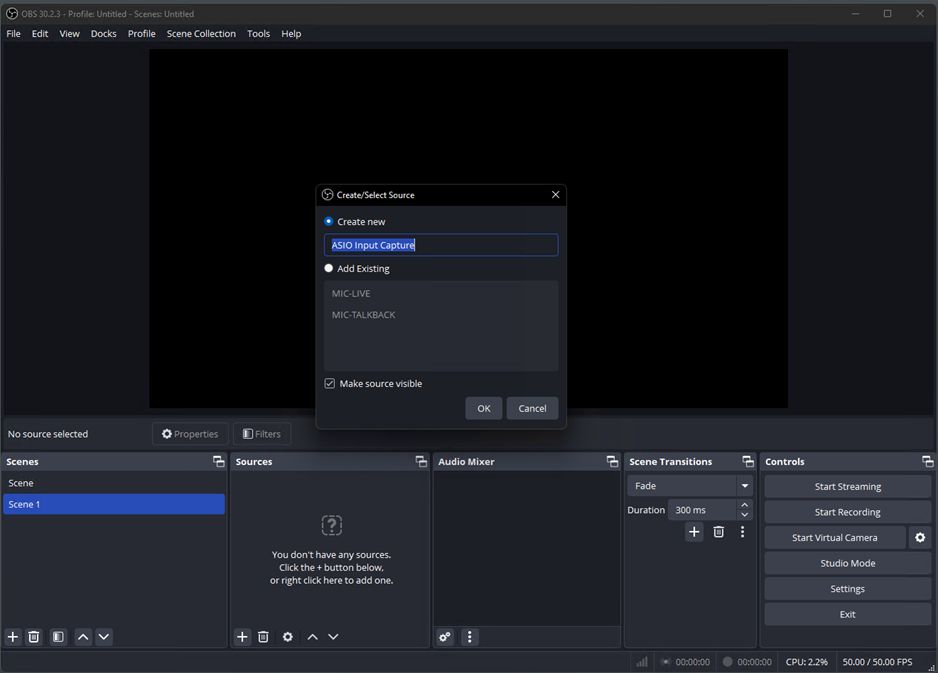
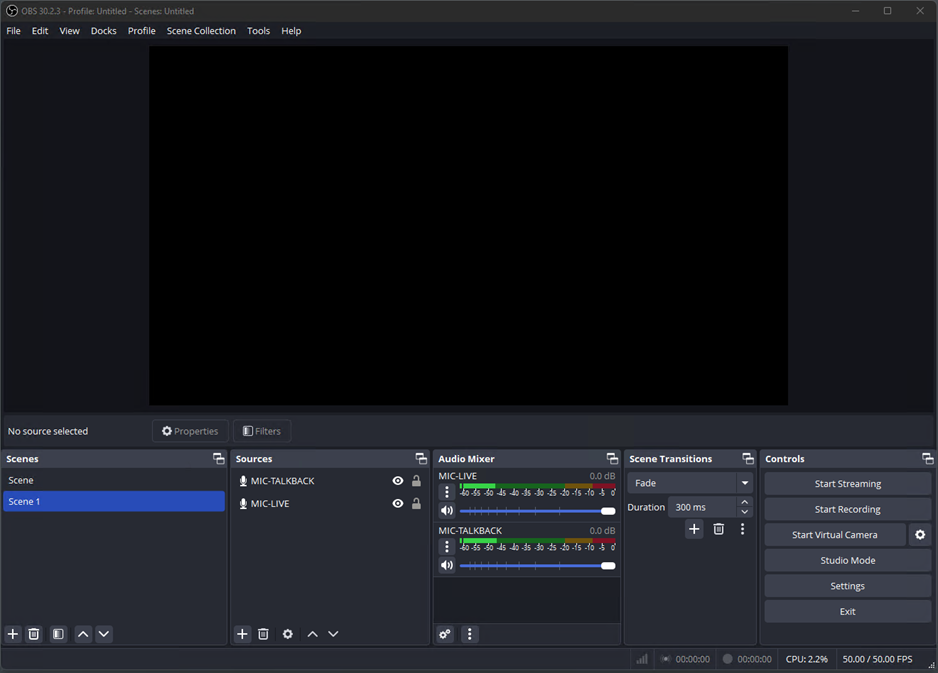
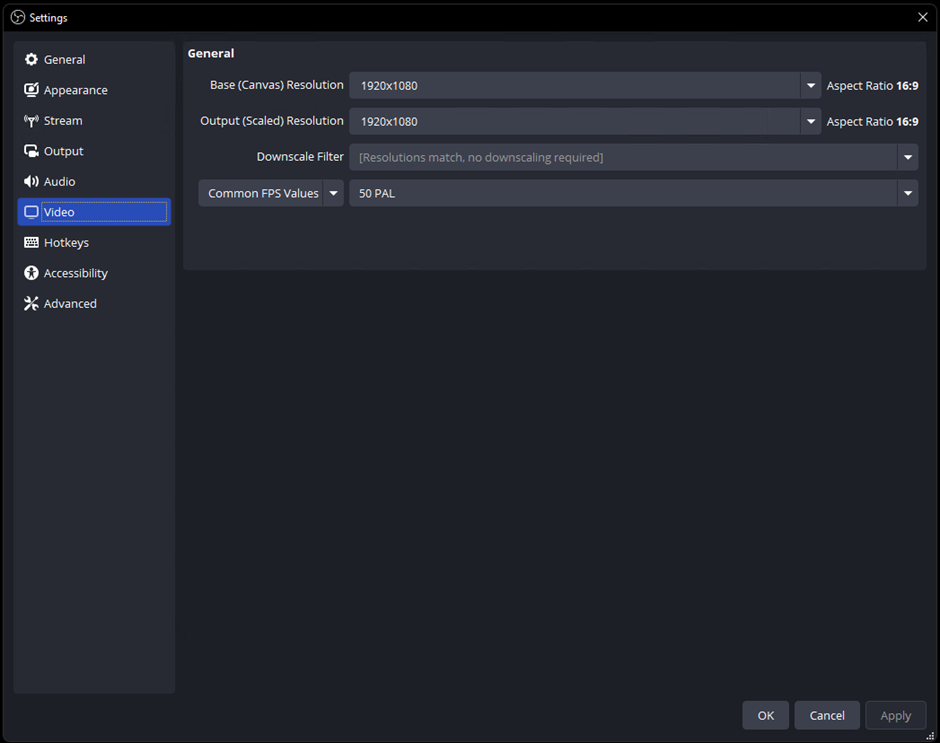
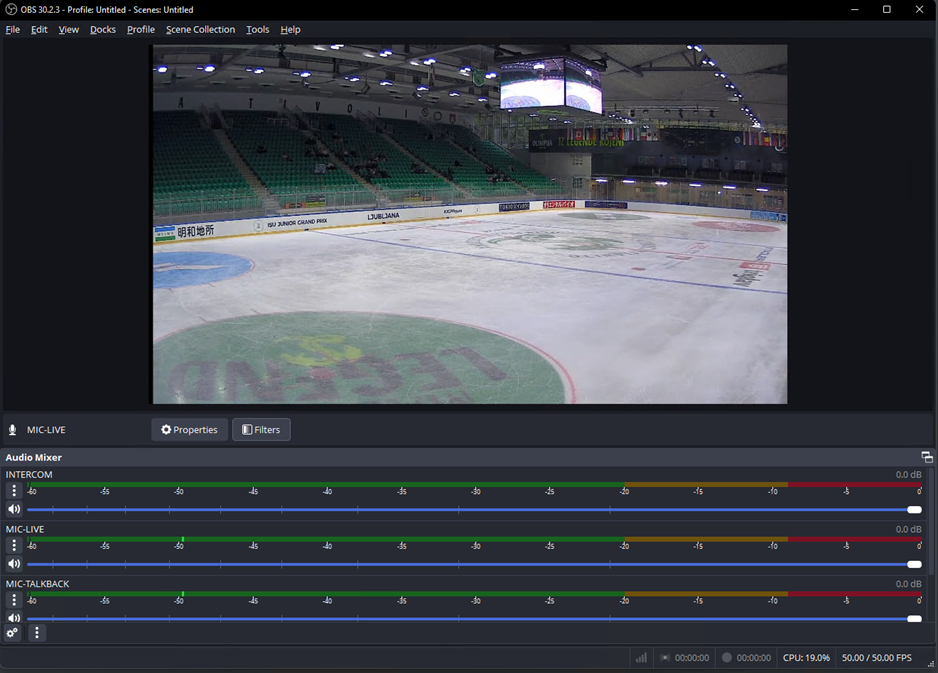
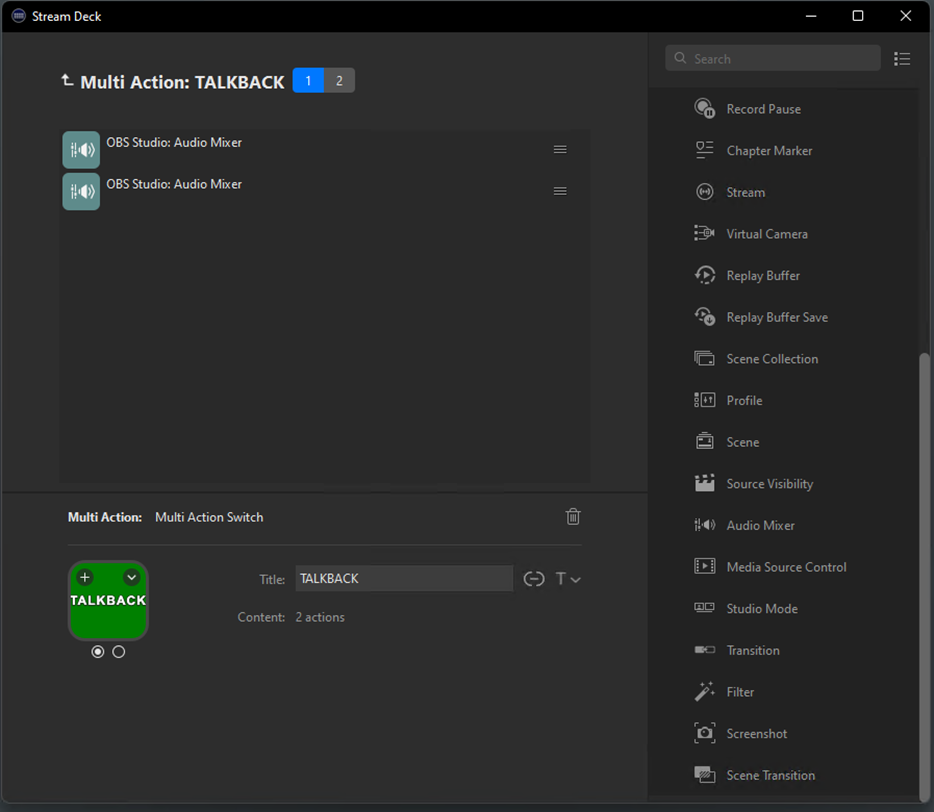
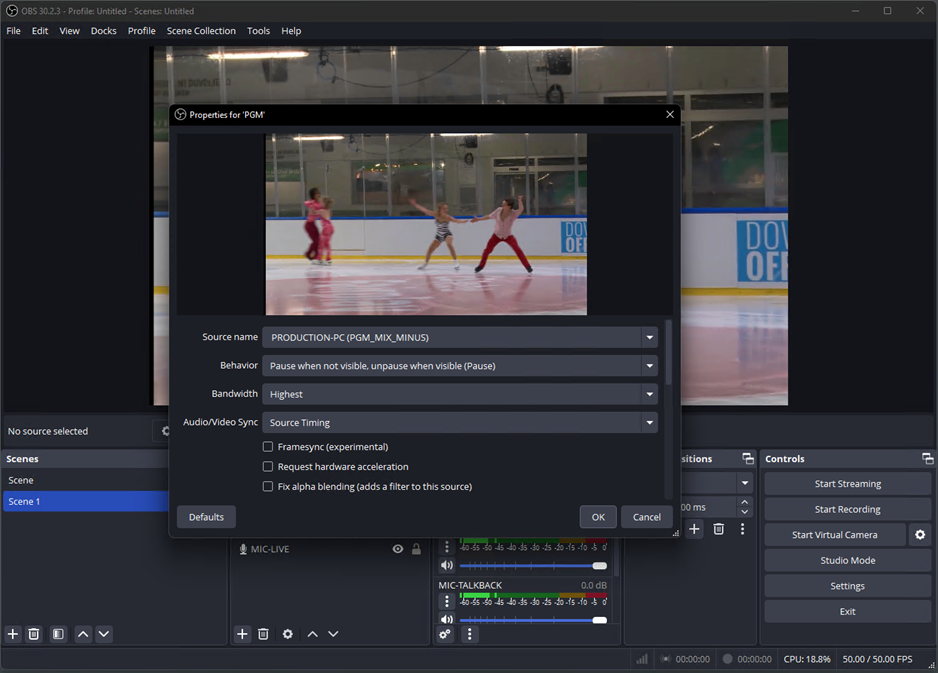
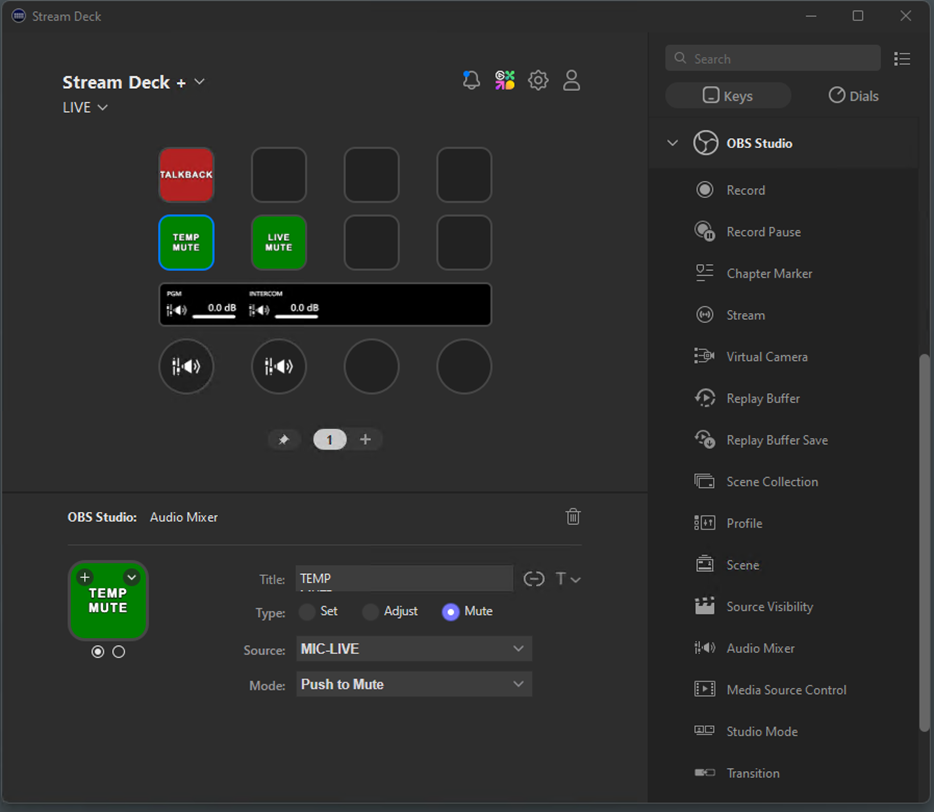
LinkedIn sets this cookie from LinkedIn share buttons and ad tags to recognize browser IDs.
MUID
Bing sets this cookie to recognize unique web browsers visiting Microsoft sites. This cookie is used for advertising, site analytics, and other operations.
ANONCHK
The ANONCHK cookie, set by Bing, is used to store a user’s session ID and verify ads’ clicks on the Bing search engine. The cookie helps in reporting and personalization as well.
YSC
Youtube sets this cookie to track the views of embedded videos on Youtube pages. .
VISITOR_INFO1_LIVE
YouTube sets this cookie to measure bandwidth, determining whether the user gets the new or old player interface.
VISITOR_PRIVACY_METADATA
YouTube sets this cookie to store the user’s cookie consent state for the current domain.
yt.innertube::requests,
YouTube sets this cookie to register a unique ID to store data on what videos from YouTube the user has seen.
yt.innertube::nextId,
YouTube sets this cookie to register a unique ID to store data on what videos from YouTube the user has seen.
visitor_id*
Pardot sets this cookie to store a unique user ID.
CLID
Microsoft Clarity set this cookie to store information about how visitors interact with the website. The cookie helps to provide an analysis report. The data collection includes the number of visitors, where they visit the website, and the pages visited
_ga_*
Google Analytics sets this cookie to store and count page views.
_ga
Google Analytics sets this cookie to calculate visitor, session and campaign data and track site usage for the site’s analytics report. The cookie stores information anonymously and assigns a randomly generated number to recognise unique visitors.
_clck
Microsoft Clarity sets this cookie to retain the browser’s Clarity User ID and settings exclusive to that website. This guarantees that actions taken during subsequent visits to the same website will be linked to the same user ID.
SM
Microsoft Clarity cookie set this cookie for synchronizing the MUID across Microsoft domains.
MR
This cookie, set by Bing, is used to collect user information for analytics purposes.
_clsk
Microsoft Clarity sets this cookie to store and consolidate a user’s pageviews into a single session recording.
pardot
The pardot cookie is set while the visitor is logged in as a Pardot user. The cookie indicates an active session and is not used for tracking.
li_gc
Linkedin set this cookie for storing visitor’s consent regarding using cookies for non-essential purposes.
lidc
LinkedIn sets the lidc cookie to facilitate data center selection.
ytidb::LAST_RESULT_ENTRY_KEY
The cookie ytidb::LAST_RESULT_ENTRY_KEY is used by YouTube to store the last search result entry that was clicked by the user. This information is used to improve the user experience by providing more relevant search results in the future.
yt-remote-device-id
YouTube sets this cookie to store the user’s video preferences using embedded YouTube videos.
yt-remote-connected-devices,
YouTube sets this cookie to store the user’s video preferences using embedded YouTube videos.
yt-remote-session-app
The yt-remote-session-app cookie is used by YouTube to store user preferences and information about the interface of the embedded YouTube video player.
yt-remote-cast-installed
The yt-remote-cast-installed cookie is used to store the user’s video player preferences using embedded YouTube video.
yt-remote-session-name
The yt-remote-session-name cookie is used by YouTube to store the user’s video player preferences using embedded YouTube video.
yt-remote-fast-check-period
The yt-remote-fast-check-period cookie is used by YouTube to store the user’s video player preferences for embedded YouTube videos.
SRM_B
Used by Microsoft Advertising as a unique ID for visitors.
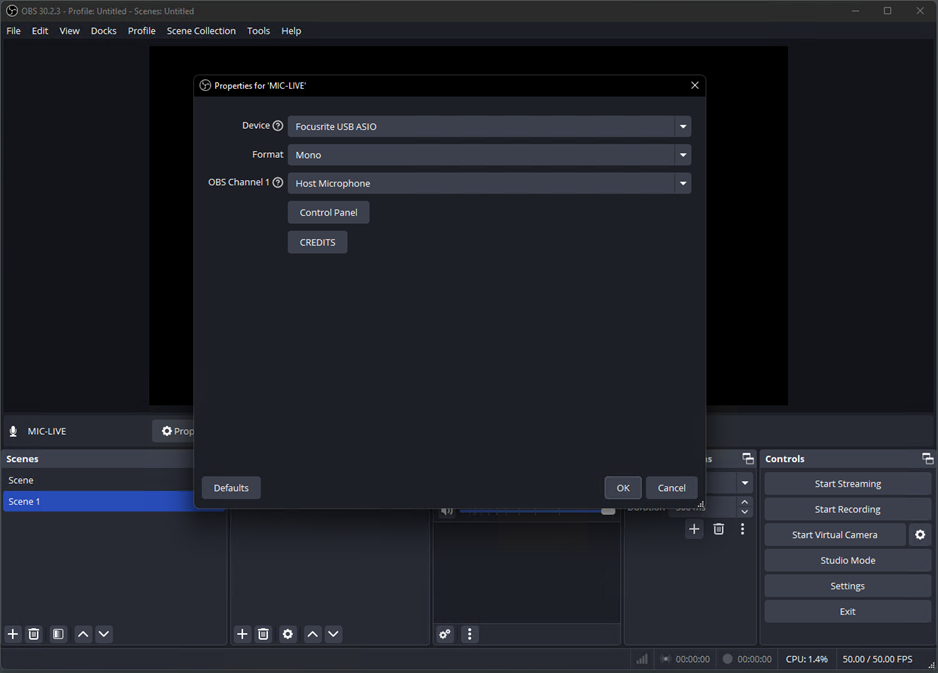


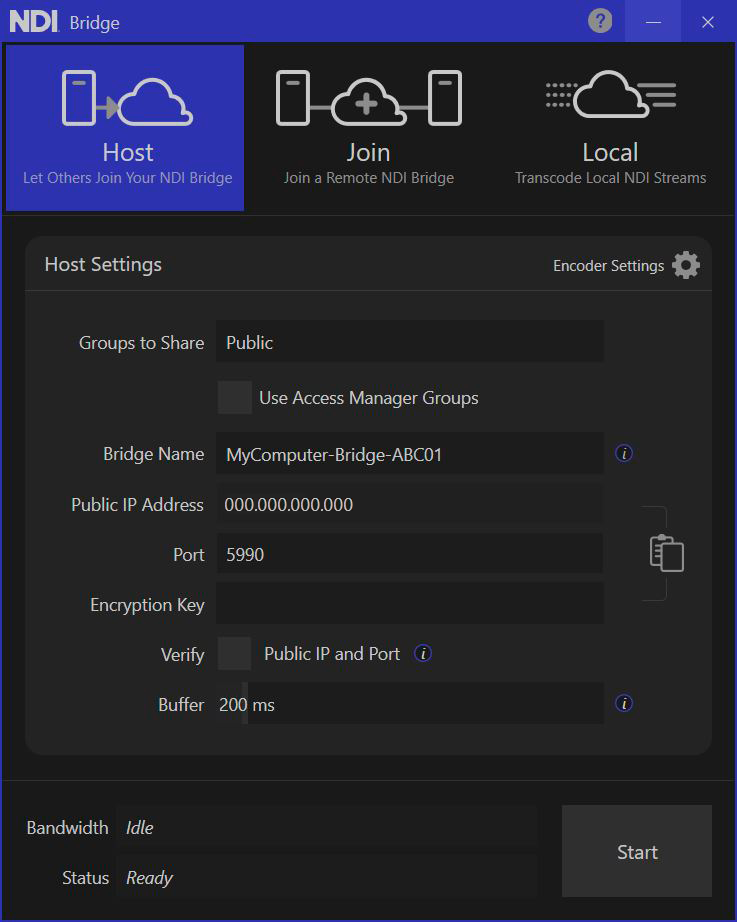
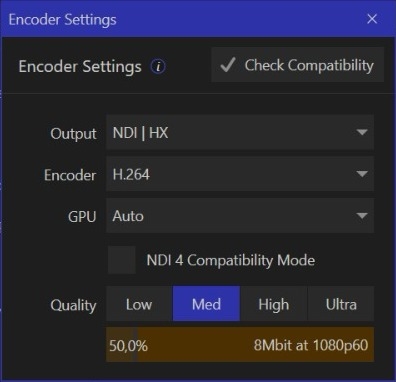

These release notes refer to changes in our complete technology, including the SDKs, NDI Tools, and any other items. Take your time to comb through the documentation and decide what is more relevant for your specific context.
*Any reference to a ChangeLog refers to the release notes shown below
Added new command-line options in the NDI Recording tool. Please refer to the SDK documentation for details.
Default Sender Monitoring Support: Enabled by default in existing sender-based NDI Tools apps.
Windows: NDI Test Patterns, NDI Screen Capture, NDI Screen Capture HX, NDI VLC Plugin.
macOS: NDI Test Patterns, NDI Scan Converter.
NDI Discovery Server Improvements: Enhanced sender discovery and monitoring capabilities. The NDI server utility is now available as a standalone installer for Windows and Linux and can run as a service. See documentation for setup details.
Fixed an issue in the NDI plugin for Adobe Premiere where the field sequence was incorrectly displayed when playing SpeedHQ progressive clips in interlaced sequences.
Resolved poor NDI HX encoding performance on AMD GPU/CPU systems in Screen Capture HX and NDI Bridge.
Fixed NDI Virtual Input on macOS failing to receive video when connected via Discovery Server and Access Manager.
Resolved an issue where would stop receiving video from the NDI HX Camera app when the camera resolution was changed.
Corrected video preview rendering in NDI Webcam to properly respect the source aspect ratio.
Fixed terminating active streams upon application closure.
New APIs: Introduced APIs for sender discovery and monitoring, designed for integration with the NDI Discovery Server. See documentation for details.
Performance Improvements: Enhanced SpeedHQ codec quality across multiple generations.
Enabled passthrough of the NDI capabilities message from NDI receiver to the NDI sender.
Enhanced Receiver Passthrough Control: Introduced per-codec passthrough override control via receiver creation JSON in the NDI Advanced SDK, enabling selective decompression of compressed formats. Please refer to the SDK documentation for details.
Improvements to FPGA reference design. Please refer to the ChangeLog files for more details.
Updated the NDI Tools installer to display the Privacy Policy on the data collection agreement page.
Fixed an issue with silent installation of NDI Tools.
Fixed an issue where the NDI Discovery Server running as a service would not start automatically after windows restart.
Added URL connection reporting in the when monitoring NDI receivers connected to HX1 sources.
Fixed a localization issue in the statistics window.
Fixed a crash that could occur when destroying an NDI receiver during an active connection attempt to a source. Improved handling of deinterlacing in r.
A new 'deinterlacing' option has been added to the Video Settings menu.
Fixed incorrect byte order handling when using NDIlib_recv_color_format_RGBX_RGBA.
Fixed an issue where NDI output from could change resolution when clips on the timeline ended.
Resolved an issue where could incorrectly select a temporary GPU adapter, which might become unavailable when remote desktop sessions end.
Fixed a potential issue where an NDI Finder could block indefinitely in certain environments.
Removed the application from the NDI Tools Suite. See for more details
Introduced the NDI Discovery app in the Tools suite for macOS and Windows for NDI receiver discovery, monitoring and control.
NDI Tools now includes support for anonymous usage data collection to help improve future releases. Users can choose to opt in or out during setup and update their preference anytime from the NDI Tools Launcher.
Updated NDI Studio Monitor (Windows) and NDI Video Monitor (Mac) to enable settings for receiver monitoring and remote source control when used with the new NDI Discovery Server.
Improved Access Manager for easier multicast configuration on Windows and Mac.
Added a new setting in Screen Capture applications on Windows to enable or disable notifications for new connections.
Improved error handling and user notifications in Screen Capture applications on Windows.
Enhanced existing NDI Discovery Server with new capabilities for receiver discovery, monitoring, and control. It is now available as a standalone installer for Windows and Linux, allowing it to run as a service. Refer to the documentation for details.
Updated the NDI Bridge Service to include local mode support.
A problem in NDI Webcam and NDI Router where the preview window could freeze or fail to render video.
Issue where the NDI record binary would stop recording when the record chop command was used with the -noautochop flag.
Crash in Scan Converter on macOS that occurred when its signal was received in Video Monitor or Studio Monitor.
Addressed a localization issue that skewed statistics in .
Usage of incorrect units for packet lost metric in statistics window.
Issue where the host could crash during stream cleanup or closure.
Fixed a potential crash in the NDI VST output plugin when used with certain DAW applications.
Issue where audio frameworks could fail to load at runtime on macOS, causing to detect no audio devices.
Introduced a new set of APIs for receiver discovery, monitoring, and control, designed for integration with the NDI Discovery Server. Refer to the documentation for details.
Added visionOS support to Apple SDKs.
Optimized audio resampler performance in NDI Frame Sync on ARM-based platforms.
Improved single-TCP sending performance by using scatter-gather to reduce per-message ACKs.
Resolved a potential crash in the NDI library when handling UDP streams on certain ARM-based processors.
Fixed an issue where NDI Virtual Input might stop functioning after a few seconds on certain macOS platforms.
Improved handling of connection metadata when used with the NDI Routing API.
Addressed a possible issue with the Discovery Server where sources might not appear intermittently.
Resolved a potential memory leak issue in NDI Test Patterns on Windows.
Added support for 16-bit color formats on FPGA platforms.
Introduced encoder support for planar alpha.
Added support for new packed and semi-planar video formats.
Implemented 64-bit addressing in raw audio/video input and output logic. For more details, refer to the ChangeLog files.
The Advanced SDK now features a new API that enables dynamic adjustment of the received bandwidth for NDI video streams. For more information, please consult the Advanced SDK documentation.
Added new audio conversion utility APIs for NDIlib_audio_frame_v3_t structure.
Made improvements to the SpeedHQ codec to verify the correctness of the bitstream before decompression.
SDK - Fixes
Fixed incorrect HDR color information in MOV files recorded using the NDI Recorder utility.
Addressed an issue where the NDI library took longer than expected to unload in specific scenarios.
Addressed a potential frame drop issue with NDI HX streams under specific conditions.
General improvements to the .
NDI Tools
NDI Tools launcher layout and style improvements. (macOS and Windows).
The NDI Virtual Input app on macOS has been updated to utilize modern system extensions introduced in macOS Sonoma 14.1.
All NDI Tools apps on Windows have been updated to use .NET 8.
NDI Tools - NDI Bridge
A connection test feature was added to determine optimal buffer delay settings for your network.
Introduced a dedicated statistics window with timeline graphs to monitor system and bridge usage.
Added a logging window with support for log-level filters to view bridge logs more effectively.
Local mode now includes an option to configure the local send group for bridge sources.
NDI Tools - New Utilities
The NDI Bridge Service is now available for free download on the NDI website. It allows you to run NDI Bridge in a headless mode as a Windows service. Please refer to the documentation for more details.
The NDI Free Audio utility is now available for free download on Windows and Linux via the NDI website. It also includes enhanced ASIO support for Windows devices.
The NDI Analysis tool has been improved to include additional information about NDI stream timings when exporting to a CSV file. Please refer to the NDI Analysis documentation for more details.
NDI Tools - Fixes
NDI Access Manager (macOS) now supports inputting multiple discovery server IP addresses.
Corrected an issue in NDI Router (macOS) where HDR images were not rendered properly in the preview.
Resolved a potential exception in the source menu of NDI Router (macOS) when parsing NDI sources.
Resolved an issue where failed to auto-start in Local mode.
Fixed a potential deadlock when closing an stream in Join mode.
Corrected NDI Test Patterns to ensure the full Rec.709 color range is output for imported images (Windows).
Fixed an issue with when enumerating system audio devices.
Resolved a potential issue in when rendering test patterns with alpha transparency.
Enabled high bit-depth decoding in for streams with BT.2020 color primaries.
Added support for higher color depth when playing SDR files using the VLC player with the NDI output plugin enabled.
Fixed audio driver stability issues with .
NDI Tools - Known Issues
NDI Virtual Input may stop working after a few seconds with certain macOS platforms.
The NDI output plugin for VLC now includes HDR support<html>
Corrected rendering issue when importing custom images from older versions of NDI Test Patterns on Windows.
Resolved a potential crash in NDI Remote.
Resolved a minor talkback audio issue in NDI Remote.
Added a firewall exception rule for the app.
Resolved an issue with loading the on newer macOS versions.
on Mac was not playing audio.
Ensured correct permissions were set on the NDI Runtime installer on MacOS.
Resolved an issue where the NDI Tools registration state was not being saved correctly.
Resolved a source limitation issue with the NDI Discovery server running on Linux.
Addressed an issue with NDI Frame Sync, restoring correct behavior in audio capture.
Fixed a potential threading issue when loading and unloading the NDI library on Windows.
Support for 16-bit color formats improved (P216/PA16).
There is a new specification for NDI HDR metadata (read the new dedicated HDR section in the NDI SDK for more details).
New receiver formats permit SpeedHQ pass-through with UYVY/P216 video.
HDR example code samples are provided with NDI SDK.
The NDI Advanced SDK includes a new for hardware (currently available for Linux), with comprehensive guidance on its use.
enhanced to capture NDI HDR streams.
Please note: The NDI Advanced SDK licensing scheme has been enhanced. To use NDI 6.0 features, advanced SDK users will need a new License ID (which replaces the former Vendor ID). Please contact [email protected]
Improved audio synchronization with NDI Frame Sync API.
A new NDI Router tool for macOS has been released.
NDI Test Patterns now supports HDR patterns (macOS and Windows).
NDI Studio Monitor now supports displaying HDR content in PQ and HLG (Windows).
NDI Studio Monitor (Windows) has been enhanced to capture NDI HDR streams.
has received 10-bit HEVC transcoding and HDR pass-through.
has received support for HDR screens and 10-bit HEVC.
in Frame Checker mode will now output HDR color information if present.
NDI Video Monitor (macOS) now includes new KVM support.
The NDI Launcher app adds a one-click link to extensive online Docs & Guides.
Reduced latency from NDI Screen Capture HX (Windows).
Resolved NDI Bridge Local mode issue when handling a source that has multiple machine names.
NDI Bridge has been enhanced to leverage the increased number of encoders supported by NVIDIA GeForce cards (may require NVIDIA driver update).
Resolved an audio driver stability issue.

Version 6.1
The Analysis tool enables expert users to analyze the performance of NDI network connections by providing key statistics that would otherwise be difficult to recover separately. It offers detailed information about the sources available on a network and their connection types, making it a valuable tool for debugging systems and identifying the root causes of potential issues.
Analysis is currently not available on the Tools Launcher. You can download it
"There are three kinds of lies: lies, damned lies, and statistics." (Mark Twain, Benjamin Disraeli, et al)
In general, if you don’t actually see a problem, you don’t need this tool.
Analysis is capable of identifying deviations that are, for all practical purposes, meaningless. Much ado about (very, very slightly more than) nothing is effectively time and effort wasted. The Analysis tool is provided to help you better diagnose and understand network issues. While it produces a deluge of detail about network connections and NDI streams, the human eye is by far the best arbiter of video performance and quality.
Ultimately your eye provides a superior real-time analysis, and one which is inherently more tolerant. In certain cases when subjective issues are visible, lower-level analysis of the root problem may be required to understand the underlying factors. While we would love to help every user with every problem, the sheer numbers of those populating ‘the NDI nation’ make this quite impossible. We do, however, offer professional services to those who need assistance in diagnosing issues or help with large scale, complex NDI networking issues.
You can always or visit our
Analysis can be used in order to locate NDI sources on the local network. To achieve this you would run:
NDIAnalysis.exe /find
Because it might take a few seconds to locate all sources on a network, you can specify a timeout – i.e., how long Analysis should scan the network. The default timeout is 5 seconds, but you can specify any number you wish. The following example invokes a 10 second time out for locating sources:
NDIAnalysis.exe /find /time:10
If you need to quit, press CTRL+C to cause Analysis to exit
By default Analysis will only only locate sources that are in the Public group. To find sources in other groups, one or more groups can be specified to locate sources in:
NDIAnalysis.exe /find:"Cameras"
NDIAnalysis.exe /find:"Public,Studio 1"
Example output from the finder is outlined below.
Analysis implements a special version of NDI that will receive all data from a source, and provide diagnosis on that data. It is important to know that Analysis does not decode any data. This means that the CPU performance of the host machine on does not significantly impact the results shown. Analysis can thus be considered to correctly measure stream details as they might be received in an ideal receive instance. That is, only up-stream CPU performance, network, network infra-structure and machine network performance have an impact on the results.
To perform an analysis of a source you could enter the following:
NDIAnalysis.exe /source:"QUASIRANDOM (NVIDIA GeForce GT 650M 1)"
Don't forget to press CTRL+C to exit quickly. Otherwise, to limit the duration of the analysis to just one minute, you could enter the following:
NDIAnalysis.exe /source:"QUASIRANDOM (NVIDIA GeForce GT 650M 1)" /time:60
By default, Analysis will request the video stream to be in high bandwidth mode. High bandwidth mode is the full resolution and best quality mode for the video stream. If you wish to run analysis in low bandwidth mode, you could enter the following:
NDIAnalysis.exe /source:"QUASIRANDOM (NVIDIA GeForce GT 650M 1)" /lowQ
The Analysis tool also has a frame checker mode, by default this is disabled. This is mostly useful when there is a suspected corruption in the video bitstream. To enable the frame checker mode, you could enter the following:
NDIAnalysis.exe /source:"QUASIRANDOM (NVIDIA GeForce GT 650M 1)" /framecheck
Normally Analysis will output statistics about both the video and audio data from a source. It can be restricted to video only or audio only, for example:
NDIAnalysis.exe /source:"QUASIRANDOM (NVIDIA GeForce GT 650M 1)" /videoonly
NDIAnalysis.exe /source:"QUASIRANDOM (NVIDIA GeForce GT 650M 1)" /audiooonly
All of the above modes can be used together. The following is an example run of NDI analysis application with all of the fields described in the notes, along with comments on the meaning and interpretation of the information provided.
This is one of the most important measures. and represents the frame rate of data actually received from the network. In this example we are watching 60 Hz video; the frame rate indicates an average frame time of 16.66 ms, which is expected. Because this is on a real network with computers that are doing other things, the variance is 2.3 ms, a value which is much smaller than a frame. If the variance number becomes too large there might be dropped frames.
All NDI applications should be designed to support frames within the Nyquist sampling limit, which would mean that any frame variance in the range of half the average should be the lowest reliable limit that would not require additional buffering or latency to display smoothly. At 60 Hz, this would require that the maximum reliable zero latency transfer rates would be 16.68 ms +/- 8.34 ms.
The minimum and maximum times are important; thus the largest delivery time (which is 24 ms in the example) provides a very important diagnostic tool. If you see values that are over 150 ms or so, it is very likely that network frames were dropped, and you should take steps to ensure that there is no packet loss on the network. It is important to bear in mind that some NDI sources might not send video frames if there is no video change occurring. Indeed, the example listed above is from Scan Converter 2 which does not provide new frames when there is no activity on-screen (thus reducing CPU time, GPU time and bandwidth or network time).
In frame checker mode (see above), NDIAnalysis will also output any NDI color information if present. For example:
To reduce clutter in the output, color information is only shown when its status changes rather than on every frame.
If the source is HEVC compressed, then frame checker mode can be used to determine if the video uses 8-bit (SDR) or 10-bit (HDR) color values. NDIAnalysis will usually output this when a keyframe in an HEVC stream is received:
12:16:39.748: HEVC frame with timecode 0 is a keyframe and indicates a bitdepth of 10 bits
but may also output the bitdepth on other frames where an SPS element is found with bitdepth information in it.
Analysis now includes the ability to write out a CSV file that includes information about the timing of every video frame captured. This is enabled at the command line with the following example:
NDIAnalysis.exe /source:"My Source (Channel 1)" /csvvideo:"my source.csv" /time:120
This will then write out a file called “my source.csv” that will include a huge list of every video frame received, the time at which it was received and the details of every frame. An example of this output is illustrated below.
Audio frames can also be captured, for example:
NDIAnalysis.exe /source:"My Source (Channel 1)" /csvaudio:"my source.csv" /time:120
Video and audio frames can be captured together, as long as separate files are used:
NDIAnalysis.exe /source:"My Source (Channel 1)" /csvvideo:"my video source.csv" /csvaudio:"my audio source.csv" /time:120
The created files are text files in comma separated values format. They can be opened in any spreadsheet application, or inspected in a text editor.
Beware that timestamp and timecode values may be very large whole numbers, so when opened in a spreadsheet a suitable number format should be chosen for those columns which does not lose precision or truncates the values.
The reason that this is very valuable is that if you wish to determine why you are seeing problems sending video over the network then you can dump the CSV data at two different locations on the network, for instance you can capture it on the sending machine and also on the receiving machine. You can now look at the “timestamp” data on each frame and locate frames that exactly match between different locations and verify whether any frames are dropped (the timestamp is present on the sender side but not on the receiver side) or if the frames are delivered late (measuring the dTime). Note that there is always some variability on most typical networks and so some level of jitter is to be expected but if there are large timing hits then there clearly is something on the network that is stopping the smooth flow of packets (e.g. congestion control on a router).
System time (utc): The local time in UTC at which the frame was received by NDI Analysis.
Elapsed time (ms): The number of milliseconds of system time elapsed in the current session. Notionally this is the time point at the start of this frame.
dTime (ms): The time difference in milliseconds between the receiving time of this frame and the previous frame. Ideally this should be equal to the frame rate, but usually varies depending on network conditions and fluctuations in frame generation.
Timestamp (100ns): The timestamp of the frame, as specified in the frame's header. This is typically set when the frame is submitted to NDI by the system creating the stream. It is in units of 100 nanoseconds. It is usually related to the originating system's clock, but the exact relationship (particularly when the zero time was) is undefined.
dTimestamp (ms): The difference in milliseconds between the timestamp of this frame and the previous frame. Typically this represents the rate at which the source is submitting the frames to NDI.
Timecode (100ns): The timecode of the frame, as specified in the frame's header, in units of 100 nanoseconds. Usually this is an ideal time mark for the frame, set by the source generating the frames.
dTimecode (ms): The difference in milliseconds between the timecodes of this frame and the previous frame. Usually this is equal to the duration of the frames as indicated by the frame rate.
X resolution, Y resolution: The image resolution of the frame, in pixels.
Aspect ratio: The aspect ratio of the frame, as specified in the frame's header.
Frame type: Indicates if the frame is progressive, fielded, or interleaved.
Codec: The codec used for the frame, plus if the frame includes an alpha channel or not.
Frame rate: The frame rate of the frame, as specified in the frame's header.
Frame duration (ms): The frame duration in milliseconds. This is derived from the frame rate in the frame's header.
Stream duration (ms): The sum of the frame durations of all the frames received so far (including this one). As this uses the frame rate specified in the frame header, it is an ideal value. It should remain close to the elapsed time with some fixed offset.
Data size (Bytes): The number of bytes of image data in the frame. If the frame is compressed then this is the size of the compressed data.
Notes: NDI Analysis will report any potential issues here, such as a frame arriving significantly later than expected or the stream not providing sufficient frames to keep up with the intended frame rate. These can be starting points for further investigation.
The audio CSV file is similar to the video CSV file and shares many of the same columns. Instead of the video frame specific columns it has these audio frame columns:
Sample rate: The sample rate of the frame, as specified in the frame's header.
Num channels: The number of channels in the audio frame, as specified in the frame's header.
Num Samples: The number of samples in the audio frame.
For advanced diagnosis of problems, the video receipt time can be combined with the video sending times described in the next note. It is important to observe these two values when looking at large maximum frame receipt times.
Some key reference times related to video timing are listed below (in milliseconds):
60 Hz = 16.66 ms
59.97 Hz = 16.67 ms
50 Hz = 20 ms
30 Hz = 33.33 ms
29.97 Hz = 33.36 ms
25 Hz = 40 ms
00:17:54.73 8
0
0
17212618746625500
0
17212618746966600
0
1920
1040
1.85
progressive
SpeedHQ
NDI Analysis v6.0.0.0 (note 1)
Copyright (C) 2023 Vizrt NDI AB. All rights reserved.
NDI version : 6.0.0.0 (note 2)
Searching for NDI sources ... (4 found) (note 3)
1: name="IPC (Channel 1 - Virtual PTZ)" (note 4)
host="192.168.1.191" (note 5
)
type="NDI|HX (Camera)" (note 6)
2: name="IPC (Channel 1)" host="192.168.1.191" type="NDI|HX (Camera)"
3: name="QUASIRANDOM (FaceTime HD Camera (Built-in))" (note 7)
host="192.168.1.193" (note 8)
port="5962" (note 9)
type="NDI" (note 10)
4: name="QUASIRANDOM (NVIDIA GeForce GT 650M 1)" host="192.168.1.193" port="5961" type="NDI"NDI Analysis v6.0.0.0
Copyright (C) 2023 Vizrt NDI AB. All rights reserved.
NDI version : 6.0.0.0
21:15:19.257: Video receiver creation succeeded. (note 1)
21:15:19.257: Audio receiver creation succeeded. (note 2)
21:15:23.287: Audio connection opened. (note 3)
21:15:23.287: Video connection opened. (note 4)
21:15:23.295: Capabilities, Recordable=false (note 5)
21:15:23.295: Capabilities, PTZ control=false
21:15:23.295: Capabilities, KVM control=false
21:15:23.295: Product, Long name=Scan Converter v2 (note 6)
21:15:23.295: Product, Short name=Scan Converter v2
21:15:23.295: Product, Model=Scan Converter v2
21:15:23.295: Product, Version=2.0000.0000
21:15:23.296: Product, Serial number=0000
21:15:23.472: Audio format changed. 44100Hz, 2 channels. (note 7)
21:15:24.756: Video format changed. 1920x1200, progressive, aspect ratio=1.60, frame rate=60.00, no alpha channel. (note 8)
21:15:24.258: Audio data rate (MBps). Avg=1.43 (note 9)
21:15:24.258: Audio size (kB). Min=5.89 Avg=5.89 +/- 0.00 Max=5.89
21:15:24.259: Audio recv (mS). Min=29.05 Avg=33.16 +/- 2.96 Max=39.23
21:15:24.259: Audio send (mS). Min=29.01 Avg=33.13 +/- 4.77 Max=42.53
21:15:29.259: Video data rate (MBps). Avg=69.39 (note 10)
21:15:29.259: Video size (kB). Min=289.90 Avg=292.33 +/- 8.09 Max=320.91 (note 11)
21:47:48.216: Video recv (mS). Min=11.44 Avg=16.66 +/- 2.30 Max=24.73 (note 12)
21:47:48.217: Video send (mS). Min=8.72 Avg=16.67 +/- 1.47 Max=24.70 (note 13)
21:15:29.260: Audio data rate (MBps). Avg=1.42
21:15:29.260: Audio size (kB). Min=5.89 Avg=5.89 +/- 0.00 Max=5.89 (note 14)
21:15:29.260: Audio recv (mS). Min=30.58 Avg=33.33 +/- 2.80 Max=40.16 (note 15)
21:15:29.261: Audio send (mS). Min=27.98 Avg=33.32 +/- 4.81 Max=42.53 (note 16)
21:15:34.262: Video data rate (MBps). Avg=82.48
21:15:34.262: Video size (kB). Min=284.67 Avg=286.25 +/- 7.71 Max=334.25
21:15:34.263: Video recv (mS). Min=14.29 Avg=38.13 +/- 34.44 Max=387.31
21:15:34.264: Video send (mS). Min=6.58 Avg=38.13 +/- 34.81 Max=388.28
21:15:34.264: Audio data rate (MBps). Avg=1.42
21:15:34.265: Audio size (kB). Min=5.89 Avg=5.89 +/- 0.00 Max=5.89
21:15:34.265: Audio recv (mS). Min=30.55 Avg=33.37 +/- 2.74 Max=39.66
21:15:34.266: Audio send (mS). Min=28.02 Avg=33.39 +/- 4.69 Max=42.04
21:15:39.266: Video data rate (MBps). Avg=124.18
21:15:39.266: Video size (kB). Min=281.54 Avg=297.39 +/- 8.12 Max=311.32
21:15:39.266: Video recv (mS). Min=14.06 Avg=31.00 +/- 46.95 Max=315.53
21:15:39.266: Video send (mS). Min=4.70 Avg=31.00 +/- 47.64 Max=317.90
21:15:39.267: Audio data rate (MBps). Avg=1.42
21:15:39.267: Audio size (kB). Min=5.89 Avg=5.89 +/- 0.00 Max=5.89
21:15:39.267: Audio recv (mS). Min=30.53 Avg=33.32 +/- 2.60 Max=39.65
21:15:39.268: Audio send (mS). Min=28.49 Avg=33.32 +/- 4.61 Max=42.05
21:24:44.547: Video receiver destroyed. (note 17)
21:24:44.652: Audio receiver destroyed. (note 18) 12:01:14.674: Color info changed. primaries=bt_709, transfer function=bt_709, matrix coefficients=bt_709
...
12:01:18.573: Color info changed. primaries=bt_2100, transfer function=bt_2100_hlg, matrix coefficients=bt_2100
...
12:01:23.165: Color info not found.41.71
83.42
248295
[dTime < Prev frame duration] 8 Mode 2 Frame arrived early compared to intended frame rate.
41.71
125.12
248146
9 Mode 2
41.71
166.83
241047
2 Mode 2
41.71
208.54
249379
4 Mode 2
41.71
250.25
240985
5 Mode 2
41.71
291.96
250443
7 Mode 2
41.71
333.67
241389
9 Mode 2
41.71
375.37
250595
0 Mode 2
41.71
417.08
242025
2 Mode 2
41.71
458.79
252542
4 Mode 2
41.71
500.5
253334
6 Mode 2
41.71
542.21
242861
7 Mode 2
41.71
583.92
255295
9 Mode 2
41.71
625.62
243193
1 Mode 2
41.71
667.33
254911
4 Mode 2
41.71
709.04
244730
3 Mode 2
41.71
750.75
253564
6 Mode 2
23.98
41.71
41.71
237893
8 Mode 2
00:17:54.76 8
30.01
30.01
17212618747035200
40.97
17212618747383700
41.71
1920
1040
1.85
progressive
SpeedHQ
00:17:54.80 9
70.98
40.97
17212618747455500
42.03
17212618747800800
41.71
1920
1040
1.85
progressive
SpeedHQ
00:17:54.85 2
113.98
43
17212618747875000
41.95
17212618748217800
41.71
1920
1040
1.85
progressive
SpeedHQ
00:17:54.89 4
155.99
42.01
17212618748285100
41
17212618748634900
41.71
1920
1040
1.85
progressive
SpeedHQ
00:17:54.93 5
196.92
40.94
17212618748704800
41.97
17212618749052000
41.71
1920
1040
1.85
progressive
SpeedHQ
00:17:54.97 7
238.92
41.99
17212618749124400
41.97
17212618749469100
41.71
1920
1040
1.85
progressive
SpeedHQ
00:17:55.01 9
280.91
41.99
17212618749534700
41.03
17212618749886200
41.71
1920
1040
1.85
progressive
SpeedHQ
00:17:55.06 0
321.88
40.97
17212618749954300
41.96
17212618750303300
41.71
1920
1040
1.85
progressive
SpeedHQ
00:17:55.10 2
363.91
42.03
17212618750374500
42.02
17212618750720300
41.71
1920
1040
1.85
progressive
SpeedHQ
00:17:55.14 4
405.88
41.97
17212618750794300
41.98
17212618751137400
41.71
1920
1040
1.85
progressive
SpeedHQ
00:17:55.18 6
447.87
41.99
17212618751204300
41
17212618751554500
41.71
1920
1040
1.85
progressive
SpeedHQ
00:17:55.22 7
488.84
40.97
17212618751623900
41.96
17212618751971600
41.71
1920
1040
1.85
progressive
SpeedHQ
00:17:55.26 9
530.81
41.97
17212618752043800
41.99
17212618752388700
41.71
1920
1040
1.85
progressive
SpeedHQ
00:17:55.31 1
572.8
42
17212618752453700
40.99
17212618752805800
41.71
1920
1040
1.85
progressive
SpeedHQ
00:17:55.35 4
615.81
43.01
17212618752873700
42
17212618753222800
41.71
1920
1040
1.85
progressive
SpeedHQ
00:17:55.39 3
654.96
39.15
17212618753293300
41.96
17212618753639900
41.71
1920
1040
1.85
progressive
SpeedHQ
00:17:55.43 6
697.69
42.72
17212618753714100
42.08
17212618754057000
41.71
1920
1040
1.85
progressive
SpeedHQ
23.98
23.98
23.98
23.98
23.98
23.98
23.98
23.98
23.98
23.98
23.98
23.98
23.98
23.98
23.98
23.98
23.98
Transforming Your Windows Computer into an NDI Video Server.
The NDI VLC Plugin enables you to present video content and other supported multimedia to the network as IP sources directly from VLC Media Player. (Available for Windows and Mac) It encodes the output from each instance of the free player to NDI in real-time, making media files of virtually any format available for use in your live production.
Download NDI Tools here.
Install on your machine.
Launch VLC Media Player, an open-source media player that supports various sources and codecs.
Click on Tools at the top of the window and select Preferences
Click on Media and choose from various options to start sharing your video.
You can open multiple instances of VLC Media Player to share different sources simultaneously.
Click play on VLC Media Player to start sharing a video across your network via NDI.
You can view these sources on another NDI-enabled device using software like NDI Studio Monitor: Right-click anywhere on the screen, then select the broadcasting computer's name and choose VLC.
Right-click on the screen, select Settings, and choose PTZ Settings.
Check the box next to Show PTZ Controls.
Use the controls on the right side to pan or zoom within your video.
You can also create preset shots to recall as needed.
Was this helpful? Please let us know by rating this page; you can also leave a .
Configure video output by clicking on the video icon under output and selecting NDI Video Output.
Configure audio output by clicking on the audio icon on the output module and selecting NDI Audio Output.
Go to the bottom of the Preferences menu and select Save.